Quantcast
Channel: wxPython - Mouse Vs Python
Viewing all 80 articles
Browse latest View live

wxPython: Using PyDispatcher instead of Pubsub

$
0
0

The other day, I wrote an updated version of my wxPython pubsub article for wxPython 2.9 and realized I had never gotten around to trying PyDispatcher to see how it differed from pubsub. I’m still not sure how it differs internally, but I thought it would be fun to “port” the pubsub code from the last article to PyDispatcher. Let’s see how much changes!

Getting Started

First of all, you will need to go get PyDispatcher and install it on your system. If you have pip installed, you can do the following:


pip install PyDispatcher

Otherwise, go to the project’s sourceforge page and download it from there. One of the benefits of using pubsub in wxPython is that it’s already included with the standard wxPython distribution. However, if you want to use pubsub OUTSIDE of wxPython, you would have to download its standalone code base and install it too. I just thought I should mention that. Most developers don’t like downloading extra packages on top of other packages.

Anyway, now that we have PyDispatcher, let’s port the code and see what we end up with!

import wx
from pydispatch import dispatcher 
 
########################################################################
class OtherFrame(wx.Frame):
    """"""
 
    #----------------------------------------------------------------------
    def __init__(self):
        """Constructor"""
        wx.Frame.__init__(self, None, wx.ID_ANY, "Secondary Frame")
        panel = wx.Panel(self)
 
        msg = "Enter a Message to send to the main frame"
        instructions = wx.StaticText(panel, label=msg)
        self.msgTxt = wx.TextCtrl(panel, value="")
        closeBtn = wx.Button(panel, label="Send and Close")
        closeBtn.Bind(wx.EVT_BUTTON, self.onSendAndClose)
 
        sizer = wx.BoxSizer(wx.VERTICAL)
        flags = wx.ALL|wx.CENTER
        sizer.Add(instructions, 0, flags, 5)
        sizer.Add(self.msgTxt, 0, flags, 5)
        sizer.Add(closeBtn, 0, flags, 5)
        panel.SetSizer(sizer)
 
    #----------------------------------------------------------------------
    def onSendAndClose(self, event):
        """
        Send a message and close frame
        """
        msg = self.msgTxt.GetValue()
        dispatcher.send("panelListener", message=msg)
        dispatcher.send("panelListener", message="test2", arg2="2nd argument!")
        self.Close()
 
########################################################################
class MyPanel(wx.Panel):
    """"""
 
    #----------------------------------------------------------------------
    def __init__(self, parent):
        """Constructor"""
        wx.Panel.__init__(self, parent)
 
        dispatcher.connect(self.myListener, signal="panelListener",
                           sender=dispatcher.Any)
 
        btn = wx.Button(self, label="Open Frame")
        btn.Bind(wx.EVT_BUTTON, self.onOpenFrame)
 
    #----------------------------------------------------------------------
    def myListener(self, message, arg2=None):
        """
        Listener function
        """
        print "Received the following message: " + message
        if arg2:
            print "Received another arguments: " + str(arg2)
 
    #----------------------------------------------------------------------
    def onOpenFrame(self, event):
        """
        Opens secondary frame
        """
        frame = OtherFrame()
        frame.Show()
 
########################################################################
class MyFrame(wx.Frame):
    """"""
 
    #----------------------------------------------------------------------
    def __init__(self):
        """Constructor"""
        wx.Frame.__init__(self, None, title="New PubSub API Tutorial")
        panel = MyPanel(self)
        self.Show()
 
#----------------------------------------------------------------------
if __name__ == "__main__":
    app = wx.App(False)
    frame = MyFrame()
    app.MainLoop()

This shouldn’t take too long to explain. So we import dispatcher from pydispatch. Then we edit the OtherFrame’s onSendAndClose method so it will send messages to our panel listener. How? By doing the following:

dispatcher.send("panelListener", message=msg)
dispatcher.send("panelListener", message="test2", arg2="2nd argument!")

Then in the MyPanel class, we setup a listener like this:

dispatcher.connect(self.myListener, signal="panelListener",
                   sender=dispatcher.Any)

This code tells pydispatcher to listen for any sender that has a signal of panelListener. If it has that signal, then it will call the panel’s myListener method. That’s all we had to do to port from pubsub to pydispatcher. Wasn’t that easy?


wxPython: An Introduction to SplitterWindows

$
0
0

The wxPython GUI toolkit comes with lots of widgets. We will be covering some widgets that are somewhat harder to get ones mind wrapped around. In this case, we will be talking about splitter windows. WxPython includes three types of splitter windows:

  • wx.SplitterWindow
  • fourwaysplitter which you can find in wx.lib.agw
  • MultiSplitterWindow which you can find in wx.lib.splitter

In this article, we will go over how to use these different kinds of splitter windows. There is one other widget that behaves kind of like a splitter window that we won’t be talking about. It is the SplitTree widget which is a part of wx.gizmos. Feel free to check it out in the wxPython demo.

The wx.SplitterWindow

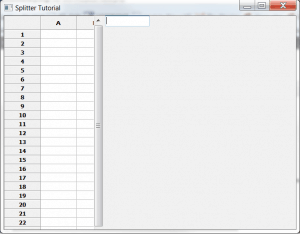
splitter_simple

The wx.SplitterWindow is a wrapper around the C++ base wxWidgets widget, and probably the most common one you’ll see in the wild. Let’s write a quick piece of code to learn how to use it.

import wx
import wx.grid as gridlib
 
########################################################################
class LeftPanel(wx.Panel):
    """"""
 
    #----------------------------------------------------------------------
    def __init__(self, parent):
        """Constructor"""
        wx.Panel.__init__(self, parent=parent)
 
        grid = gridlib.Grid(self)
        grid.CreateGrid(25,12)
 
        sizer = wx.BoxSizer(wx.VERTICAL)
        sizer.Add(grid, 0, wx.EXPAND)
        self.SetSizer(sizer)
 
########################################################################
class RightPanel(wx.Panel):
    """"""
 
    #----------------------------------------------------------------------
    def __init__(self, parent):
        """Constructor"""
        wx.Panel.__init__(self, parent=parent)
        txt = wx.TextCtrl(self)
 
########################################################################
class MyForm(wx.Frame):
 
    #----------------------------------------------------------------------
    def __init__(self):
        wx.Frame.__init__(self, None, title="Splitter Tutorial")
 
        splitter = wx.SplitterWindow(self)
        leftP = LeftPanel(splitter)
        rightP = RightPanel(splitter)
 
        # split the window
        splitter.SplitVertically(leftP, rightP)
        splitter.SetMinimumPaneSize(20)
 
        sizer = wx.BoxSizer(wx.VERTICAL)
        sizer.Add(splitter, 1, wx.EXPAND)
        self.SetSizer(sizer)
 
#----------------------------------------------------------------------
# Run the program
if __name__ == "__main__":
    app = wx.App(False)
    frame = MyForm()
    frame.Show()
    app.MainLoop()

As you can see, we make the wx.SplitterWindow widget the only child of the frame. In most applications, you normally make the wx.Panel the only child, but this is a special case. Next we create a couple of panels and make them children of the wx.SplitterWindow. Then we tell the wx.SplitterWindow to SplitVertically and give it a minimum pane size of 20. You need to do set the size to make sure both panels are visible. The SplitterWindow can be bound to four different widget-specific events: EVT_SPLITTER_SASH_POS_CHANGING, EVT_SPLITTER_SASH_POS_CHANGED, EVT_SPLITTER_UNSPLIT, EVT_SPLITTER_DCLICK. We don’t use any of them in this example, but you should be aware of them. It should also be noted that you can set the sash position.

The other piece that’s worth knowing about is that you can set the sash gravity. The gravity controls how the panes resize when you move the save. It’s default is 0.0, which means that only the bottom or right window is automatically resized. You can also set it to 0.5 where both windows grow equally or to 1.0 where only the left/top window grows.

Nesting Splitters

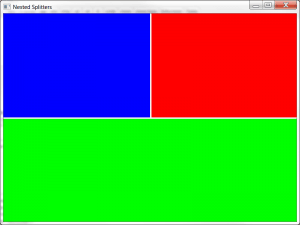
nested_splitters

Occasionally you’ll want to nest splitter windows inside of each other to create complex layouts, like the one used in the wxPython demo. Let’s take a moment and find out how to do that with the following piece of code:

import wx
 
########################################################################
class RandomPanel(wx.Panel):
    """"""
 
    #----------------------------------------------------------------------
    def __init__(self, parent, color):
        """Constructor"""
        wx.Panel.__init__(self, parent)
        self.SetBackgroundColour(color)
 
########################################################################
class MainPanel(wx.Panel):
    """"""
 
    #----------------------------------------------------------------------
    def __init__(self, parent):
        """Constructor"""
        wx.Panel.__init__(self, parent)
 
        topSplitter = wx.SplitterWindow(self)
        vSplitter = wx.SplitterWindow(topSplitter)
 
        panelOne = RandomPanel(vSplitter, "blue")
        panelTwo = RandomPanel(vSplitter, "red")
        vSplitter.SplitVertically(panelOne, panelTwo)
        vSplitter.SetSashGravity(0.5)
 
        panelThree = RandomPanel(topSplitter, "green")
        topSplitter.SplitHorizontally(vSplitter, panelThree)
        topSplitter.SetSashGravity(0.5)
 
        sizer = wx.BoxSizer(wx.VERTICAL)
        sizer.Add(topSplitter, 1, wx.EXPAND)
        self.SetSizer(sizer)
 
########################################################################
class MainFrame(wx.Frame):
    """"""
 
    #----------------------------------------------------------------------
    def __init__(self):
        """Constructor"""
        wx.Frame.__init__(self, None, title="Nested Splitters",
                          size=(800,600))
        panel = MainPanel(self)
        self.Show()
 
#----------------------------------------------------------------------
if __name__ == "__main__":
    app = wx.App(False)
    frame = MainFrame()
    app.MainLoop()

Here we create a top-level splitter that is the only child of the frame. Then we create a second splitter and add a couple of panels to it. Next we split the second splitter vertically and the top splitter horizontally to get the application you saw at the beginning of this section. Now we’re ready to learn about our next type of splitter window!

The FourWaySplitter Widget

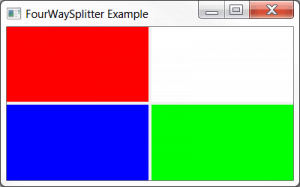
fourway_split

The FourWaySplitter widget is a custom widget, written in pure Python and is a part of the agw sub-library which can be found in wx.lib.agw. The agw stands for Advanced Generic Widgets, although I think it can equally stand for Andrea Gavana Widgets, the author of all the widgets in that sub-library. Regardless, this is very handy splitter in that you don’t need to do any nesting of splitter windows to get the same effect that this widget does by default. We’ll use an example from the wxPython documentation to see how we use this widget:

import wx
import wx.lib.agw.fourwaysplitter as fws
 
########################################################################
class MyFrame(wx.Frame):
 
    #----------------------------------------------------------------------
    def __init__(self):
 
        wx.Frame.__init__(self, None, title="FourWaySplitter Example")
 
        splitter = fws.FourWaySplitter(self, agwStyle=wx.SP_LIVE_UPDATE)
 
        # Put in some coloured panels...
        for colour in [wx.RED, wx.WHITE, wx.BLUE, wx.GREEN]:
 
            panel = wx.Panel(splitter)
            panel.SetBackgroundColour(colour)
 
            splitter.AppendWindow(panel)
 
#----------------------------------------------------------------------
if __name__ == "__main__":
    app = wx.App(False)
 
    frame = MyFrame()
    app.SetTopWindow(frame)
    frame.Show()
 
    app.MainLoop()

In this example, we create an instance of the FourWaySplitter and then we loop over a list of four colors. As we loop, we create a panel who’s parent is the FourWaySplitter and which gets its own unique color. Finally, we append the panel to the splitter. One thing this widget can do that a nested set of wx.SplitterWindows cannot is to resize all the panels at once. If you grab the sash at the intersection, you can resize everything. This is simply not possible with the regular splitter widget.

The MultiSplitterWindow

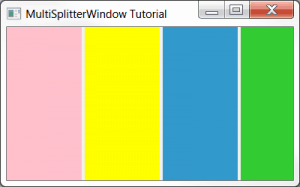
multisplitter

The MultiSplitterWindow is kind of an extension of the wx.SplitterWindow in that it allows for more than two Windows/Panels and more than one sash. Otherwise, most of the styles, constants and methods behave the same way. If you look at the wxPython demo, you’ll notice that it uses the AppendWindow in the same manner as the FourWaySplitter. Let’s create a simple demo based on the one in the official wxPython demo:

import wx
from wx.lib.splitter import MultiSplitterWindow
 
########################################################################
class SamplePanel(wx.Panel):
    """"""
 
    #----------------------------------------------------------------------
    def __init__(self, parent, colour):
        """Constructor"""
        wx.Panel.__init__(self, parent)
        self.SetBackgroundColour(colour)
 
########################################################################
class MainFrame(wx.Frame):
    """"""
 
    #----------------------------------------------------------------------
    def __init__(self):
        """Constructor"""
        wx.Frame.__init__(self, None, title="MultiSplitterWindow Tutorial")
 
        splitter = MultiSplitterWindow(self, style=wx.SP_LIVE_UPDATE)
 
        colours = ["pink", "yellow", "sky blue", "Lime Green"]
        for colour in colours:
            panel = SamplePanel(splitter, colour)
            splitter.AppendWindow(panel)
 
        self.Show()
 
#----------------------------------------------------------------------
if __name__ == "__main__":
    app = wx.App(False)
    frame = MainFrame()
    app.MainLoop()

As you can see, all you need to do to add “windows” or panels is to add them to the splitter using its AppendWindow method. In this case, we just appended four different panels that each had a different background colour.

Wrapping Up

It should be noted that the panels you add to the MultiSplitterWindow or the FourWaySplitter can have other widgets in them just as in the first example with the SplitterWindow. With these widgets (or combinations of these widgets) you can create very complex and flexible interfaces. One of the applications I see that uses these types of widgets the most is an FTP client like Filezilla. However most photography software has movable sashes to expand options on the right or left or on the bottom as well. I recommend trying to replicate some of these other programs to help you learn how to use these widgets effectively.

Additional Reading

Source Code

wxPython: How to Get Selected Cells in a Grid

$
0
0

wxgridselect.png

Today we will be looking at how to get the selected cells from a wxPython grid object. Most of the time, getting the section is easy, but when the user selects more then one cell, getting the selection becomes more complicated. We will need to create some sample code to show how all this fits together. Let’s get started!

Grid Cell Selection

There is an interesting article on the web that covers this topic. You can read it here. However, there are several problems with the article which we will look at as well. Here’s the code we’ll be looking at:

import wx
import wx.grid as gridlib
 
########################################################################
class MyPanel(wx.Panel):
    """"""
 
    #----------------------------------------------------------------------
    def __init__(self, parent):
        """Constructor"""
        wx.Panel.__init__(self, parent)
        self.currentlySelectedCell = (0, 0)
 
        self.myGrid = gridlib.Grid(self)
        self.myGrid.CreateGrid(12, 8)
        self.myGrid.Bind(gridlib.EVT_GRID_SELECT_CELL, self.onSingleSelect)
        self.myGrid.Bind(gridlib.EVT_GRID_RANGE_SELECT, self.onDragSelection)
 
        selectBtn = wx.Button(self, label="Get Selected Cells")
        selectBtn.Bind(wx.EVT_BUTTON, self.onGetSelection)
 
        sizer = wx.BoxSizer(wx.VERTICAL)
        sizer.Add(self.myGrid, 1, wx.EXPAND)
        sizer.Add(selectBtn, 0, wx.ALL|wx.CENTER, 5)
        self.SetSizer(sizer)
 
    #----------------------------------------------------------------------
    def onDragSelection(self, event):
        """
        Gets the cells that are selected by holding the left
        mouse button down and dragging
        """
        if self.myGrid.GetSelectionBlockTopLeft():
            top_left = self.myGrid.GetSelectionBlockTopLeft()[0]
            bottom_right = self.myGrid.GetSelectionBlockBottomRight()[0]
            self.printSelectedCells(top_left, bottom_right)
 
    #----------------------------------------------------------------------
    def onGetSelection(self, event):
        """
        Get whatever cells are currently selected
        """
        cells = self.myGrid.GetSelectedCells()
        if not cells:
            if self.myGrid.GetSelectionBlockTopLeft():
                top_left = self.myGrid.GetSelectionBlockTopLeft()[0]
                bottom_right = self.myGrid.GetSelectionBlockBottomRight()[0]
                self.printSelectedCells(top_left, bottom_right)
            else:
                print self.currentlySelectedCell
        else:
            print cells
 
    #----------------------------------------------------------------------
    def onSingleSelect(self, event):
        """
        Get the selection of a single cell by clicking or 
        moving the selection with the arrow keys
        """
        print "You selected Row %s, Col %s" % (event.GetRow(),
                                               event.GetCol())
        self.currentlySelectedCell = (event.GetRow(),
                                      event.GetCol())
        event.Skip()
 
    #----------------------------------------------------------------------
    def printSelectedCells(self, top_left, bottom_right):
        """
        Based on code from http://ginstrom.com/scribbles/2008/09/07/getting-the-selected-cells-from-a-wxpython-grid/
        """
        cells = []
 
        rows_start = top_left[0]
        rows_end = bottom_right[0]
 
        cols_start = top_left[1]
        cols_end = bottom_right[1]
 
        rows = range(rows_start, rows_end+1)
        cols = range(cols_start, cols_end+1)
 
        cells.extend([(row, col)
            for row in rows
            for col in cols])
 
        print "You selected the following cells: ", cells
 
        for cell in cells:
            row, col = cell
            print self.myGrid.GetCellValue(row, col)
 
########################################################################
class MyFrame(wx.Frame):
    """"""
 
    #----------------------------------------------------------------------
    def __init__(self):
        """Constructor"""
        wx.Frame.__init__(self, parent=None, title="Single Cell Selection")
        panel = MyPanel(self)
        self.Show()
 
#----------------------------------------------------------------------
if __name__ == "__main__":
    app = wx.App(False)
    frame = MyFrame()
    app.MainLoop()

Let’s take a few moments to break this down. First of all, we create a grid object that we’re calling self.myGrid. We bind to two grid specific events, EVT_GRID_SELECT_CELL and EVT_GRID_RANGE_SELECT. This is for demonstration purposes as you usually don’t need to bind to EVT_GRID_SELECT_CELL. For the single cell selection event, we call the onSingleSelect handler. In it we use the event object to grab the correct row and column. If you look at the article linked to above, you’ll notice that they are using GetGridCursorRow and GetGridCursorCol. I found that these only return the previously selected cell, not the cell that is currently selected. This is the reason we are using the event object’s methods instead. Also note that we are updating the value of self.currentlySelectedCell to equal whatever the currently selected cell is.

The other grid event is bound to onDragSelection. In this event handler we call the grid’s GetSelectionBlockTopLeft() method and check to make sure it returns something. If it does not, then we do nothing else. But if it does return something, then we grab its contents as well as the contents returned from GetSelectionBlockBottomRight(). Then we pass these to our printSelectedCells method. This code is based on the previously mentioned article, although it has been simplified a bit as I found the original’s for loop was throwing an error. Basically all this method does is create two lists of values using Python’s range function. Then it extends a list using a nested list comprehension. Finally it prints out the cells that were selected to stdout.

The last method to look at is the button event handler: onGetSelection. This method calls the grid’s GetSelectedCells() method. This will return the selected cells that single clicked. It will also work if the user drag selects some cells. If the user just selects one cell, then we will print self.currentlySelectedCell as it will always equal the value of the current selection.

Wrapping Up

As you can see, getting the selected cell or cells from the grid object can be a little tricky. But with a bit of work, we were able to overcome. Hopefully you will find this useful in one of your current or future projects.

Related Reading

wxPython 101: Using Frame Styles

$
0
0

The wxPython Frame widget is used in almost all wxPython applications. It has the minimize, maximize and close buttons on it as well as the caption along the top that identifies the application. The wx.Frame allows you to modify its styles in such a way that you can remove or disable various buttons and features. In this article, we will look at some of the ways that you can change the behavior of the wx.Frame widget. Specifically, we will cover the following:

  • Different ways to create a default frame
  • How to create a frame without a caption (i.e. no title bar)
  • How to create a frame with a disabled close button
  • How to create a frame without a maximize or minimize button
  • How to create a frame that cannot be resized
  • How to create a frame without the system menu
  • How to make your frame stay on top of other windows

Getting Started

default_frame

It’s always a good idea to look at how the default style works and then modify that to see what happens. So let’s start with the frame’s default style: wx.DEFAULT_FRAME_STYLE. You can create a frame that uses wx.DEFAULT_FRAME_STYLE (or its equivalent) in 3 different ways. The first an easiest is to just do something like this:

import wx
 
########################################################################
class DefaultFrame(wx.Frame):
    """
    The default frame
    """
 
    #----------------------------------------------------------------------
    def __init__(self):
        """Constructor"""
        wx.Frame.__init__(self, None, title="Default Frame")
        panel = wx.Panel(self)
        self.Show()
 
#----------------------------------------------------------------------
if __name__ == "__main__":
    app = wx.App(False)
    frame = DefaultFrame()
    app.MainLoop()

This will create a normal frame with all the normal functionality any user would expect. Now let’s change it slightly by passing it the wx.DEFAULT_FRAME_STYLE.

import wx 
 
########################################################################
class DefaultFrame(wx.Frame):
    """
    The default frame
    """
 
    #----------------------------------------------------------------------
    def __init__(self):
        """Constructor"""
        wx.Frame.__init__(self, None, title="Default Frame", style=wx.DEFAULT_FRAME_STYLE)
        panel = wx.Panel(self)
        self.Show()
 
#----------------------------------------------------------------------
if __name__ == "__main__":
    app = wx.App(False)
    frame = DefaultFrame()
    app.MainLoop()

This code does EXACTLY the same thing as the previous code. Now if you do a little research, you’ll find out that wx.DEFAULT_FRAME_STYLE is the equivalent of passing the following:

wx.MINIMIZE_BOX | wx.MAXIMIZE_BOX | wx.RESIZE_BORDER | wx.SYSTEM_MENU | wx.CAPTION | wx.CLOSE_BOX | wx.CLIP_CHILDREN

So let’s modify out code one more time to show how that would work.

import wx
 
########################################################################
class DefaultFrame(wx.Frame):
    """
    The default frame
    """
 
    #----------------------------------------------------------------------
    def __init__(self):
        """Constructor"""
        default = wx.MINIMIZE_BOX | wx.MAXIMIZE_BOX | wx.RESIZE_BORDER | wx.SYSTEM_MENU | wx.CAPTION | wx.CLOSE_BOX | wx.CLIP_CHILDREN
        wx.Frame.__init__(self, None, title="Default Frame", style=default)
        panel = wx.Panel(self)
        self.Show()
 
#----------------------------------------------------------------------
if __name__ == "__main__":
    app = wx.App(False)
    frame = DefaultFrame()
    app.MainLoop()

That was easy. Now we’re ready to start experimenting!

Create a Frame Without a Caption

no_caption_frame

Let’s create a frame that doesn’t have a caption. The caption is what holds the buttons along the top of the frame along with the title of the application.

import wx
 
########################################################################
class NoCaptionFrame(wx.Frame):
    """"""
 
    #----------------------------------------------------------------------
    def __init__(self):
        """Constructor"""
        no_caption = wx.MINIMIZE_BOX | wx.MAXIMIZE_BOX | wx.RESIZE_BORDER | wx.SYSTEM_MENU | wx.CLOSE_BOX | wx.CLIP_CHILDREN
        wx.Frame.__init__(self, None, title="No Caption", style=no_caption)
        panel = wx.Panel(self)
        self.Show()
 
#----------------------------------------------------------------------
if __name__ == "__main__":
    app = wx.App(False)
    frame = NoCaptionFrame()
    app.MainLoop()

When this code is run, the panel is squashed up in the upper left hand corner of the frame. You can resize the frame and the panel will “snap” into place, but it’s kind of weird looking. You might also note that you cannot close this application since there is no close button on it. You will need to kill your Python process to close this application.

Create a Frame With a Disabled Close Button

no_close_frame

Some programmers think they need a frame where there’s no close button. Well you can’t really remove the close button and keep the other buttons at the same time, but you can disable the close button. Here’s how:

import wx
 
########################################################################
class NoCloseFrame(wx.Frame):
    """
    This frame has no close box and the close menu is disabled
    """
 
    #----------------------------------------------------------------------
    def __init__(self):
        """Constructor"""
        no_close = wx.MINIMIZE_BOX | wx.MAXIMIZE_BOX | wx.RESIZE_BORDER | wx.SYSTEM_MENU | wx.CAPTION | wx.CLIP_CHILDREN
        wx.Frame.__init__(self, None, title="No Close", style=no_close)
        panel = wx.Panel(self)
        self.Show()
 
#----------------------------------------------------------------------
if __name__ == "__main__":
    app = wx.App(False)
    frame = NoCloseFrame()
    app.MainLoop()

Of course, you cannot close this application either, so this is a rather annoying piece application. You’ll probably want to add a wx.Button that can close it instead.

Create a Frame Without Maximize/Minimize

no_max_min_frame

Sometimes you’ll want to create an application that you cannot minimize or maximize. If you’re going to go that far, let’s make an application that also doesn’t show up in the taskbar!

import wx
 
########################################################################
class NoMaxMinFrame(wx.Frame):
    """
    This frame does not have maximize or minimize buttons
    """
 
    #----------------------------------------------------------------------
    def __init__(self):
        """Constructor"""
        no_caption = wx.RESIZE_BORDER | wx.SYSTEM_MENU | wx.CAPTION | wx.CLOSE_BOX | wx.CLIP_CHILDREN | wx.FRAME_NO_TASKBAR
        wx.Frame.__init__(self, None, title="No Max/Min", style=no_caption)
        panel = wx.Panel(self)
        self.Show()
 
#----------------------------------------------------------------------
if __name__ == "__main__":
    app = wx.App(False)
    frame = NoMaxMinFrame()
    app.MainLoop()

As you can see, we just removed the wx.MINIMIZE_BOX and wx.MAXIMIZE_BOX style flags and added the wx.FRAME_NO_TASKBAR style flag.

Create a Un-Resizable Frame

no_resize_frame

Occasionally you’ll want to create a frame that cannot be resized. You could use SetSizeHints or you could just set some frame style flags. We’ll be doing the latter here:

import wx
 
########################################################################
class NoResizeFrame(wx.Frame):
    """
    This frame cannot be resized. It can only be minimized, maximized
    and closed
    """
 
    #----------------------------------------------------------------------
    def __init__(self):
        """Constructor"""
        no_resize = wx.DEFAULT_FRAME_STYLE & ~ (wx.RESIZE_BORDER | 
                                                wx.RESIZE_BOX | 
                                                wx.MAXIMIZE_BOX)
        wx.Frame.__init__(self, None, title="No Resize", style=no_resize)
        panel = wx.Panel(self)
        self.Show()
 
#----------------------------------------------------------------------
if __name__ == "__main__":
    app = wx.App(False)
    frame = NoResizeFrame()
    app.MainLoop()

Note that here we use bitwise operators to remove 3 style flags from the wx.DEFAULT_FRAME_STYLE. As you can see, this gives us a frame that we cannot resize in any way.

Create a Frame Without a System Menu

no_sys_menu_frame

This is a rather silly requirement, but I’ve seen people ask for it. Basically, they want to remove ALL the buttons, but leave the title. Here’s how to do that:

import wx
 
########################################################################
class NoSystemMenuFrame(wx.Frame):
    """
    There is no system menu, which means the title bar is there, but
    no buttons and no menu when clicking the top left hand corner
    of the frame
    """
 
    #----------------------------------------------------------------------
    def __init__(self):
        """Constructor"""
        no_sys_menu = wx.MINIMIZE_BOX | wx.MAXIMIZE_BOX | wx.RESIZE_BORDER | wx.CAPTION | wx.CLIP_CHILDREN | wx.CLOSE_BOX
        wx.Frame.__init__(self, None, title="No System Menu", style=no_sys_menu)
        panel = wx.Panel(self)
        self.Show()
 
#----------------------------------------------------------------------
if __name__ == "__main__":
    app = wx.App(False)
    frame = NoSystemMenuFrame()
    app.MainLoop()

As you can see, there is a title and you can resize the frame, but you cannot maximize, minimize or close the application.

Update: I’ve had a report that this one doesn’t work on Windows XP. While I don’t particularly care much about that OS at this point, the solution provided was to pass the following style instead of the one above:

no_sys_menu=wx.CAPTION

Create a Frame That Stays on Top

stay_on_top_frame

A lot of programmers ask about this one. They want their application to stay on top of all the others. While there isn’t a completely foolproof way to accomplish this, the little recipe below will work most of the time.

import wx
 
########################################################################
class StayOnTopFrame(wx.Frame):
    """
    There is no system menu, which means the title bar is there, but
    no buttons and no menu when clicking the top left hand corner
    of the frame
    """
 
    #----------------------------------------------------------------------
    def __init__(self):
        """Constructor"""
        on_top = wx.DEFAULT_FRAME_STYLE | wx.STAY_ON_TOP
        wx.Frame.__init__(self, None, title="Stay on top", style=on_top)
        panel = wx.Panel(self)
        self.Show()
 
#----------------------------------------------------------------------
if __name__ == "__main__":
    app = wx.App(False)
    frame = StayOnTopFrame()
    app.MainLoop()

Here we just use the default style flag and add on wx.STAY_ON_TOP.

Wrapping Up

At this point, you should know how to edit almost all the frame’s styles. There are a couple of other style flags that are OS dependent (like wx.ICONIZE) or just aren’t that useful. If you’re interested in those, check out the links below. Otherwise, go forth and use your knowledge wisely.

Note: This code was tested on Windows 7 using Python 2.6.6 with wxPython 2.8.12.1

Related Links

wxPython: Adding Tooltips to ObjectListView

$
0
0

wxOLVTooltips

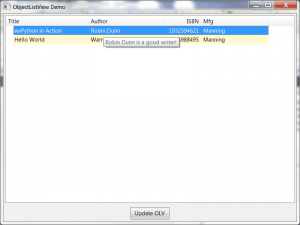
Recently I was trying to figure out how to add tooltips to each item in an ObjectListView widget in wxPython on Windows. The wxPython wiki has an example that uses PyWin32, but I didn’t want to go that route. So I asked on the wxPython Google Group and got an interesting answer. They had actually used one of my old articles to build their solution for me. I have cleaned it up a little bit and decided it was worth sharing with my readers:

import wx
from ObjectListView import ObjectListView, ColumnDefn
 
########################################################################
class Book(object):
    """
    Model of the Book object
 
    Contains the following attributes:
    'ISBN', 'Author', 'Manufacturer', 'Title'
    """
    #----------------------------------------------------------------------
    def __init__(self, title, author, isbn, mfg):
        self.isbn = isbn
        self.author = author
        self.mfg = mfg
        self.title = title
 
 
########################################################################
class MainPanel(wx.Panel):
    #----------------------------------------------------------------------
    def __init__(self, parent):
        wx.Panel.__init__(self, parent=parent, id=wx.ID_ANY)
        self.products = [Book("wxPython in Action", "Robin Dunn",
                              "1932394621", "Manning"),
                         Book("Hello World", "Warren and Carter Sande",
                              "1933988495", "Manning")
                         ]
 
        self.dataOlv = ObjectListView(self, wx.ID_ANY, style=wx.LC_REPORT|wx.SUNKEN_BORDER)
        self.setBooks()
 
        # Allow the cell values to be edited when double-clicked
        self.dataOlv.cellEditMode = ObjectListView.CELLEDIT_SINGLECLICK
 
        # create an update button
        updateBtn = wx.Button(self, wx.ID_ANY, "Update OLV")
        updateBtn.Bind(wx.EVT_BUTTON, self.updateControl)
 
        # Create some sizers
        mainSizer = wx.BoxSizer(wx.VERTICAL)        
 
        mainSizer.Add(self.dataOlv, 1, wx.ALL|wx.EXPAND, 5)
        mainSizer.Add(updateBtn, 0, wx.ALL|wx.CENTER, 5)
        self.SetSizer(mainSizer)
 
        self.dataOlv.Bind(wx.EVT_LIST_ITEM_SELECTED, self.onSetToolTip)
 
    #----------------------------------------------------------------------
    def updateControl(self, event):
        """
        Update the control
        """
        print "updating..."
        #product_dict = [{"title":"Core Python Programming", "author":"Wesley Chun",
                         #"isbn":"0132269937", "mfg":"Prentice Hall"},
                        #{"title":"Python Programming for the Absolute Beginner",
                         #"author":"Michael Dawson", "isbn":"1598631128",
                         #"mfg":"Course Technology"},
                        #{"title":"Learning Python", "author":"Mark Lutz",
                         #"isbn":"0596513984", "mfg":"O'Reilly"}
                        #]
 
        product_list = [Book("Core Python Programming", "Wesley Chun",
                             "0132269937", "Prentice Hall"),
                        Book("Python Programming for the Absolute Beginner",
                             "Michael Dawson", "1598631128", "Course Technology"),
                        Book("Learning Python", "Mark Lutz", "0596513984",
                             "O'Reilly")
                        ]
 
        data = self.products + product_list
        self.dataOlv.SetObjects(data)
 
    #----------------------------------------------------------------------
    def setBooks(self, data=None):
        """
        Sets the book data for the OLV object
        """
        self.dataOlv.SetColumns([
            ColumnDefn("Title", "left", 220, "title"),
            ColumnDefn("Author", "left", 200, "author"),
            ColumnDefn("ISBN", "right", 100, "isbn"),
            ColumnDefn("Mfg", "left", 180, "mfg")
        ])
 
        self.dataOlv.SetObjects(self.products)
 
    #----------------------------------------------------------------------
    def onSetToolTip(self, event):
        """
        Set the tool tip on the selected row
        """
        item = self.dataOlv.GetSelectedObject()
        tooltip = "%s is a good writer!" % item.author
        event.GetEventObject().SetToolTipString(tooltip)
        event.Skip()
 
########################################################################
class MainFrame(wx.Frame):
    #----------------------------------------------------------------------
    def __init__(self):
        wx.Frame.__init__(self, parent=None, id=wx.ID_ANY, 
                          title="ObjectListView Demo", size=(800,600))
        panel = MainPanel(self)
 
########################################################################
class GenApp(wx.App):
 
    #----------------------------------------------------------------------
    def __init__(self, redirect=False, filename=None):
        wx.App.__init__(self, redirect, filename)
 
    #----------------------------------------------------------------------
    def OnInit(self):
        # create frame here
        frame = MainFrame()
        frame.Show()
        return True
 
#----------------------------------------------------------------------
def main():
    """
    Run the demo
    """
    app = GenApp()
    app.MainLoop()
 
if __name__ == "__main__":
    main()

All I needed to do was add a binding to wx.EVT_LIST_ITEM_SELECTED. Then in my event handler I needed to grab the event object and set its tooltip string. What I would really like to do is find a way to copy this grid recipe so that I can just mouse over items and have the tooltip change, but it doesn’t look like ObjectListView / ListCtrl has the methods I would need to translate mouse coordinates to a column / row. Regardless, the solution given does work as advertised. Thanks a lot, Erxin!

Update: One of my astute readers noticed an error in my code where when I hit the update button, it added a dictionary to the ObjectListView widget. While you can add a dictionary, this broke the onSetToolTip method as some of the items that were added were no longer Book instances. So I have updated the code to add the extra items as Book instances and commented out the dictionary example.

The post wxPython: Adding Tooltips to ObjectListView appeared first on The Mouse Vs. The Python.

wxPython: ObjectListview – How to Double-click items

$
0
0

The other day I was working on a project where I was using the fabulous ObjectListView widget (a wrapper around wx.ListCtrl) and I wanted to add the ability to double-click an item in the control to make it open a PDF. I knew I had read somewhere on the internet about how do this sort of thing, but it was once again a drag to find that information. So now that I know, I decided to share it this time. I’ll also show you how to open a PDF file on Windows as a bonus!

Digging into the Code

wxOLVDoubleclick

Working with the ObjectListView widget is pretty easy. I’ve talked about it in the past, so if you want you can go check out those previous article which I’ll link to at the end of this one. Anyway, I always find it easier to show the code and then explain what’s going on, so let’s do that here too:

import glob
import os
import subprocess
import wx
 
from ObjectListView import ObjectListView, ColumnDefn
 
########################################################################
class File(object):
    """
    Model of the file object
    """
 
    #----------------------------------------------------------------------
    def __init__(self, path):
        """Constructor"""
        self.filename = os.path.basename(path)
        self.path = path
 
########################################################################
class UIPanel(wx.Panel):
    """
    Panel class
    """
 
    #----------------------------------------------------------------------
    def __init__(self, parent):
        """Constructor"""
        wx.Panel.__init__(self, parent)
        self.base_path = os.path.dirname(os.path.abspath(__file__))
        self.data = []
 
        # -----------------------------------------------
        # create the widgets
 
        # add the data viewing control
        self.pdfOlv = ObjectListView(self, 
                                     style=wx.LC_REPORT|wx.SUNKEN_BORDER)
        self.pdfOlv.Bind(wx.EVT_LIST_ITEM_ACTIVATED, self.onDoubleClick)
        self.pdfOlv.SetEmptyListMsg("No PDFs Found!")
        self.updateDisplay()
 
        browseBtn = wx.Button(self, label="Browse")
        browseBtn.Bind(wx.EVT_BUTTON, self.getPdfs)
 
        # -----------------------------------------------
        # layout the widgets
        mainSizer = wx.BoxSizer(wx.VERTICAL)
 
        mainSizer.Add(self.pdfOlv, 1, wx.ALL|wx.EXPAND, 5)
        mainSizer.Add(browseBtn, 0, wx.ALL|wx.CENTER, 5)
 
        self.SetSizer(mainSizer)
 
    #----------------------------------------------------------------------
    def getPdfs(self, event):
        """
        Attempts to load PDFs into objectlistview
        """
        self.data = []
 
        dlg = wx.DirDialog(self, "Choose a directory:",
                          style=wx.DD_DEFAULT_STYLE)
        res = dlg.ShowModal()
        if res != wx.ID_OK:
            return
        path = dlg.GetPath()
        dlg.Destroy()
 
        pdfs = glob.glob(path + "/*.pdf")
 
        if pdfs:
            for pdf in pdfs:
                self.data.append(File(pdf))
 
            self.updateDisplay()
 
    #----------------------------------------------------------------------
    def onDoubleClick(self, event):
        """
        Opens the PDF that is double-clicked
        """
        obj = self.pdfOlv.GetSelectedObject()
        print "You just double-clicked on %s" % obj.path
        cmd = os.getenv("comspec")
        acrobat = "acrord32.exe"
        pdf = obj.path
 
        cmds = [cmd, "/c", "start", acrobat, "/s", pdf]
        subprocess.Popen(cmds)
 
    #----------------------------------------------------------------------
    def updateDisplay(self):
        """
        Updates the object list view control
        """
        self.pdfOlv.SetColumns([
            ColumnDefn("File", "left", 700, "filename")
            ])
        self.pdfOlv.SetObjects(self.data)
 
########################################################################
class MainFrame(wx.Frame):
    """
    Main frame
    """
 
    #----------------------------------------------------------------------
    def __init__(self):
        """Constructor"""
        wx.Frame.__init__(self, None, title="DoubleClick OLV Demo",
                          size=(800,600))
        panel = UIPanel(self)
        self.createMenu()
        self.Show()
 
    #----------------------------------------------------------------------
    def createMenu(self):
        """
        Create the menus
        """
        menubar = wx.MenuBar()
        fileMenu = wx.Menu()
        closeMenuItem = fileMenu.Append(wx.NewId(), "Close",
                                        "Close the application")
        self.Bind(wx.EVT_MENU, self.onClose, closeMenuItem)
 
        menubar.Append(fileMenu, "&File")
        self.SetMenuBar(menubar)
 
    #----------------------------------------------------------------------
    def onClose(self, event):
        """
        Close the application
        """
        self.Close()
 
#----------------------------------------------------------------------
def main():
    """
    Run the application
    """
    app = wx.App(False)
    frame = MainFrame()
    app.MainLoop()
 
#----------------------------------------------------------------------
if __name__ == "__main__":
    main()

The ObjectListView (OLV) widget works with objects and dictionaries. For this example, we create a File class that we will be feeding to our OLV widget. Then in the panel class, we create the OLV widget along with a browse button. To get the double-click effect, we bind the OLV widget to wx.EVT_LIST_ITEM_ACTIVATED. It’s not a very intuitively named event, but it does work for catching double-clicking. To actually do something with this script, you’ll want to browse to a folder that has PDFs in it. Once you’ve chosen a folder, the getPdfs method is called.

In said method, we use Python’s glob module to look for pdfs. If it returns some, then we update our data list by appending instances of the File class to it. Now you should have something that looks kind of like the screenshot you saw at the beginning of the article. Now when you double-click the item it will print out the path of the PDF and then try to get Window’s cmd.exe path using Python’s os module. Then it will attempt to call Adobe Acrobat Reader’s 32-bit version with a couple of flags and the path to the PDF using Python’s subprocess module. If everyone works correctly, you should see Acrobat load with the PDF you selected.

Note: I’m receiving a wxPyDeprecationWarning when the double click event handler fires. I’m not entirely sure why that is happening as it is talking about key events, but I just thought my readers should know that they can just ignore that as I don’t believe it will affect them in any way.

I tested this code using ObjectListView 1.2, wxPython 2.9.4.0 (classic), and Python 2.7.3 on Windows 7.

The post wxPython: ObjectListview – How to Double-click items appeared first on The Mouse Vs. The Python.

wxPython 201: Syncing Scrolling Between Two Grids

$
0
0

This week I saw a question on StackOverflow about putting two grids into a SplitterWindow which itself was in a Notebook page. Personally I think that’s a little convoluted, but I thought it was an interesting challenge and I came up with a solution. Then the fellow wanted to know how to sync the scrolling of the two grids. Well, I found an answer and modified my code and decided it was worth writing an article about. Here is a screenshot of the finished result:

wxScrollGrid

Yes, for some reason the person who wanted this also wanted a panel below the two grids. I think it’s a bit ugly, especially with the pink background, but to each their own. Let’s take a look at the code:

import wx
import wx.grid as gridlib
 
class ScrollSync(object):
    def __init__(self, panel1, panel2):
        self.panel1 = panel1
        self.panel2 = panel2
        self.panel1.grid.Bind(wx.EVT_SCROLLWIN, self.onScrollWin1)
        self.panel2.grid.Bind(wx.EVT_SCROLLWIN, self.onScrollWin2)
 
    def onScrollWin1(self, event):
        if event.Orientation == wx.SB_HORIZONTAL:
            self.panel2.grid.Scroll(event.Position, -1)
        else:
            self.panel2.grid.Scroll(-1, event.Position)
        event.Skip()
 
    def onScrollWin2(self, event):
        if event.Orientation == wx.SB_HORIZONTAL:
            self.panel1.grid.Scroll(event.Position, -1)
        else:
            self.panel1.grid.Scroll(-1, event.Position)
        event.Skip()
 
########################################################################
class RegularPanel(wx.Panel):
    """"""
 
    #----------------------------------------------------------------------
    def __init__(self, parent):
        """Constructor"""
        wx.Panel.__init__(self, parent)
        self.SetBackgroundColour("pink")
 
 
########################################################################
class GridPanel(wx.Panel):
    """"""
 
    #----------------------------------------------------------------------
    def __init__(self, parent):
        """Constructor"""
        wx.Panel.__init__(self, parent)
        self.grid = gridlib.Grid(self, style=wx.BORDER_SUNKEN)
        self.grid.CreateGrid(25,8)
 
        sizer = wx.BoxSizer(wx.VERTICAL)
        sizer.Add(self.grid, 1, wx.EXPAND)
        self.SetSizer(sizer)
 
 
########################################################################
class MainPanel(wx.Panel):
    """"""
 
    #----------------------------------------------------------------------
    def __init__(self, parent):
        """Constructor"""
        wx.Panel.__init__(self, parent)
 
        notebook = wx.Notebook(self)
 
        page = wx.SplitterWindow(notebook)
        notebook.AddPage(page, "Splitter")
        hSplitter = wx.SplitterWindow(page)
 
        panelOne = GridPanel(hSplitter)
        panelTwo = GridPanel(hSplitter)
        ScrollSync(panelOne, panelTwo)
 
        hSplitter.SplitVertically(panelOne, panelTwo)
        hSplitter.SetSashGravity(0.5)
 
        panelThree = RegularPanel(page)
        page.SplitHorizontally(hSplitter, panelThree)
        page.SetSashGravity(0.5)
 
        sizer = wx.BoxSizer(wx.VERTICAL)
        sizer.Add(notebook, 1, wx.EXPAND)
        self.SetSizer(sizer)
 
########################################################################
class MainFrame(wx.Frame):
    """"""
 
    #----------------------------------------------------------------------
    def __init__(self):
        """Constructor"""
        wx.Frame.__init__(self, None, title="Nested Splitters",
                          size=(800,600))
        panel = MainPanel(self)
        self.Show()
 
#----------------------------------------------------------------------
if __name__ == "__main__":
    app = wx.App(False)
    frame = MainFrame()
    app.MainLoop()

The piece we care about most is the ScrollSync class. It accepts the two panels that the grids are on as arguments. We then bind the grids to wx.EVT_SCROLLWIN and then during that event, we change the position of the opposite grid. Now this code has several limitations. It only works when you are physically moving the scrollbars with your mouse. If you use the mouse’s scroll wheel, the arrow keys or Page up/down, then the two grids no longer sync. I attempted to add mouse wheel support via the wx.EVT_MOUSEWHEEL event, but it doesn’t provide Orientation or Position in the same way as EVT_SCROLLWIN does. In fact, its Position is a wx.Point whereas EVT_SCROLLWIN returns an Integer. Adding those bits of functionality would be fun, but they are outside the scope of this article.

This code should get you started on your way in getting the syncing working though. I also found a couple of other articles related to this subject that you might find helpful should you need to sync scrolling up in a couple of widgets:

The post wxPython 201: Syncing Scrolling Between Two Grids appeared first on The Mouse Vs. The Python.

wxPython: Creating a Simple RSS Reader

$
0
0

Really Simple Syndication (RSS) has been with us for a long time and allows us to see new articles on our favorite website easily. Python doesn’t have an RSS reader module in the standard library, so we’ll be using the Universal Feed Parser 5.1.3 to do our parsing. If you do not have it already, you should go download it from the Python Package Index now. We’ll use this blog’s RSS feed to make testing simpler. The url for the feed is: http://www.blog.pythonlibrary.org/feed/. During my experiments, I noticed that my blog software will change a dash into the following unicode character: \u2013. This will cause feedparser to throw a UnicodeEncodeError, so I also recommend downloading the handy unidecode module to help with that.

Getting Started

Once you have the prerequisites mentioned above, we can get started. The feedparser package is actually a single module and is pretty easy to use. Here’s a quick example:

import feedparser
 
rss = 'http://www.blog.pythonlibrary.org/feed/'
feed = feedparser.parse(rss)
for key in feed["entries"]: 
    print unidecode.unidecode(key["title"])

If you run this code it will print out the 10 latest article titles from the blog. If you are curious, try printing out the feed variable. If you do that, you will see a pretty gnarly dictionary that’s rather hard to follow. I ended up doing the following to make it a bit easier to read:

import pprint
pp = pprint.PrettyPrinter(indent=4)
pp.pprint(feed)

This will give you a print out that’s similar to the following snippet:

{   'bozo': 0,
    'encoding': u'UTF-8',
    'entries': [   {   'author': u'Mike',
                       'author_detail': {   'name': u'Mike'},
                       'authors': [{   }],
                       'comments': u'http://www.blog.pythonlibrary.org/2014/01/03/reportlab-create-landscape-pages/#comments',
                       'content': [   {   'base': u'http://www.blog.pythonlibrary.org/feed/',
                                          'language': None,
                                          'type': u'text/html',
 
                       'guidislink': False,
                       'id': u'http://www.blog.pythonlibrary.org/?p=3639',
                       'link': u'http://www.blog.pythonlibrary.org/2014/01/03/reportlab-create-landscape-pages/',
                       'links': [   {   'href': u'http://www.blog.pythonlibrary.org/2014/01/03/reportlab-create-landscape-pages/',
                                        'rel': u'alternate',
                                        'type': u'text/html'}],
                       'published': u'Fri, 03 Jan 2014 22:54:11 +0000',
                       'published_parsed': time.struct_time(tm_year=2014, tm_mon=1, tm_mday=3, tm_hour=22, tm_min=54, tm_sec=11, tm_wday=4, tm_yday=3, tm_isdst=0),
                       'slash_comments': u'0',
                       'summary': u'<p>The other day I had an interesting task I needed to complete with Reportlab. I needed to create a PDF in landscape orientation that had to be rotated 90 degrees when I saved it. To make it easier to lay out the document, I created a class with a flag that allows me to save [&#8230;]</p><p>The post <a href="http://www.blog.pythonlibrary.org/2014/01/03/reportlab-create-landscape-pages/" rel="nofollow">Reportlab: How to Create Landscape Pages</a> appeared first on <a href="http://www.blog.pythonlibrary.org" rel="nofollow">The Mouse Vs. The Python</a>.</p>',
                       'summary_detail': {   'base': u'http://www.blog.pythonlibrary.org/feed/',
                                             'language': None,
                                             'type': u'text/html',
                                             'value': u'<p>The other day I had an interesting task I needed to complete with Reportlab. I needed to create a PDF in landscape orientation that had to be rotated 90 degrees when I saved it. To make it easier to lay out the document, I created a class with a flag that allows me to save [&#8230;]</p><p>The post <a href="http://www.blog.pythonlibrary.org/2014/01/03/reportlab-create-landscape-pages/" rel="nofollow">Reportlab: How to Create Landscape Pages</a> appeared first on <a href="http://www.blog.pythonlibrary.org" rel="nofollow">The Mouse Vs. The Python</a>.</p>'},
                       'tags': [   {   'label': None,
                                       'scheme': None,
                                       'term': u'Cross-Platform'},
                                   {   'label': None,
                                       'scheme': None,
                                       'term': u'Python'},
                                   {   'label': None,
                                       'scheme': None,
                                       'term': u'Reportlab'}],
                       'title': u'Reportlab: How to Create Landscape Pages',
                       'title_detail': {   'base': u'http://www.blog.pythonlibrary.org/feed/',
                                           'language': None,
                                           'type': u'text/plain',
                                           'value': u'Reportlab: How to Create Landscape Pages'},
                       'wfw_commentrss': u'http://www.blog.pythonlibrary.org/2014/01/03/reportlab-create-landscape-pages/feed/'},

I shortened that up quite a bit as you get a LOT of detail. Anyway, back to parsing the feed dict. If you print out the keys, you’ll see they are as follows: feed, status, updated, updated_parsed, encoding, bozo, headers, href, version, entries, namespaces. The one I think is probably the most useful is the entries key. If you access its value, you will find a list of dictionaries that contain information about each of the ten articles.

Of course, this isn’t very interesting if we don’t have a nice way to display the data. Let’s take a moment and create a simple user interface using wxPython!

Creating the UI

wxrss

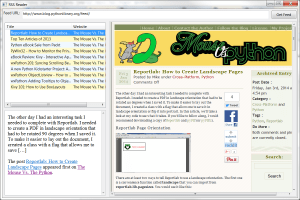
I recommend using wxPython 2.9 or higher for this next piece as the WebView widget was added in that series and that makes displaying HTML much simpler. I’ll be using wxPython 2.9.4 (classic). I’m also going to use ObjectListView, so make sure you have the right packages install before you try to do this exercise. Let’s jump right into the code!

# wxRss.py
 
import feedparser
import os
import unidecode
import wx
import wx.html2 as webview
 
from ObjectListView import ObjectListView, ColumnDefn
 
########################################################################
class RSS(object):
    """
    RSS object
    """
 
    #----------------------------------------------------------------------
    def __init__(self, title, link, website, summary, all_data):
        """Constructor"""
        self.title = title
        self.link = link
        self.all_data = all_data
        self.website = website
        self.summary = summary
 
 
########################################################################
class RssPanel(wx.Panel):
    """"""
 
    #----------------------------------------------------------------------
    def __init__(self, parent):
        """Constructor"""
        wx.Panel.__init__(self, parent, style=wx.NO_FULL_REPAINT_ON_RESIZE)
        self.data = []
 
        lbl = wx.StaticText(self, label="Feed URL:")
        self.rssUrlTxt = wx.TextCtrl(self, value="http://www.blog.pythonlibrary.org/feed/")
        urlBtn = wx.Button(self, label="Get Feed")
        urlBtn.Bind(wx.EVT_BUTTON, self.get_data)
 
        self.rssOlv = ObjectListView(self, 
                                     style=wx.LC_REPORT|wx.SUNKEN_BORDER)
        self.rssOlv.SetEmptyListMsg("No data")
        self.rssOlv.Bind(wx.EVT_LIST_ITEM_SELECTED, self.on_select)
        self.rssOlv.Bind(wx.EVT_LIST_ITEM_ACTIVATED, self.on_double_click)
        self.summaryTxt = webview.WebView.New(self)
 
        self.wv = webview.WebView.New(self)
 
        # add sizers
        rowSizer = wx.BoxSizer(wx.HORIZONTAL)
        rowSizer.Add(lbl, 0, wx.ALL, 5)
        rowSizer.Add(self.rssUrlTxt, 1, wx.EXPAND|wx.ALL, 5)
        rowSizer.Add(urlBtn, 0, wx.ALL, 5)
 
        vSizer = wx.BoxSizer(wx.VERTICAL)
        vSizer.Add(self.rssOlv, 1, wx.EXPAND|wx.ALL, 5)
        vSizer.Add(self.summaryTxt, 1, wx.EXPAND|wx.ALL, 5)
 
        dispSizer = wx.BoxSizer(wx.HORIZONTAL)
        dispSizer.Add(vSizer, 1, wx.EXPAND|wx.ALL, 5)
        dispSizer.Add(self.wv, 2, wx.EXPAND|wx.ALL, 5)
 
        mainSizer = wx.BoxSizer(wx.VERTICAL)
        mainSizer.Add(rowSizer, 0, wx.EXPAND)
        mainSizer.Add(dispSizer, 1, wx.EXPAND)
        self.SetSizer(mainSizer)
 
        self.update_display()
 
    #----------------------------------------------------------------------
    def get_data(self, event):
        """
        Get RSS feed and add it to display
        """
        msg = "Processing feed..."
        busyDlg = wx.BusyInfo(msg)
        rss = self.rssUrlTxt.GetValue()
        feed = feedparser.parse(rss)
 
        website = feed["feed"]["title"]
        for key in feed["entries"]:
            title = unidecode.unidecode(key["title"])
            link = key["link"]
            summary = key["summary"]
            self.data.append(RSS(title, link, website, summary, key))
 
        busyDlg = None
        self.update_display()
 
    #----------------------------------------------------------------------
    def on_double_click(self, event):
        """
        Load the selected link in the browser widget
        """
        obj = self.rssOlv.GetSelectedObject()
        self.wv.LoadURL(obj.link)
 
    #----------------------------------------------------------------------
    def on_select(self, event):
        """
        Load the summary in the text control
        """
        base_path = os.path.dirname(os.path.abspath(__file__))        
        obj = self.rssOlv.GetSelectedObject()
        html = "<html><body>%s</body></html>" % obj.summary
        fname = "summary.html"
        full_path = os.path.join(base_path, fname)
        try:
            with open(full_path, "w") as fh:
                fh.write(html)
                print "file:///" + full_path
                self.summaryTxt.LoadURL("file:///" + full_path)
        except (OSError, IOError):
            print "Error writing html summary"
 
    #----------------------------------------------------------------------
    def update_display(self):
        """
        Update the RSS feed display
        """
        self.rssOlv.SetColumns([
            ColumnDefn("Title", "left", 200, "title"),
            ColumnDefn("Website", "left", 200, "website"),
            ])
        self.rssOlv.SetObjects(self.data)
 
########################################################################
class RssFrame(wx.Frame):
    """"""
 
    #----------------------------------------------------------------------
    def __init__(self):
        """Constructor"""
        wx.Frame.__init__(self, None, title="RSS Reader", size=(1200,800))
        panel = RssPanel(self)
        self.Show()
 
#----------------------------------------------------------------------
if __name__ == "__main__":
    app = wx.App(False)
    frame = RssFrame()
    app.MainLoop()

This code is a little complicated, so let’s spend some time figuring out what’s going on here. Along the top of the application, we have a label, a text control and a button. The text control is for adding RSS feed URLs. Once added, you click the button to retrieve the RSS feed. This happens by calling the get_data event handler. In said handler, we show a BusyInfo dialog that tells the user something is happening while we parse the feed. When the parsing is done, we dismiss the dialog and update the display.

If you select an item from the ObjectListView widget on the left, then you will see a summary of the article below. That bottom left widget is a small example of the WebView widget. It is basically a fully fledged web browser, so if you click a link, it will attempt to load it. You will notice that in that selection event handler, we actually save the HTML to a file and then load it into the WebView widget.

To actually view the entire article, you can double-click the item and it will load on the right in another WebView widget.

Wrapping Up

Wasn’t that fun? I thought it was. Anyway, at this point you should know enough to parse an RSS feed with Python and actually create something halfway useful to boot. Here are some improvement ideas:

  • add a way to save the feed data so you don’t have to parse it every time you start the program
  • create a way to save the articles you like
  • hide the articles you read, but also add a filter to show just the read articles or maybe all the articles

Creating applications like this always sets my imagination in motion. I hope it does the same for you. Have fun and happy coding!

Related Links

The post wxPython: Creating a Simple RSS Reader appeared first on The Mouse Vs. The Python.


wxPython: Wrap Widgets with WrapSizer

$
0
0

wxPython 2.9 introduced the world to a new type of sizer that can take widgets and automatically make them “wrap” around as you resize the frame. That sizer is known as wx.WrapSizer. For some reason, it is relatively unknown, so we’ll spend a few minutes going over how to use it in this article.

To follow along with this tutorial, you will need to have wxPython 2.9 or greater. Once you’ve got that, we can continue.

Using WrapSizer

wxWrapSizerDemo

The wx.WrapSizer widget works in much the same way as a wx.BoxSizer. All you need to do to use it is to instantiate it and add widgets to it. Let’s take a look at a simple program:

import random
import wx
from wx.lib.buttons import GenButton
 
########################################################################
class MyPanel(wx.Panel):
    """"""
 
    #----------------------------------------------------------------------
    def __init__(self, parent):
        """Constructor"""
        wx.Panel.__init__(self, parent)
 
        text = "ABCDEFGHIJKLMNOPQRSTUVWXYZ"
        sizer = wx.WrapSizer()
        for letter in text:
            btn = GenButton(self, label=letter)
            r = random.randint(128, 255)
            g = random.randint(128, 255)
            b = random.randint(128, 255)
            btn.SetBackgroundColour(wx.Colour(r,g,b))
            btn.Refresh()
            sizer.Add(btn, 0, wx.ALL, 5)
 
        self.SetSizer(sizer)
 
########################################################################
class MyFrame(wx.Frame):
    """"""
 
    #----------------------------------------------------------------------
    def __init__(self):
        """Constructor"""
        wx.Frame.__init__(self, None, title="WrapSizers", size=(400,500))
        panel = MyPanel(self)
        self.Show()
 
#----------------------------------------------------------------------
if __name__ == "__main__":
    app = wx.App(False)
    frame = MyFrame()
    app.MainLoop()

Here we create an instance of our sizer and then loop over the letters in the alphabet, creating a button for each letter. We also change the background color of each button to add a little variety. If you haven’t guessed yet, this example is based on the wxPython demo example. You will notice that as you resize the frame, the buttons will rearrange themselves as best they can. Sometimes, they may even change size a bit. Let’s learn a bit more about this sizer!

The wx.WrapSizer can be told its orientation and you can pass it flags at instantiation. The orientation flags are wx.HORIZONTAL and wx.VERTICAL. Horizontal is the default. According to the documentation “the flags parameter can be a combination of the values EXTEND_LAST_ON_EACH_LINE which will cause the last item on each line to use any remaining space on that line and REMOVE_LEADING_SPACES which removes any spacer elements from the beginning of a row.” The WrapSizer also has four additional methods beyond the normal wx.Sizer method: CalcMin (calculates minimal size), InformFirstDirection (appears not be used), IsSpaceItem (can be used to treat some normal items as spacers) and RecalcSizes (implements the calculation of a box sizer’s dimensions and then sets the size of its children).

That just about wraps up all the information on this widget. Hopefully you will find many good uses for this relatively unknown sizer in your own projects.

Note: This code was tested using wxPython 2.9.3 (classic) with Python 2.7.3 on Windows 7.

wxPython: An Introduction to Sized Controls

$
0
0

The wxPython toolkit provides an alternative to using Sizers for layout that is known as “sized_controls”. These controls or widgets are basically top-level widgets (like frame, panel, dialog, etc) that have sizing logic built into them. This article will cover all four types of sized_controls. They are as follows:

  • SizedPanel
  • SizedScrolledPanel
  • SizedFrame
  • SizedDialog

The SizedScrolledPanel widget is new as of wxPython 2.9.3.1, but the other 3 types of controls are available in wxPython 2.8.8 and possibly older versions (see Trac for more info). Just keep that in mind if you are on wxPython 2.8. If you are ready, we can get started!

The SizedPanel

wxSizedPanelDemo

The SizedPanel widget will automatically create a sizer for itself. The sizer defaults to a vertical box sizer. The widget will also automatically add any children you add to the panel into the sizer. If you need to change the sizer type, just call SetSizerType() and pass it “horizontal”, “vertical”, “form” (a 2-col flex grid sizer), or “grid”. Should you choose “grid”, then you can also pass two more arguments: “cols” and “rows”. According to the wxPython demo: This class also applies control borders that adhere to the native platform’s Human Interface Guidelines (HIG) on Win, GTK and Mac.

Let’s take a look at a simple example:

# sized_panel.py
 
import wx
import wx.lib.sized_controls as sc
 
########################################################################
class SizedPanel(sc.SizedPanel):
    """"""
 
    #----------------------------------------------------------------------
    def __init__(self, parent):
        """Constructor"""
        sc.SizedPanel.__init__(self, parent)        
 
        for item in range(5):
            txt = wx.TextCtrl(self)
 
########################################################################
class RegularFrame(wx.Frame):
    """"""
 
    #----------------------------------------------------------------------
    def __init__(self):
        """Constructor"""
        wx.Frame.__init__(self, None, title="SizedPanel demo",
                          size=(400,300))
        panel = SizedPanel(self)
        self.Show()
 
#----------------------------------------------------------------------
if __name__ == "__main__":
    app = wx.App(False)
    frame = RegularFrame()
    app.MainLoop()

The code to add widgets to sizers is much less verbose when using a sized control widget. If you want to try a little experiment, try adding the following line of code right before the loop in the SizedPanel class:

self.SetSizerType("horizontal")

This will cause the widgets to be added horizontally instead of vertically. Just for comparison’s sake, let’s take a moment and look at the regular way to do this kind of layout with a sizer:

import wx
 
########################################################################
class RegularPanel(wx.Panel):
    """"""
 
    #----------------------------------------------------------------------
    def __init__(self, parent):
        """Constructor"""
        wx.Panel.__init__(self, parent)
 
        sizer = wx.BoxSizer(wx.VERTICAL)
        for item in range(5):
            txt = wx.TextCtrl(self)
            sizer.Add(txt, 0, wx.ALL, 5)
 
        self.SetSizer(sizer)
 
########################################################################
class RegularFrame(wx.Frame):
    """"""
 
    #----------------------------------------------------------------------
    def __init__(self):
        """Constructor"""
        wx.Frame.__init__(self, None, title="SizedPanel demo",
                          size=(400,300))
        panel = RegularPanel(self)
        self.Show()
 
#----------------------------------------------------------------------
if __name__ == "__main__":
    app = wx.App(False)
    frame = RegularFrame()
    app.MainLoop()

The main difference between these two pieces of code is that the RegularPanel code has several extra lines related to setting up the sizer, adding widgets to the sizer and then setting the sizer.

The SizedScrolledPanel

wxSizedScrolledPanelDemo

The SizedScrolledPanel is very similar to the ScrolledPanel widget in that if there are too many widgets to show on one panel, it will create a scrollbar. The main difference is that once again, the sized control will do all the sizer stuff for us. Here’s an example:

# sized_scrolled_panel.py
 
import wx
import wx.lib.sized_controls as sc
 
########################################################################
class MySizedScrolledPanel(sc.SizedScrolledPanel):
    """"""
 
    #----------------------------------------------------------------------
    def __init__(self, parent):
        """Constructor"""
        sc.SizedScrolledPanel.__init__(self, parent)
 
        for item in range(25):
            txt = wx.TextCtrl(self)
            txt.SetSizerProps(expand=True)
 
########################################################################
class MyFrame(wx.Frame):
    """"""
 
    #----------------------------------------------------------------------
    def __init__(self):
        """Constructor"""
        wx.Frame.__init__(self, None, title="SizedScrolledPanel Demo",
                          size=(400, 500))
        panel = MySizedScrolledPanel(self)
        self.Show()        
 
#----------------------------------------------------------------------
if __name__ == "__main__":
    app = wx.App(False)
    frame = MyFrame()
    app.MainLoop()

The code above is very similar to the SizedPanel example, however I added in a little extra piece of logic to make the text controls expand. Did you see it? Take a look at the loop, right after we create the text control widget:

txt.SetSizerProps(expand=True)

By using a sized control, it adds a special method to our widgets that’s called SetSizerProps. The valid values for this method are “proportion”, “hgrow”, “vgrow”, “align”, “halign”, “valign”, “border”, “minsize” and “expand”. In this example, we set expand to boolean True.

The SizedFrame

wxSizedFrameDemo

The SizedFrame is a little bit different than the last two sized controls in that it automatically sets up a SizedPanel as its first child. If you want to get access to that panel, you will need to call GetContentsPane(). Let’s look at an example:

# sized_frame.py
 
import wx
import wx.lib.sized_controls as sc
 
########################################################################
class SizedFrame(sc.SizedFrame):
    """"""
 
    #----------------------------------------------------------------------
    def __init__(self):
        """Constructor"""
        sc.SizedFrame.__init__(self, None, title="SizedFrame Demo",
                               size=(400,500))
 
        panel = self.GetContentsPane()
 
        for item in range(5):
            btn = wx.Button(panel, label=str(item))
            btn.SetSizerProps(border=("all", 5))
 
        self.Show()
 
#----------------------------------------------------------------------
if __name__ == "__main__":
    app = wx.App()
    frame = SizedFrame()
    app.MainLoop()

Here we see that we need to extract the SizedPanel so we can add buttons to it. That was easy!

SizedDialog

sizedDlgDemo

The SizedDialog is very similar to the SizedFrame in that it too has a SizedPanel built into it. Let’s make a derivative of one of the demos from the wxPython demo so we can see how it works:

# sized_dialog.py
 
import wx
import wx.lib.sized_controls as sc
 
########################################################################
class MySizedDialog(sc.SizedDialog):
    """"""
 
    #----------------------------------------------------------------------
    def __init__(self):
        """Constructor"""
        sc.SizedDialog.__init__(self, None, title="SizedDialog Demo",
                                size=(400,500))
 
        panel = self.GetContentsPane()
 
        # row 1
        wx.StaticText(panel, -1, "Name")
        textCtrl = wx.TextCtrl(panel)
        textCtrl.SetSizerProps(expand=True)
 
        # row 2
        wx.StaticText(panel, -1, "Email")
        emailCtrl = wx.TextCtrl(panel)
        emailCtrl.SetSizerProps(expand=True)
 
        # row 3
        wx.StaticText(panel, -1, "Gender")
        wx.Choice(panel, -1, choices=["male", "female"])
 
        # row 4
        wx.StaticText(panel, -1, "State")
        wx.TextCtrl(panel, size=(60, -1)) # two chars for state
 
        # row 5
        wx.StaticText(panel, -1, "Title")
 
        # here's how to add a 'nested sizer' using sized_controls
        radioPane = sc.SizedPanel(panel, -1)
        radioPane.SetSizerType("horizontal")
 
        # make these children of the radioPane to have them use
        # the horizontal layout
        wx.RadioButton(radioPane, -1, "Mr.")
        wx.RadioButton(radioPane, -1, "Mrs.")
        wx.RadioButton(radioPane, -1, "Dr.")
        # end row 5
 
#----------------------------------------------------------------------
if __name__ == "__main__":
    app = wx.App(False)
    dlg = MySizedDialog()
    dlg.ShowModal()
    app.MainLoop()

This code demonstrates two new concepts. It shows a new sizer type (“form”) and it shows how to nest a sizer. The sizer type “form” basically tells wxPython to put the widgets into two columns instead of stacking them all vertically. Thus we have a StaticText and a TextCtrl on the same level with each other. The RadioButtons are all on their own row. How did that happen? This is where the nested sizer piece comes in. We create a new SizedPanel that we assign to radioPane and then we change its orientation to “horizontal”. Next we add the 3 RadioButtons to it by setting radioPane as their parent.

Wrapping Up

At this point you should have enough information to get started using wxPython’s sized controls for yourself. You have just learned how to use all four variants: SizedPanel, SizedScrolledPanel, SizedFrame and SizedDialog. You have also learned a little about how to nest sized controls in each other. Nesting is a very powerful tool that can help you create very complex interfaces. I think the best thing about sized controls is that they make using sizers more intuitive.

Additional Resouces

Download the Source

Note: The code in this article was tested using wxPython 2.9.4.0 (classic) and Python 2.7.3 on Windows 7

wxPython: Creating a File Downloading App

$
0
0

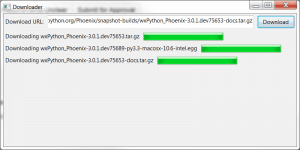
I’ve been thinking about creating a simple downloading script with wxPython for quite a while. Then I saw someone on StackOverflow asking about how to do it and I decided it was time to figure it out. Downloading a file with Python is trivial. I wrote about a couple of different ways to do that in a previous article. The big question was how to do it in such a way that I could update the UI as the file was downloading. It’s actually pretty easy and this article will show you how!


Getting Started

The script in this article will require you to have the 3rd party requests package installed. You will also need wxPython, of course. I’ll be using wxPython 2.9 in this article.


Diving In

wxDownloader

I ended up taking a few of my previous articles and combining their code bit by bit until I got what I wanted. I always find diving into the code the quickest way to see how to do things, so let’s take a look at the source:

import requests
import os
import wx
import wx.lib.scrolledpanel as scrolled
 
from threading import Thread
from wx.lib.pubsub import pub
 
########################################################################
class DownloadThread(Thread):
    """Downloading thread"""
 
    #----------------------------------------------------------------------
    def __init__(self, gnum, url, fsize):
        """Constructor"""
        Thread.__init__(self)
        self.fsize = fsize
        self.gnum = gnum
        self.url = url
        self.start()
 
    #----------------------------------------------------------------------
    def run(self):
        """
        Run the worker thread
        """
        local_fname = os.path.basename(self.url)
        count = 1
        while True:
            if os.path.exists(local_fname):
                tmp, ext = os.path.splitext(local_fname)
                cnt = "(%s)" % count
                local_fname = tmp + cnt + ext
                count += 1
            else:
                break
        req = requests.get(self.url, stream=True)
        total_size = 0
        print local_fname
        with open(local_fname, "wb") as fh:
            for byte in req.iter_content(chunk_size=1024):
                if byte:
                    fh.write(byte)
                    fh.flush()
                total_size += 1024
                if total_size < self.fsize:
                    wx.CallAfter(pub.sendMessage, 
                                 "update_%s" % self.gnum,
                                 msg=total_size)
        print "DONE!"
        wx.CallAfter(pub.sendMessage,
                     "update_%s" % self.gnum,
                     msg=self.fsize)
 
 
########################################################################
class MyGauge(wx.Gauge):
    """"""
 
    #----------------------------------------------------------------------
    def __init__(self, parent, range, num):
        """Constructor"""
        wx.Gauge.__init__(self, parent, range=range)
 
        pub.subscribe(self.updateProgress, "update_%s" % num)
 
    #----------------------------------------------------------------------
    def updateProgress(self, msg):
        """"""
        self.SetValue(msg)
 
########################################################################
class MyPanel(scrolled.ScrolledPanel):
    """"""
 
    #----------------------------------------------------------------------
    def __init__(self, parent):
        """Constructor"""
        scrolled.ScrolledPanel.__init__(self, parent)
 
        self.data = []
        self.download_number = 1
 
        # create the sizers
        self.main_sizer = wx.BoxSizer(wx.VERTICAL)
        dl_sizer = wx.BoxSizer(wx.HORIZONTAL)
 
        # create the widgets
        lbl = wx.StaticText(self, label="Download URL:")
        self.dl_txt = wx.TextCtrl(self)
        btn = wx.Button(self, label="Download")
        btn.Bind(wx.EVT_BUTTON, self.onDownload)
 
        # layout the widgets
        dl_sizer.Add(lbl, 0, wx.ALL|wx.CENTER, 5)
        dl_sizer.Add(self.dl_txt, 1, wx.EXPAND|wx.ALL, 5)
        dl_sizer.Add(btn, 0, wx.ALL, 5)
        self.main_sizer.Add(dl_sizer, 0, wx.EXPAND)
 
        self.SetSizer(self.main_sizer)
        self.SetAutoLayout(1)
        self.SetupScrolling()
 
    #----------------------------------------------------------------------
    def onDownload(self, event):
        """
        Update display with downloading gauges
        """
        url = self.dl_txt.GetValue()
        try:
            header = requests.head(url)
            fsize = int(header.headers["content-length"]) / 1024
 
            sizer = wx.BoxSizer(wx.HORIZONTAL)
            fname = os.path.basename(url)
            lbl = wx.StaticText(self, label="Downloading %s" % fname)
            gauge = MyGauge(self, fsize, self.download_number)
 
            sizer.Add(lbl, 0, wx.ALL|wx.CENTER, 5)
            sizer.Add(gauge, 0, wx.ALL|wx.EXPAND, 5)
            self.main_sizer.Add(sizer, 0, wx.EXPAND)
 
            self.Layout()
 
            # start thread
            DownloadThread(self.download_number, url, fsize)
            self.dl_txt.SetValue("")
            self.download_number += 1
        except Exception, e:
            print "Error: ", e
 
########################################################################
class DownloaderFrame(wx.Frame):
    """"""
 
    #----------------------------------------------------------------------
    def __init__(self):
        """Constructor"""
        wx.Frame.__init__(self, None, title="Downloader", size=(800, 400))
        panel = MyPanel(self)
        self.Show()
 
#----------------------------------------------------------------------
if __name__ == "__main__":
    app = wx.App(False)
    frame = DownloaderFrame()
    app.MainLoop()

Let’s take this code a part piece and piece to make it easier to explain. First off, we have to subclass the Thread class as follows:

########################################################################
class DownloadThread(Thread):
    """Downloading thread"""
 
    #----------------------------------------------------------------------
    def __init__(self, gnum, url, fsize):
        """Constructor"""
        Thread.__init__(self)
        self.fsize = fsize
        self.gnum = gnum
        self.url = url
        self.start()
 
    #----------------------------------------------------------------------
    def run(self):
        """
        Run the worker thread
        """
        local_fname = os.path.basename(self.url)
        count = 1
        while True:
            if os.path.exists(local_fname):
                tmp, ext = os.path.splitext(local_fname)
                cnt = "(%s)" % count
                local_fname = tmp + cnt + ext
                count += 1
            else:
                break
        req = requests.get(self.url, stream=True)
        total_size = 0
        print local_fname
        with open(local_fname, "wb") as fh:
            for byte in req.iter_content(chunk_size=1024):
                if byte:
                    fh.write(byte)
                    fh.flush()
                total_size += 1024
                if total_size < self.fsize:
                    wx.CallAfter(pub.sendMessage, 
                                 "update_%s" % self.gnum,
                                 msg=total_size)
        print "DONE!"
        wx.CallAfter(pub.sendMessage,
                     "update_%s" % self.gnum,
                     msg=self.fsize)

We pass in the gauge number (gnum), the url to download and the file size. The reason we pass in the gauge number is that each gauge instance needs to be able to update independently of the others gauges, so we need to keep track of which gauge we need to update. In the run method, we check and see if the filename already exists. If it does, we try appending a number to it and check to see if that file exists, etc. Once we find a filename that does not exist, we continue and tell requests to download the file as a stream. Then we pull down a byte at a time, write it to disk and tell the display to update. Once we drop out of the for loop that is pulling the file down, we send one last update to the gauge to tell it that it is done downloading.

Next up, we have to subclass the wx.Gauge:

########################################################################
class MyGauge(wx.Gauge):
    """"""
 
    #----------------------------------------------------------------------
    def __init__(self, parent, range, num):
        """Constructor"""
        wx.Gauge.__init__(self, parent, range=range)
 
        pub.subscribe(self.updateProgress, "update_%s" % num)
 
    #----------------------------------------------------------------------
    def updateProgress(self, msg):
        """"""
        self.SetValue(msg)

This is pretty simple. We just subclass wx.Gauge and set up a pubsub subscriber so it listens for updates just for itself. Then we add a method called updateProgress that we’ll call whenever the listener fires to actually update the gauge widget. Now we’re ready to look at the panel code:

########################################################################
class MyPanel(scrolled.ScrolledPanel):
    """"""
 
    #----------------------------------------------------------------------
    def __init__(self, parent):
        """Constructor"""
        scrolled.ScrolledPanel.__init__(self, parent)
 
        self.data = []
        self.download_number = 1
 
        # create the sizers
        self.main_sizer = wx.BoxSizer(wx.VERTICAL)
        dl_sizer = wx.BoxSizer(wx.HORIZONTAL)
 
        # create the widgets
        lbl = wx.StaticText(self, label="Download URL:")
        self.dl_txt = wx.TextCtrl(self)
        btn = wx.Button(self, label="Download")
        btn.Bind(wx.EVT_BUTTON, self.onDownload)
 
        # layout the widgets
        dl_sizer.Add(lbl, 0, wx.ALL|wx.CENTER, 5)
        dl_sizer.Add(self.dl_txt, 1, wx.EXPAND|wx.ALL, 5)
        dl_sizer.Add(btn, 0, wx.ALL, 5)
        self.main_sizer.Add(dl_sizer, 0, wx.EXPAND)
 
        self.SetSizer(self.main_sizer)
        self.SetAutoLayout(1)
        self.SetupScrolling()
 
    #----------------------------------------------------------------------
    def onDownload(self, event):
        """
        Update display with downloading gauges
        """
        url = self.dl_txt.GetValue()
        try:
            header = requests.head(url)
            fsize = int(header.headers["content-length"]) / 1024
 
            sizer = wx.BoxSizer(wx.HORIZONTAL)
            fname = os.path.basename(url)
            lbl = wx.StaticText(self, label="Downloading %s" % fname)
            gauge = MyGauge(self, fsize, self.download_number)
 
            sizer.Add(lbl, 0, wx.ALL|wx.CENTER, 5)
            sizer.Add(gauge, 0, wx.ALL|wx.EXPAND, 5)
            self.main_sizer.Add(sizer, 0, wx.EXPAND)
 
            self.Layout()
 
            # start thread
            DownloadThread(self.download_number, url, fsize)
            self.dl_txt.SetValue("")
            self.download_number += 1
        except Exception, e:
            print "Error: ", e

For the panel, I decided to go with the ScrolledPanel widget because I figured I might want to download a bunch of files and it would be nice if my downloaded added a scrollbar should the gauges run out of space. We set up the widgets and sizers in the __init__ method as usual. The onDownload method is where the action’s at. Here we grab the URL from the text control and attempt to get the file size from the server using the requests package. We divide by 1024 to get the Kilobyte size. If that is successful, we create a horizontal box sizer and add a static text and a gauge to it. Note that we tell the gauge which download it is and we also pass that number along to a new thread. We also reset the text control to be empty to make it easier to add a new URL. Finally we increment the download number so we’ll be ready to download a new file.

The rest of the code is pretty much boilerplate.


Wrapping Up

As you can see, this code was pretty simple to put together. I can see a lot to improve though. For example, it would be good if the application had some way to change where the downloads end up. Currently they just get saved in the same folder as the script. In retrospect, it should add the new downloads to the top and push the older ones down instead of the vice-versa. It would be cool to show the actual size of the file and how much is left. We could even add a tab for files that have finished downloading! Anyway, I hope that gives you some fun ideas for what you could do to improve the script.


Related Reading

wxPython: How to Catch All Exceptions

$
0
0

One of my friends on the wxPython Google Group asked how to catch any exception that happens in wxPython. The problem is complicated somewhat because wxPython is a wrapper on top of a C++ library (wxWidgets). You can read about the issue on the wxPython wiki. Several wxPython users mentioned using Python’s sys.excepthook to catch the errors. So I decided to write up an example showing how that worked based on something that Andrea Gavana posted on the aforementioned thread. We will also look at the solution that is in that wiki link.


Catching all the Errors with sys.excepthook

It ended up being a bit more work than I expected as I ended up needing to import Python’s traceback module and I decided I wanted to display the error, so I also created a dialog. Let’s take a look at the code:

import sys
import traceback
import wx
import wx.lib.agw.genericmessagedialog as GMD
 
########################################################################
class Panel(wx.Panel):
    """"""
 
    #----------------------------------------------------------------------
    def __init__(self, parent):
        """Constructor"""
        wx.Panel.__init__(self, parent)
 
        btn = wx.Button(self, label="Raise Exception")
        btn.Bind(wx.EVT_BUTTON, self.onExcept)
 
    #----------------------------------------------------------------------
    def onExcept(self, event):
        """
        Raise an error
        """
        1/0
 
########################################################################
class Frame(wx.Frame):
    """"""
 
    #----------------------------------------------------------------------
    def __init__(self):
        """Constructor"""
        wx.Frame.__init__(self, None, title="Exceptions")
        sys.excepthook = MyExceptionHook
        panel = Panel(self)
        self.Show()
 
########################################################################
class ExceptionDialog(GMD.GenericMessageDialog):
    """"""
 
    #----------------------------------------------------------------------
    def __init__(self, msg):
        """Constructor"""
        GMD.GenericMessageDialog.__init__(self, None, msg, "Exception!",
                                          wx.OK|wx.ICON_ERROR)
 
 
#----------------------------------------------------------------------
def MyExceptionHook(etype, value, trace):
    """
    Handler for all unhandled exceptions.
 
    :param `etype`: the exception type (`SyntaxError`, `ZeroDivisionError`, etc...);
    :type `etype`: `Exception`
    :param string `value`: the exception error message;
    :param string `trace`: the traceback header, if any (otherwise, it prints the
     standard Python header: ``Traceback (most recent call last)``.
    """
    frame = wx.GetApp().GetTopWindow()
    tmp = traceback.format_exception(etype, value, trace)
    exception = "".join(tmp)
 
    dlg = ExceptionDialog(exception)
    dlg.ShowModal()
    dlg.Destroy()    
 
#----------------------------------------------------------------------
if __name__ == "__main__":
    app = wx.App(False)
    frame = Frame()
    app.MainLoop()

This code is a bit involved so we’ll spend a little time on each section. The Panel code has one button on it that will call a method that will cause a ZeroDivisionError. In the Frame class, we set sys.excepthook to a custom function, MyExceptionHook. Let’s take a look at that:

#----------------------------------------------------------------------
def MyExceptionHook(etype, value, trace):
    """
    Handler for all unhandled exceptions.
 
    :param `etype`: the exception type (`SyntaxError`, `ZeroDivisionError`, etc...);
    :type `etype`: `Exception`
    :param string `value`: the exception error message;
    :param string `trace`: the traceback header, if any (otherwise, it prints the
     standard Python header: ``Traceback (most recent call last)``.
    """
    frame = wx.GetApp().GetTopWindow()
    tmp = traceback.format_exception(etype, value, trace)
    exception = "".join(tmp)
 
    dlg = ExceptionDialog(exception)
    dlg.ShowModal()
    dlg.Destroy()

This function accepts 3 arguments: etype, value and the traceback. We use the traceback module to put those pieces together to get us a full traceback that we can pass to our message dialog.


Using the Original Error Catching Method

Robin Dunn (creator of wxPython) mentioned that there was a solution on the wiki in that same thread above and that he’d like to see it used as a decorator. Here is my implementation:

import logging
import wx
import wx.lib.agw.genericmessagedialog as GMD
 
########################################################################
class ExceptionLogging(object):
 
    #----------------------------------------------------------------------
    def __init__(self, fn):
        self.fn = fn
 
        # create logging instance
        self.log = logging.getLogger("wxErrors")
        self.log.setLevel(logging.INFO)
 
        # create a logging file handler / formatter
        log_fh = logging.FileHandler("error.log")
        formatter = logging.Formatter("%(asctime)s - %(name)s - %(message)s")
        log_fh.setFormatter(formatter)
        self.log.addHandler(log_fh)
 
    #----------------------------------------------------------------------
    def __call__(self,evt):
        try:
            self.fn(self, evt)
        except Exception, e:
            self.log.exception("Exception")
 
########################################################################
class Panel(wx.Panel):
    """"""
 
    #----------------------------------------------------------------------
    def __init__(self, parent):
        """Constructor"""
        wx.Panel.__init__(self, parent)
 
        btn = wx.Button(self, label="Raise Exception")
        btn.Bind(wx.EVT_BUTTON, self.onExcept)
 
    #----------------------------------------------------------------------
    @ExceptionLogging
    def onExcept(self, event):
        """
        Raise an error
        """
        1/0
 
########################################################################
class Frame(wx.Frame):
    """"""
 
    #----------------------------------------------------------------------
    def __init__(self):
        """Constructor"""
        wx.Frame.__init__(self, None, title="Exceptions")
        panel = Panel(self)
        self.Show()
 
#----------------------------------------------------------------------
if __name__ == "__main__":
    app = wx.App(False)
    frame = Frame()
    app.MainLoop()

We use the custom exception class to log errors. To apply that class to our event handlers, we decorate them with the class using @classname, which in this case translates into @ExceptionLogging. Thus whenever this event handler is called, it is run through the decorator which wraps the event handler in a try/except and logs all exceptions to disk. I’m not entirely sure if both of the methods mentioned in this article can catch the same errors or not. Feel free to let me know in the comments.

wxPython: How to Disable a Wizard’s Next Button

$
0
0

The other day someone was asking a lot of questions on StackOverflow about how to work with wizards in wxPython. You can read the two original questions here and here. The code we’ll be looking at in this example is what I used to answer the questions on Stack. The primary question was how to disable the Next in a wxPython wizard.


How do you disable the Wizard’s Next Button anyway?

wxwizard

The idea that the original person had when they posted the question was that they wanted the user to fill out two text controls before being able to continue. That means that we need to disable the Next button until both text widgets have something in them. I came up with an idea where I use a wx.Timer to check the text controls once a second to see if they have data in them. If they do, then the timer’s event handler will enable the Next button. Let’s take a look:

import wx
import wx.wizard
 
########################################################################
class WizardPage(wx.wizard.PyWizardPage):
    #----------------------------------------------------------------------
    def __init__(self, parent, title):
        wx.wizard.PyWizardPage.__init__(self, parent)
        self.next = None
        self.prev = None
        self.initializeUI(title)
 
    #----------------------------------------------------------------------
    def initializeUI(self, title):      
        # create grid layout manager    
        self.sizer = wx.GridBagSizer()
        self.SetSizerAndFit(self.sizer)
 
    #----------------------------------------------------------------------
    def addWidget(self, widget, pos, span): 
        self.sizer.Add(widget, pos, span, wx.EXPAND)
 
    #----------------------------------------------------------------------
    # getters and setters 
    def SetPrev(self, prev):
        self.prev = prev
 
    #----------------------------------------------------------------------
    def SetNext(self, next):
        self.next = next
 
    #----------------------------------------------------------------------
    def GetPrev(self):
        return self.prev
 
    #----------------------------------------------------------------------
    def GetNext(self):
        return self.next
 
########################################################################
class MyWizard(wx.wizard.Wizard):
    """"""
 
    #----------------------------------------------------------------------
    def __init__(self):
        """Constructor"""
        wx.wizard.Wizard.__init__(self, None, -1, "Some Title")
        self.SetPageSize((500, 350))
 
        mypage1 = self.create_page1()
 
        forward_btn = self.FindWindowById(wx.ID_FORWARD) 
        forward_btn.Disable()
 
        self.timer = wx.Timer(self)
        self.Bind(wx.EVT_TIMER, self.onUpdate, self.timer)
        self.timer.Start(1)
 
        self.RunWizard(mypage1)
 
    #----------------------------------------------------------------------
    def create_page1(self):
        page1 = WizardPage(self, "Page 1")
        d = wx.StaticText(page1, label="test")
        page1.addWidget(d, (2, 1), (1,5))
 
        self.text1 = wx.TextCtrl(page1)
        page1.addWidget(self.text1, (3,1), (1,5))
 
        self.text2 = wx.TextCtrl(page1)
        page1.addWidget(self.text2, (4,1), (1,5))
 
        page2 = WizardPage(self, "Page 2")
        page2.SetName("page2")
        self.text3 = wx.TextCtrl(page2)
        self.Bind(wx.wizard.EVT_WIZARD_PAGE_CHANGED, self.onPageChanged)
        page3 = WizardPage(self, "Page 3")
 
        # Set links
        page2.SetPrev(page1)
        page1.SetNext(page2)
        page3.SetPrev(page2)
        page2.SetNext(page3)
 
        return page1
 
    #----------------------------------------------------------------------
    def onPageChanged(self, event):
        """"""
        page = event.GetPage()
 
        if page.GetName() == "page2":
            self.text3.SetValue(self.text2.GetValue())
 
    #----------------------------------------------------------------------
    def onUpdate(self, event):
        """
        Enables the Next button if both text controls have values
        """
        value_one = self.text1.GetValue()
        value_two = self.text2.GetValue()
        if value_one and value_two:
            forward_btn = self.FindWindowById(wx.ID_FORWARD) 
            forward_btn.Enable()
            self.timer.Stop()
 
#----------------------------------------------------------------------
def main():
    """"""
    wizard = MyWizard()
 
#----------------------------------------------------------------------
if __name__ == "__main__":
    app = wx.App(False)
    main()
    app.MainLoop()

Let’s break this down a bit. The first class we’ll look at is MyWizard, which is where all the action is anyway. MyWizard is a subclass of wxPython’s Wizard class. In the __init__, we create a page and we find the Next button so we can disable it. Then we create and start our timer object while binding it to the onUpdate method. Finally, we run the wizard. When we create a wizard page, we instantiate the WizardPage class. That class is actually pretty self-explanatory. Anyway, we end up creating several widgets that we place on the wizard page. The only other interesting bit is in the onUpdate method. Here we check to see if the user has entered data into both of the text controls.

If they have, then we find the Next button, enable it and stop the timer. There is a potential bug here. What happens if the user goes and removes some content AFTER they have filled them both out? The Next button doesn’t disable itself again. Here’s an updated version of the onUpdate method that fixes that issue:

#----------------------------------------------------------------------
def onUpdate(self, event):
    """
    Enables the Next button if both text controls have values
    """
    value_one = self.text1.GetValue()
    value_two = self.text2.GetValue()
    forward_btn = self.FindWindowById(wx.ID_FORWARD) 
    if value_one and value_two:
        forward_btn.Enable()
    else:
        if forward_btn.IsEnabled():
            forward_btn.Disable()

Here we never stop the timer. Instead, the timer is constantly checking the values of the text controls and if it finds that one of them doesn’t have data AND the next button is enabled, the handler will disable the button.


Wrapping Up

Disabling the Next button in a wxPython wizard isn’t particularly hard, it’s just a bit convoluted. It would be nice if the API for the Wizard widget allowed a bit more access to the standard widgets it creates. However, now you know how to work with them and change their state. Use this knowledge wisely!


Related Reading

wxPython: Catching Exceptions from Anywhere

$
0
0

The wxPython Google Group was discussing different methods of catching exceptions in wxPython the other day. If you use wxPython a lot, you will soon realize that some exceptions are difficult to catch. The wxPython Wiki explains why. Anyway, the fellows on the list were recommending the use of sys.excepthook. So I took one of the methods they mentioned and created a little example:

import sys
import traceback
import wx
 
########################################################################
class Panel(wx.Panel):
    """"""
 
    #----------------------------------------------------------------------
    def __init__(self, parent):
        """Constructor"""
        wx.Panel.__init__(self, parent)
 
        btn = wx.Button(self, label="Raise Exception")
        btn.Bind(wx.EVT_BUTTON, self.onExcept)
 
    #----------------------------------------------------------------------
    def onExcept(self, event):
        """
        Raise an error
        """
        1/0
 
########################################################################
class Frame(wx.Frame):
    """"""
 
    #----------------------------------------------------------------------
    def __init__(self):
        """Constructor"""
        wx.Frame.__init__(self, None, title="Exceptions")
        sys.excepthook = MyExceptionHook
        panel = Panel(self)
        self.Show()
 
########################################################################
class ExceptionDialog(GMD.GenericMessageDialog):
    """"""
 
    #----------------------------------------------------------------------
    def __init__(self, msg):
        """Constructor"""
        GMD.GenericMessageDialog.__init__(self, None, msg, "Exception!",
                                          wx.OK|wx.ICON_ERROR)        
 
#----------------------------------------------------------------------
def MyExceptionHook(etype, value, trace):
    """
    Handler for all unhandled exceptions.
 
    :param `etype`: the exception type (`SyntaxError`, `ZeroDivisionError`, etc...);
    :type `etype`: `Exception`
    :param string `value`: the exception error message;
    :param string `trace`: the traceback header, if any (otherwise, it prints the
     standard Python header: ``Traceback (most recent call last)``.
    """
    frame = wx.GetApp().GetTopWindow()
    tmp = traceback.format_exception(etype, value, trace)
    exception = "".join(tmp)
 
    dlg = ExceptionDialog(exception)
    dlg.ShowModal()
    dlg.Destroy()    
 
#----------------------------------------------------------------------
if __name__ == "__main__":
    app = wx.App(False)
    frame = Frame()
    app.MainLoop()

In this example, we create a panel with a button that will deliberately cause an exception to be raised. We catch the exception by redirecting sys.excepthook to our MyExceptionHook function. This function will format the traceback of the exception, format it to make it readable and then display a dialog with the exception information. Robing Dunn, creator of wxPython, thought it would be good if someone came up with a decorator that we could use to catch exception with that could then be added as an example to the wiki page.

My first idea for a decorator was the following:

import logging
import wx
 
########################################################################
class ExceptionLogging(object):
 
    #----------------------------------------------------------------------
    def __init__(self, fn):
        self.fn = fn
 
        # create logging instance
        self.log = logging.getLogger("wxErrors")
        self.log.setLevel(logging.INFO)
 
        # create a logging file handler / formatter
        log_fh = logging.FileHandler("error.log")
        formatter = logging.Formatter("%(asctime)s - %(name)s - %(message)s")
        log_fh.setFormatter(formatter)
        self.log.addHandler(log_fh)
 
    #----------------------------------------------------------------------
    def __call__(self, evt):
        try:
            self.fn(self, evt)
        except Exception, e:
            self.log.exception("Exception")
 
########################################################################
class Panel(wx.Panel):
    """"""
 
    #----------------------------------------------------------------------
    def __init__(self, parent):
        """Constructor"""
        wx.Panel.__init__(self, parent)
 
        btn = wx.Button(self, label="Raise Exception")
        btn.Bind(wx.EVT_BUTTON, self.onExcept)
 
    #----------------------------------------------------------------------
    @ExceptionLogging
    def onExcept(self, event):
        """
        Raise an error
        """
        1/0
 
########################################################################
class Frame(wx.Frame):
    """"""
 
    #----------------------------------------------------------------------
    def __init__(self):
        """Constructor"""
        wx.Frame.__init__(self, None, title="Exceptions")
        panel = Panel(self)
        self.Show()
 
#----------------------------------------------------------------------
if __name__ == "__main__":
    app = wx.App(False)
    frame = Frame()
    app.MainLoop()

In this code, we create a class that creates a logging instance. Then we override the __call__ method to wrap a method call in an exception handler so we can catch exceptions. Basically what we’re doing here is creating a class decorator. Next we decorate an event handler with our exception logging class. This wasn’t exactly what Mr. Dunn wanted, as the decorator needed to be able to wrap other functions too. So I edited it a bit and came up with the following minor adjustment:

import logging
import wx
 
class ExceptionLogging(object):
    def __init__(self, fn, *args, **kwargs):
        self.fn = fn
 
        # create logging instance
        self.log = logging.getLogger("wxErrors")
        self.log.setLevel(logging.INFO)
 
        # create a logging file handler / formatter
        log_fh = logging.FileHandler("error.log")
        formatter = logging.Formatter("%(asctime)s - %(name)s - %(message)s")
        log_fh.setFormatter(formatter)
        self.log.addHandler(log_fh)
 
    def __call__(self, *args, **kwargs):
        try:
            self.fn(self, *args, **kwargs)
        except Exception, e:
            self.log.exception("Exception")
 
########################################################################
class Panel(wx.Panel):
    """"""
 
    #----------------------------------------------------------------------
    def __init__(self, parent):
        """Constructor"""
        wx.Panel.__init__(self, parent)
 
        btn = wx.Button(self, label="Raise Exception")
        btn.Bind(wx.EVT_BUTTON, self.onExcept)
 
    #----------------------------------------------------------------------
    @ExceptionLogging
    def onExcept(self, event):
        """
        Raise an error
        """
        1/0
 
########################################################################
class Frame(wx.Frame):
    """"""
 
    #----------------------------------------------------------------------
    def __init__(self):
        """Constructor"""
        wx.Frame.__init__(self, None, title="Exceptions")
        panel = Panel(self)
        self.Show()
 
#----------------------------------------------------------------------
if __name__ == "__main__":
    app = wx.App(False)
    frame = Frame()
    app.MainLoop()

This time the __call__ method can accept any number of arguments or keyword arguments, which gives it a bit more flexibility. This still wasn’t what Robin Dunn wanted, so he wrote up the following example:

from __future__ import print_function
 
import logging
import wx
 
print(wx.version())
 
def exceptionLogger(func, loggerName=''):
    """
    A simple decorator that will catch and log any exceptions that may occur
    to the root logger.
    """
    assert callable(func)
    mylogger = logging.getLogger(loggerName)
 
    # wrap a new function around the callable
    def logger_func(*args, **kw):
        try:
            if not kw:
                return func(*args)
            return func(*args, **kw)
        except Exception:
            mylogger.exception('Exception in %s:', func.__name__)
 
    logger_func.__name__ = func.__name__
    logger_func.__doc__ = func.__doc__
    if hasattr(func, '__dict__'):
        logger_func.__dict__.update(func.__dict__)
    return logger_func    
 
 
def exceptionLog2Logger(loggerName):
    """
    A decorator that will catch and log any exceptions that may occur
    to the named logger.
    """
    import functools
    return functools.partial(exceptionLogger, loggerName=loggerName)    
 
 
########################################################################
class Panel(wx.Panel):
    """"""
 
    #----------------------------------------------------------------------
    def __init__(self, parent):
        """Constructor"""
        wx.Panel.__init__(self, parent)
 
        btn = wx.Button(self, label="Raise Exception")
        btn.Bind(wx.EVT_BUTTON, self.onExcept)
 
    #----------------------------------------------------------------------
 
    @exceptionLog2Logger('testLogger')
    def onExcept(self, event):
        """
        Raise an error
        """
        print(self, event)
        print(isinstance(self, wx.Panel))
 
        #trigger an exception
        1/0
 
########################################################################
class Frame(wx.Frame):
    """"""
 
    #----------------------------------------------------------------------
    def __init__(self):
        """Constructor"""
        wx.Frame.__init__(self, None, title="Exceptions")
        panel = Panel(self)
        self.Show()
 
#----------------------------------------------------------------------
if __name__ == "__main__":
 
    # set up the default logger
    log = logging.getLogger('testLogger')
    log.setLevel(logging.INFO)
 
    # create a logging file handler / formatter
    log_fh = logging.FileHandler("error.log")
    formatter = logging.Formatter("%(asctime)s - %(name)s - %(message)s")
    log_fh.setFormatter(formatter)
    log.addHandler(log_fh)
 
    app = wx.App(False)
    frame = Frame()
    app.MainLoop()

This shows a couple of different decorator examples. This example demonstrates the more traditional methodology of decorator construction. It has a bit more metaprogramming in it though. The first example checks to make sure what is passed to it is actually callable. Then it creates a logger and wraps the callable with an exception handler. Before it returns the wrapped function, the wrapped function is modified so that it has the same name and docstring as the original function passed to it. I believe you could drop that and use functools.wraps instead, but being explicit is probably better in a tutorial.


Wrapping Up

Now you know how you catch exceptions in a couple of different ways. Hopefully you will find this helpful in your own application design. Have fun!

wxPython: How to Create a Login Dialog

$
0
0

I’ve been using wxPython for quite a while now and I see certain questions come up on a fairly frequent basis. One of the popular ones is how to ask the user for their credentials before loading up the rest of the application. There are several approaches to this, but I am going to focus on a simple solution as I believe this solution can be used as the basis for more complex solutions.

Basically what we want to happen is for the user to see a login dialog where they have to enter their username and password. If they enter it correctly, then the program will continue to load and they’ll see the main interface. You see this a lot on websites with a common use case being web email clients. Desktop applications don’t include this functionality as often, although you will see it for Stamps.com’s application and for law enforcement software. We will be creating a dialog that looks like this:

wxLogin.png

Let’s take a look at some code:

import wx
 
if "2.8" in wx.version():
    import wx.lib.pubsub.setupkwargs
    from wx.lib.pubsub import pub
else:
    from wx.lib.pubsub import pub
 
 
########################################################################
class LoginDialog(wx.Dialog):
    """
    Class to define login dialog
    """
 
    #----------------------------------------------------------------------
    def __init__(self):
        """Constructor"""
        wx.Dialog.__init__(self, None, title="Login")
 
        # user info
        user_sizer = wx.BoxSizer(wx.HORIZONTAL)
 
        user_lbl = wx.StaticText(self, label="Username:")
        user_sizer.Add(user_lbl, 0, wx.ALL|wx.CENTER, 5)
        self.user = wx.TextCtrl(self)
        user_sizer.Add(self.user, 0, wx.ALL, 5)
 
        # pass info
        p_sizer = wx.BoxSizer(wx.HORIZONTAL)
 
        p_lbl = wx.StaticText(self, label="Password:")
        p_sizer.Add(p_lbl, 0, wx.ALL|wx.CENTER, 5)
        self.password = wx.TextCtrl(self, style=wx.TE_PASSWORD|wx.TE_PROCESS_ENTER)
        p_sizer.Add(self.password, 0, wx.ALL, 5)
 
        main_sizer = wx.BoxSizer(wx.VERTICAL)
        main_sizer.Add(user_sizer, 0, wx.ALL, 5)
        main_sizer.Add(p_sizer, 0, wx.ALL, 5)
 
        btn = wx.Button(self, label="Login")
        btn.Bind(wx.EVT_BUTTON, self.onLogin)
        main_sizer.Add(btn, 0, wx.ALL|wx.CENTER, 5)
 
        self.SetSizer(main_sizer)
 
    #----------------------------------------------------------------------
    def onLogin(self, event):
        """
        Check credentials and login
        """
        stupid_password = "pa$$w0rd!"
        user_password = self.password.GetValue()
        if user_password == stupid_password:
            print "You are now logged in!"
            pub.sendMessage("frameListener", message="show")
            self.Destroy()
        else:
            print "Username or password is incorrect!"
 
########################################################################
class MyPanel(wx.Panel):
    """"""
 
    #----------------------------------------------------------------------
    def __init__(self, parent):
        """Constructor"""
        wx.Panel.__init__(self, parent)
 
 
########################################################################
class MainFrame(wx.Frame):
    """"""
 
    #----------------------------------------------------------------------
    def __init__(self):
        """Constructor"""
        wx.Frame.__init__(self, None, title="Main App")
        panel = MyPanel(self)
        pub.subscribe(self.myListener, "frameListener")
 
        # Ask user to login
        dlg = LoginDialog()
        dlg.ShowModal()
 
    #----------------------------------------------------------------------
    def myListener(self, message, arg2=None):
        """
        Show the frame
        """
        self.Show()
 
if __name__ == "__main__":
    app = wx.App(False)
    frame = MainFrame()
    app.MainLoop()

The majority of this code is taken up by the subclass of wx.Dialog that we are calling LoginDialog. You will notice that we have set the password text control widget to use the wx.TE_PASSWORD style, which will hide the characters that the user types into that control. The event handler is where the real action is. Here we define a silly password that we use to compare to the one that the user enters. In the real world, you would probably take a hash of the password that is entered and compare it to one that is stored in a database. Or you might send the credentials to your authentication server and have it tell you if the user’s credentials are legitimate or not. For demonstration purposes, we opt for the simple approach and just check the password. You will notice that we completely ignore what the user enters for a username. This is not realistic, but again, this is just an example.

Anyway, if the user enters the correct password, the event handler sends a message via pubsub to our MainFrame object telling it to finish loading and then the dialog is destroyed. There are other ways to tell the main frame to continue, such as using a flag in the dialog class that we can check against. Here is an implementation that demonstrates this latter method:

import wx
 
########################################################################
class LoginDialog(wx.Dialog):
    """
    Class to define login dialog
    """
 
    #----------------------------------------------------------------------
    def __init__(self):
        """Constructor"""
        wx.Dialog.__init__(self, None, title="Login")
        self.logged_in = False
 
        # user info
        user_sizer = wx.BoxSizer(wx.HORIZONTAL)
 
        user_lbl = wx.StaticText(self, label="Username:")
        user_sizer.Add(user_lbl, 0, wx.ALL|wx.CENTER, 5)
        self.user = wx.TextCtrl(self)
        user_sizer.Add(self.user, 0, wx.ALL, 5)
 
        # pass info
        p_sizer = wx.BoxSizer(wx.HORIZONTAL)
 
        p_lbl = wx.StaticText(self, label="Password:")
        p_sizer.Add(p_lbl, 0, wx.ALL|wx.CENTER, 5)
        self.password = wx.TextCtrl(self, style=wx.TE_PASSWORD|wx.TE_PROCESS_ENTER)
        self.password.Bind(wx.EVT_TEXT_ENTER, self.onLogin)
        p_sizer.Add(self.password, 0, wx.ALL, 5)
 
        main_sizer = wx.BoxSizer(wx.VERTICAL)
        main_sizer.Add(user_sizer, 0, wx.ALL, 5)
        main_sizer.Add(p_sizer, 0, wx.ALL, 5)
 
        btn = wx.Button(self, label="Login")
        btn.Bind(wx.EVT_BUTTON, self.onLogin)
        main_sizer.Add(btn, 0, wx.ALL|wx.CENTER, 5)
 
        self.SetSizer(main_sizer)
 
    #----------------------------------------------------------------------
    def onLogin(self, event):
        """
        Check credentials and login
        """
        stupid_password = "pa$$w0rd!"
        user_password = self.password.GetValue()
        if user_password == stupid_password:
            print "You are now logged in!"
            self.logged_in = True
            self.Close()
        else:
            print "Username or password is incorrect!"
 
########################################################################
class MyPanel(wx.Panel):
    """"""
 
    #----------------------------------------------------------------------
    def __init__(self, parent):
        """Constructor"""
        wx.Panel.__init__(self, parent)
 
 
########################################################################
class MainFrame(wx.Frame):
    """"""
 
    #----------------------------------------------------------------------
    def __init__(self):
        """Constructor"""
        wx.Frame.__init__(self, None, title="Main App")
        panel = MyPanel(self)
 
        # Ask user to login
        dlg = LoginDialog()
        dlg.ShowModal()
        authenticated = dlg.logged_in
        if not authenticated:
            self.Close()
 
        self.Show()
 
if __name__ == "__main__":
    app = wx.App(False)
    frame = MainFrame()
    app.MainLoop()

In this example, we added a flag in the dialog subclass that we called self.logged_in. If the user enters the correct password, we tell the dialog to close. This causes wxPython to return control back to the MainFrame class where we check that variable to see if the user is logged in or not. If they are not, we close the application. Otherwise we load the application.


Wrapping Up

There are a few enhancements we could add, such as setting the focus to the first text control or adding a cancel button. I’m sure you can think of a few others yourself. Overall though, this should get you started.


wxPython: Converting wx.DateTime to Python datetime

$
0
0

The wxPython GUI toolkit includes its own date / time capabilities. Most of the time, you can just use Python’s datetime and time modules and you’ll be fine. But occasionally you’ll find yourself needing to convert from wxPython’s wx.DateTime objects to Python’s datetime objects. You may encounter this when you use the wx.DatePickerCtrl widget.

Fortunately, wxPython’s calendar module has some helper functions that can help you convert datetime objects back and forth between wxPython and Python. Let’s take a look:

def _pydate2wxdate(date):
     import datetime
     assert isinstance(date, (datetime.datetime, datetime.date))
     tt = date.timetuple()
     dmy = (tt[2], tt[1]-1, tt[0])
     return wx.DateTimeFromDMY(*dmy)
 
def _wxdate2pydate(date):
     import datetime
     assert isinstance(date, wx.DateTime)
     if date.IsValid():
          ymd = map(int, date.FormatISODate().split('-'))
          return datetime.date(*ymd)
     else:
          return None

You can use these handy functions in your own code to help with your conversions. I would probably put these into a controller or utilities script. I would also rewrite it slightly so I wouldn’t import Python’s datetime module inside the functions. Here’s an example:

import datetime
import wx
 
def pydate2wxdate(date):
     assert isinstance(date, (datetime.datetime, datetime.date))
     tt = date.timetuple()
     dmy = (tt[2], tt[1]-1, tt[0])
     return wx.DateTimeFromDMY(*dmy)
 
def wxdate2pydate(date):
     assert isinstance(date, wx.DateTime)
     if date.IsValid():
          ymd = map(int, date.FormatISODate().split('-'))
          return datetime.date(*ymd)
     else:
          return None

You can read more about this topic on this old wxPython mailing thread. Have fun and happy coding!

Python 101: Redirecting stdout

$
0
0

Redirecting stdout to something most developers will need to do at some point or other. It can be useful to redirect stdout to a file or to a file-like object. I have also redirected stdout to a text control in some of my desktop GUI projects. In this article we will look at the following:

  • Redirecting stdout to a file (simple)
  • The Shell redirection method
  • Redirecting stdout using a custom context manager
  • Python 3’s contextlib.redirect_stdout()
  • Redirect stdout to a wxPython text control

Redirecting stdout

The easiest way to redirect stdout in Python is to just assign it an open file object. Let’s take a look at a simple example:

import sys
 
def redirect_to_file(text):
    original = sys.stdout
    sys.stdout = open('/path/to/redirect.txt', 'w')
    print('This is your redirected text:')
    print(text)
    sys.stdout = original
 
    print('This string goes to stdout, NOT the file!')
 
if __name__ == '__main__':Redirecting stdout / stderr
    redirect_to_file('Python rocks!')

Here we just import Python’s sys module and create a function that we can pass strings that we want to have redirected to a file. We save off a reference to sys.stdout so we can restore it at the end of the function. This can be useful if you intend to use stdout for other things. Before you run this code, be sure to update the path to something that will work on your system. When you run it, you should see the following in your file:


This is your redirected text:
Python rocks!

That last print statement will go to stdout, not the file.


Shell Redirection

Shell redirection is also pretty common, especially in Linux, although Windows also works the same way in most cases. Let’s create a silly example of a noisy function that we will call noisy.py:

# noisy.py
def noisy(text):
    print('The noisy function prints a lot')
    print('Here is the string you passed in:')
    print('*' * 40)
    print(text)
    print('*' * 40)
    print('Thank you for calling me!')
 
if __name__ == '__main__':
    noisy('This is a test of Python!')

You will notice that we didn’t import the sys module this time around. The reason is that we don’t need it since we will be using shell redirection. To do shell redirection, open a terminal (or command prompt) and navigate to the folder where you saved the code above. Then execute the following command:


python noisy.py > redirected.txt

The greater than character (i.e. >) tells your operating system to redirect stdout to the filename you specified. At this point you should have a file named “redirected.txt” in the same folder as your Python script. If you open it up, the file should have the following contents:


The noisy function prints a lot
Here is the string you passed in:
****************************************
This is a test of Python!
****************************************
Thank you for calling me!

Now wasn’t that pretty cool?


Redirect stdout with a context manager

Another fun way to redirect stdout is by using a context manager. Let’s create a custom context manager that accepts a file object to redirect stdout to:

import sys
from contextlib import contextmanager
 
 
@contextmanager
def custom_redirection(fileobj):
    old = sys.stdout
    sys.stdout = fileobj
    try:
        yield fileobj
    finally:
        sys.stdout = old
 
if __name__ == '__main__':
    with open('/path/to/custom_redir.txt', 'w') as out:
        with custom_redirection(out):
            print('This text is redirected to file')
            print('So is this string')
        print('This text is printed to stdout')

When you run this code, it will write out two lines of text to your file and one to stdout. As usual, we reset stdout at the end of the function.


Using contextlib.redirect_stdout

Python 3.4 added the redirect_stdout function to their contextlib module. Let’s try using that to create a context manager to redirect stdout:

import sys
from contextlib import redirect_stdout
 
def redirected(text, path):
    with open(path, 'w') as out:
        with redirect_stdout(out):
            print('Here is the string you passed in:')
            print('*' * 40)
            print(text)
            print('*' * 40)
 
if __name__ == '__main__':
    path = '/path/to/red.txt'
    text = 'My test to redirect'
    redirected(text, path)

This code is a little simpler because the built-in function does all the yielding and resetting of stdout automatically for you. Otherwise, it works in pretty much the same way as our custom context manager.


Redirecting stdout in wxPython

wxredirect

I have written about redirecting stdout in wxPython on several occasions. The following code is actually from an article I wrote in 2009 and updated in 2015:

import sys
import wx
 
class MyForm(wx.Frame):
 
    def __init__(self):
        wx.Frame.__init__(self, None,
                          title="wxPython Redirect Tutorial")
 
        # Add a panel so it looks the correct on all platforms
        panel = wx.Panel(self, wx.ID_ANY)
        style = wx.TE_MULTILINE|wx.TE_READONLY|wx.HSCROLL
        log = wx.TextCtrl(panel, wx.ID_ANY, size=(300,100),
                          style=style)
        btn = wx.Button(panel, wx.ID_ANY, 'Push me!')
        self.Bind(wx.EVT_BUTTON, self.onButton, btn)
 
        # Add widgets to a sizer
        sizer = wx.BoxSizer(wx.VERTICAL)
        sizer.Add(log, 1, wx.ALL|wx.EXPAND, 5)
        sizer.Add(btn, 0, wx.ALL|wx.CENTER, 5)
        panel.SetSizer(sizer)
 
        # redirect text here
        sys.stdout = log
 
    def onButton(self, event):
        print "You pressed the button!"
 
# Run the program
if __name__ == "__main__":
    app = wx.App(False)
    frame = MyForm().Show()
    app.MainLoop()

This code just creates a simple frame with a panel that contains a multi-line text control and a button. Whenever you press the button, it will print out some text to stdout, which we have redirected to the text control. Give it a try to see how well it works!


Wrapping Up

Now you know several different methods for redirecting stdout to files. Some methods are better than others. Personally I thought it was cool that Python 3 now has a context manager built-in just for this purpose. Speaking of which, Python 3 also has a function for redirecting stderr. All of these examples can be modified slightly to support redirecting stderr or both stdout and stderr. The very last thing we touched on was redirecting stdout to a text control in wxPython. This can be really useful for debugging or for grabbing the output from a subprocess, although in the latter case you will need to print out the output to have it redirected correctly.


Related Reading

ANN: The wxPython Cookbook Kickstarter

$
0
0

Several years ago, the readers of this blog asked me to take some of my articles and turn them into a cookbook on wxPython. I have finally decided to do just that. I am including over 50 recipes that I am currently editing to make them more consistent and updating them to be compatible with the latest versions of wxPython. I currently have nearly 300 pages of content!

To help fund the initial production of the book, I am doing a fun little Kickstarter campaign for the project. The money raised will be used for the unique perks offered in the campaign as well as various production costs related to the book, such as ISBN acquisition, artwork, software expenses, advertising, etc.

In case you don’t know what wxPython is, the wxPython package is a popular toolkit for creating cross platform desktop user interfaces. It works on Windows, Mac and Linux with little to no modification of your code base.

The examples in my book will work with both wxPython 3.0.2 Classic as well as wxPython Phoenix, which is the bleeding edge of wxPython that supports Python 3. If I discover any recipes that do not work with Phoenix, they will be clearly marked or there will be an alternative example given that does work.

Here is a listing of the current set of recipes in no particular order:

  • Adding / Removing Widgets Dynamically
  • How to put a background image on a panel
  • Binding Multiple Widgets to the Same Handler
  • Catching Exceptions from Anywhere
  • wxPython’s Context Managers
  • Converting wx.DateTime to Python datetime
  • Creating an About Box
  • How to Create a Login Dialog
  • How to Create a “Dark Mode”
  • Generating a Dialog from a Config File
  • How to Disable a Wizard’s Next Button
  • How to Use Drag and Drop
  • How to Drag and Drop a File From Your App to the OS
  • How to Edit Your GUI Interactively Using reload()
  • How to Embed an Image in the Title Bar
  • Extracting XML from the RichTextCtrl
  • How to Fade-in a Frame / Dialog
  • How to Fire Multiple Event Handlers
  • Making your Frame Maximize or Full Screen
  • Using wx.Frame Styles
  • Get the Event Name Instead of an Integer
  • How to Get Children Widgets from a Sizer
  • How to Use the Clipboard
  • Catching Key and Char Events
  • Learning How Focus Works in wxPython
  • Making Your Text Flash
  • Minimizing to System Tray
  • Using ObjectListView instead of ListCtrl
  • Making a Panel Self-Destruct
  • How to Switch Between Panels
  • wxPython: Using PyDispatcher instead of Pubsub
  • Creating Graphs with PyPlot
  • Redirect Python’s Logging Module to a TextCtrl
  • Redirecting stdout / stderr
  • Resetting the Background Color
  • Saving Data to a Config File
  • How to Take a Screenshot of Your wxPython App and Print it
  • Creating a Simple Notebook
  • Ensuring Only One Instance Per Frame
  • Storing Objects in ComboBox or ListBox Widgets
  • Syncing Scrolling Between Two Grids
  • Creating Taskbar Icons
  • A wx.Timer Tutorial
  • How to Update a Progress Bar from a Thread
  • Updating Your Application with Esky
  • Creating a URL Shortener
  • Using Threads in wxPython
  • How to Create a Grid in XRC
  • An Introduction to XRC

 Note: Recipe names and order are subject to change

wxpython_cookbook_final

wxPython Cookbook Sample Chapters

$
0
0

My newest book will be my own home brewed version of a wxPython Cookbook. If you’re interested in learning more about it, then please check out the Kickstarter campaign. The brief synopsis is that it will have a little over 50 recipes in the book and around 300 pages of content.

To help you make an informed decision about whether or not you would like to support the book, I am releasing a few sample chapters. You can download them here as a PDF. Please note that these chapters are in a beta state. I will be updating the vast majority of the book with new screenshots and updated code examples where appropriate as well as various other tweaks and enhancements.

wxPython Cookbook Cover Story

$
0
0

I always spend some time thinking about how I want my book’s cover to look. When I was designing the Cookbook’s cover, I thought mostly about food and chefs. I had originally thought I might have some kind of kitchen scene with mice in chef hats and a snake on the mantle. But I wanted to take the idea of cooking and put a twist on it.

Instead of a kitchen, I thought of cowboys herding cattle and how they usually had a cook with them. So I went with that idea, although I didn’t have the herds of animals added to the cover.

To help differentiate the Cookbook from my previous works, I hired a different artist from my previous titles named Liza Tretyakova. You can check out some of her work on Behance or even contact her directly by email (schimmel@inbox.ru) if you happen to need a great artist.

I thought it might be fun for you to see how the cover art evolved as I worked with the artist to get my ideas for the cover turned into reality. Let’s start with the first sketch I got from Liza:

wxpython_cookbook_cover_sketch

This sketch impressed me quite a bit as my previous artists always gave me much rougher sketches to look at. The next step was to add a touch of color to the cover:

wxpython_cookbook_color_sketch

At this point, I hadn’t really thought too much about making each mouse unique in its coloring. Liza suggested that idea and I agreed. The next to last step was to add almost full color to the cover:

wxpython_cookbook_color

This looked really good so I approved it and Liza finished the cover. As you’ve probably already seen, it looks like this:

wxpython_cookbook_final

This whole process took Liza and I about a week and a half. I think it turned out quite well!

Be sure to check out the Kickstarter if you’d like to support this book or you’d like to get a good deal on my previous titles.

Viewing all 80 articles
Browse latest View live