I’ve been toying with the idea of doing a hard cover version of my books for a long time so I thought I might try it out with the Cookbook. I went ahead and ran the numbers using my printer on demand resources and discovered that a regular hard cover isn’t crazy expensive. So I have added a new perk priced at $35 for a hard cover version of the book.
But wait! There’s more! Since the cookbook will have so many screenshots and code examples, it occurred to me that it might be fun to offer a color version of the book. That way you can see the screenshots in full color and you’ll also be able to view the syntax highlighting in the code examples too! Unfortunately, printing in color is crazy expensive. But if you are interested in that option, it is available at $100.
All versions of the book will be signed. If there’s a lot of interest in the black-and-white hard cover, I’ll increase the number of items available for that one.
To get either of these editions or the regular paperback, you will need to pledge on Kickstarter.
I am excited to announce that the wxPython Cookbook is now available for Pre-Order. You can get your digital copy on Gumroad or Leanpub now. You can get a sample of the book on Leanpub if you’d like to “try before you buy”.
There will be over 50 recipes in this book. The examples in my book will work with both wxPython 3.0.2 Classic as well as wxPython Phoenix, which is the bleeding edge of wxPython that supports Python 3. If I discover any recipes that do not work with Phoenix, they will be clearly marked or there will be an alternative example given that does work.
Here is a partial listing of the current set of recipes in no particular order:
Adding / Removing Widgets Dynamically
How to put a background image on a panel
Binding Multiple Widgets to the Same Handler
Catching Exceptions from Anywhere
wxPython’s Context Managers
Converting wx.DateTime to Python datetime
Creating an About Box
How to Create a Login Dialog
How to Create a “Dark Mode”
Generating a Dialog from a Config File
How to Disable a Wizard’s Next Button
How to Use Drag and Drop
How to Drag and Drop a File From Your App to the OS
How to Edit Your GUI Interactively Using reload()
How to Embed an Image in the Title Bar
Extracting XML from the RichTextCtrl
How to Fade-in a Frame / Dialog
How to Fire Multiple Event Handlers
Making your Frame Maximize or Full Screen
Using wx.Frame Styles
Get the Event Name Instead of an Integer
How to Get Children Widgets from a Sizer
How to Use the Clipboard
Catching Key and Char Events
Learning How Focus Works in wxPython
Making Your Text Flash
Minimizing to System Tray
Using ObjectListView instead of ListCtrl
You can read more about the project in my Kickstarter announcement article. Please note that the Kickstarter campaign is over.
I am happy to announce that I now have all the chapters for my latest book, wxPython Cookbook, ready to be checked out. I still consider the book to be in beta mode as I need to go through each chapter and check them over as much as possible this month, but I am also pretty confident that the book is over 90% complete. Some chapters still need a screenshot or two added and I also plan to add another chapter or two as well.
For those of you who like raw data, there are currently 51 recipes in the book + the introduction and installation chapters. There are over 300 pages of content, which is more than either of my previous books!
I hope to do some polishing this week by adding the missing screenshots and also writing a brand new chapter. I am also hoping to get some of the code examples into Github this week. I do apologize for the delay in getting that done. Life has been really crazy on my end.
You can get early access to the book on Leanpub and Gumroad. You will also receive the final product + updates if you purchase the book from either of those websites. You can also check out the original Kickstarter campaign to learn more about the book.
It’s the holiday season so I am putting all my books on sale starting today. The sale will run through December 23rd. You can purchase any of my books for $6.99 on Gumroad or Leanpub. I’m actually recommending Leanpub now as I find its user interface much easier to navigate for my readers, but if you already have a Gumroad account, then feel free to use that.
You will receive the books in PDF, mobi and epub from both Leanpub and Gumroad.
wxPython Cookbook (95% finished…you will receive the early version + the finished product)
Softcover editions
I have 10 more copies of the first run of Python 201: Intermediate Python that you can now purchase. You will also receive the digital versions of the book. Note that the first run had a mistake in the asyncio chapter that has been rectified in the digital copies. The future versions of the paperback will be fixed soon.
I recently finished up Mmy third book, wxPython Cookbook and I am officially releasing it today. My wxPython Cookbook is my longest book yet, clocking in at over 340 pages and over 50 recipes. I have a full table of contents on Leanpub for anyone who is interested in the nitty gritty details.
Here are the current places that you can get a copy of the book:
I always put a lot of thought into the covers of my book. For my first book on wxPython, I thought it would be fun to do a cookbook because I already had a lot of recipes on my blog. So I went with the idea of doing a cookbook. For the cover, my first thought was to have some kind of kitchen scene with mice cooks. Then I decided that was too obvious and decided to go with the idea of an Old West cover with cowboy (or cow mice) cooking at a fire.
I asked Liza Tretyakova, my cover artist for wxPython Cookbook, to do a quick interview about herself. Here is what she had to say:
Can you tell us a little about yourself (hobbies, education, etc):
My name is Liza Tretyakova, I’m a free-lance illustrator currently working in Moscow.
Education:
Moscow State University, Faculty of History of Arts
BA(Hons) Illustration, University of Plymouth
I work as an illustrator for about 10 years. I love horses and I used to have a horse. Also I’m interested in archery. I like reading and spending a lot of time with my daughter Yara, who is 7 years old.
What motivated you to be an illustrator versus some other profession?
Since I was a child I have been drawing all the time and it just happened that I started to work as an illustrator, it turned into a profession.
What process do you go through when you are creating a new piece of art?
It is different every time, there is no specific “recipe”
Do you have any advice for someone who wants to be an illustrator?
You should try to draw every day, the more the better.
Do you have anything else you would like to say?
It was a pleasure working with you!
Thanks so much for doing the interview and for agreeing to be my illustrator for my wxPython Cookbook.
The wxPython GUI toolkit comes with many widgets. A common control is a tree widget. wxPython has several different tree widgets, including the regular wx.TreeCtrl, the newer DVC_TreeCtrl and the pure Python variants, CustomTreeCtrl and HyperTreeList. In this article, we will focus on the regular wx.TreeCtrl and learn the basics of how to create and use one.
Creating a Simple Tree
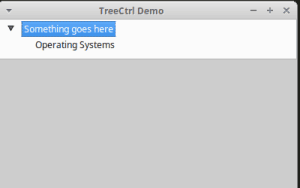
Creating a TreeCtrl is actually quite easy. The wxPython demo has a fairly complex example, so I wasn’t able to use it here. Instead I ended up taking the demo example and stripping it down as much as I could. Here’s the result:
In this example, we create a subclass of wx.TreeCtrl that doesn’t do anything. Then we create a panel subclass where we instantiate the tree and add a root and sub-item. Finally we create the frame that holds the panel and run the application. You should end up with something that looks similar to the following:
This is a pretty boring example, so let’s make something a bit more interesting.
Creating an XML Viewer
Something that I’ve wanted to do for some time now is to create an XML editor with Python. To get started, I wrote some code a couple of weekends ago that could read XML into a TreeCtrl for viewing the tag elements. For this example, I will be using some sample XML I found on Microsoft’s MSDN website:
<?xmlversion="1.0"?><catalog><bookid="bk101"><author>Gambardella, Matthew</author><title>XML Developer's Guide</title><genre>Computer</genre><price>44.95</price><publish_date>2000-10-01</publish_date><description>An in-depth look at creating applications
with XML.</description></book><bookid="bk102"><author>Ralls, Kim</author><title>Midnight Rain</title><genre>Fantasy</genre><price>5.95</price><publish_date>2000-12-16</publish_date><description>A former architect battles corporate zombies,
an evil sorceress, and her own childhood to become queen
of the world.</description></book><bookid="bk103"><author>Corets, Eva</author><title>Maeve Ascendant</title><genre>Fantasy</genre><price>5.95</price><publish_date>2000-11-17</publish_date><description>After the collapse of a nanotechnology
society in England, the young survivors lay the
foundation for a new society.</description></book><bookid="bk104"><author>Corets, Eva</author><title>Oberon's Legacy</title><genre>Fantasy</genre><price>5.95</price><publish_date>2001-03-10</publish_date><description>In post-apocalypse England, the mysterious
agent known only as Oberon helps to create a new life
for the inhabitants of London. Sequel to Maeve
Ascendant.</description></book><bookid="bk105"><author>Corets, Eva</author><title>The Sundered Grail</title><genre>Fantasy</genre><price>5.95</price><publish_date>2001-09-10</publish_date><description>The two daughters of Maeve, half-sisters,
battle one another for control of England. Sequel to
Oberon's Legacy.</description></book><bookid="bk106"><author>Randall, Cynthia</author><title>Lover Birds</title><genre>Romance</genre><price>4.95</price><publish_date>2000-09-02</publish_date><description>When Carla meets Paul at an ornithology
conference, tempers fly as feathers get ruffled.</description></book><bookid="bk107"><author>Thurman, Paula</author><title>Splish Splash</title><genre>Romance</genre><price>4.95</price><publish_date>2000-11-02</publish_date><description>A deep sea diver finds true love twenty
thousand leagues beneath the sea.</description></book><bookid="bk108"><author>Knorr, Stefan</author><title>Creepy Crawlies</title><genre>Horror</genre><price>4.95</price><publish_date>2000-12-06</publish_date><description>An anthology of horror stories about roaches,
centipedes, scorpions and other insects.</description></book><bookid="bk109"><author>Kress, Peter</author><title>Paradox Lost</title><genre>Science Fiction</genre><price>6.95</price><publish_date>2000-11-02</publish_date><description>After an inadvertant trip through a Heisenberg
Uncertainty Device, James Salway discovers the problems
of being quantum.</description></book><bookid="bk110"><author>O'Brien, Tim</author><title>Microsoft .NET: The Programming Bible</title><genre>Computer</genre><price>36.95</price><publish_date>2000-12-09</publish_date><description>Microsoft's .NET initiative is explored in
detail in this deep programmer's reference.</description></book><bookid="bk111"><author>O'Brien, Tim</author><title>MSXML3: A Comprehensive Guide</title><genre>Computer</genre><price>36.95</price><publish_date>2000-12-01</publish_date><description>The Microsoft MSXML3 parser is covered in
detail, with attention to XML DOM interfaces, XSLT processing,
SAX and more.</description></book><bookid="bk112"><author>Galos, Mike</author><title>Visual Studio 7: A Comprehensive Guide</title><genre>Computer</genre><price>49.95</price><publish_date>2001-04-16</publish_date><description>Microsoft Visual Studio 7 is explored in depth,
looking at how Visual Basic, Visual C++, C#, and ASP+ are
integrated into a comprehensive development
environment.</description></book></catalog>
The first thing we need to decide is what Python XML parser we want to use. I personally like lxml the best, but Python’s own ElementTree is certainly a viable option and actually quite easy to switch too if you start out with lxml. But for this example, we will be using lxml. Let’s take a look:
The main change here is in the TreeCtrl subclass, although we had to make some small modifications in the other classes to pass in the XML file path. Let’s focus on the TreeCtrl class though. First we read the XML from the file and load it into lxml’s objectify module. At this point, we have an XML object that we can use to populate the TreeCtrl with data. So we add the root and then loop over the top-level children in the XML. For each top level element, we add an item to the root of the TreeCtrl. This is extremely basic as we should also be checking each element to see if it has children too. We don’t. Instead we just assume that it does and call the TreeCtrl’s SetItemHasChildren() method. This adds an arrow to the element to allow expanding of the element.
Lastly we expand the root and bind an event to EVT_TREE_ITEM_EXPANDING which will allow us to update the sub-elements when they get expanded. You can see how this is done in the onItemExpanding event handler and the add_book_elements() which is called by the event handler. Here we actually DO check the element to see if it has children using lxml’s getchildren(). If it does, then we call SetItemHasChildren(). The other thing I want to point out is all the calls to SetPyData(). The SetPyData() method is for saving data into the tree item. In this case, we are saving the XML element into the tree item itself, which we can get access to again via GetPyData(). This will be important if we want to add editing functionality to the GUI.
Other Odds and Ends
The wxPython demo also demonstrates some interesting tidbits. For example, it shows that you can add a wx.ImageList to your TreeCtrl. It also shows some of the other tree specific events you can bind to. Such as:
EVT_TREE_ITEM_COLLAPSED
EVT_TREE_SEL_CHANGED
EVT_TREE_BEGIN_LABEL_EDIT
EVT_TREE_END_LABEL_EDIT
EVT_TREE_ITEM_ACTIVATED
Of course, you can also bind to mouse events like EVT_LEFT_DCLICK and EVT_RIGHT_DOWN too.
If you’d like to make the tree elements editable, then you’ll need to pass the wx.TR_EDIT_LABELS style flag in when you instantiate the tree. Since my example is just a viewer, I didn’t feel the need to do that. There are some other style flags mentioned in the demo and in the documentation that you may also want to check out.
Wrapping Up
At this point, I think you should be able to get started using wxPython’s handy wx.TreeCtrl. It is quite powerful and easy to utilize. Should you find yourself needing to do something more custom, then I highly recommend checking out one of wxPython’s alternate tree controls, such as the CustomTreeCtrl or HyperTreeList.
Most applications come with the Status Bar. The status bar is the widget along the bottom of most applications that you use every day. They give you information about what line you’re editing in a text editor or when you last saved. In wxPython, you can add a status bar to your frame by using the wx.StatusBar class. In this article, we will learn all about how to use status bars in wxPython.
No Status Bars
It’s always good to start at the beginning. So we will begin our journey by looking at some sample code that shows what a frame looks like without a status bar:
When you run this code, you should see something like the following:
Well that was pretty simple. Let’s find out how to add a status bar!
Adding a Status Bar
Of course not adding something was pretty simple. But you will soon find that adding a simple one-field status bar is also really easy in wxPython. In fact, it’s really just a one line change! However to make it a bit more interesting, we will also set the status bar’s text to something too. Let’s take a look:
import wx
class MainFrame(wx.Frame):
def__init__(self):
wx.Frame.__init__(self, None, title='')
panel = wx.Panel(self)self.statusbar = self.CreateStatusBar(1)self.statusbar.SetStatusText('This goes in your statusbar')self.Show()if __name__ == '__main__':
app = wx.App(False)
frame = MainFrame()
app.MainLoop()
I am going to run this code on Windows 7 as I think Windows has one of the easiest to see status bars. When you run it, you should see something similar to this:
You will notice that when we created the status bar, we had to call the frame’s CreateStatusBar() method. The parameter we passed in told the status bar that we only wanted one field in the status bar.
Creating a Multi-Field Status Bar
A lot of applications can display multiple pieces of information to the user in the application’s status bar. Microsoft’s Word is a good example as it will list out page information, word count and more in separate sections of the status bar. You can show this kind of thing withc wxPython too. Let’s see an example:
In this example, we pass the number two to CreateStatusBar to create two equally sized sections in our status bar. Then we call SetStatusText(). You will note that the first call doesn’t specify which section to put its text. That’s because the default is zero. To put text in a field other than zero, we need to be more explicit. Thus in the second call to SetStatusText() we pass it a one (1) which tells wxPython to put the text in the second section of the status bar.
Changing Section Widths
You can specify the section widths via the status bar’s SetStatusWidths() method, which accepts a Python list. You can either set fixed width or variable widths in your status bar. For fixed, you just pass a Python list of integers where each integer represents the field’s size in pixels. If you’d rather do a variable width, then you will use a list that contains negative numbers. For example, if you had [-2, -1], the first field would take up 66% of the space while the second took up the remaining 33%. You can also mix fixed and variable, like this: [-2, -1, 50]. In this case, you are telling wxPython to take up 66% of the remaining space in the first field, 33% of the remaining space in the second field and 50 pixels in the 3rd field.
This may be easier to see visually, so let’s look at an example!
In this example, we want our first field to be 100 pixels wide with the second field being 300 pixels. When you run the code, you should see something like this:
Note that I resized the window to demonstrate that when the frame is wider then 400 pixels, the status bar looks kind of weird. This is a common problem when using fixed widths. You will have similar problems if you use absolute positioning of widgets instead of using sizers. Let’s see if we can fix the issue by using a mix of fixed width and variable widths. Here’s the change to the code:
You will note that we replaced the 300 pixels with a -1, which means the second field should take up all the space following the first 100 pixels. Here’s a screenshot:
This time the status bar doesn’t look so odd. You can resize the status bar as wide as you want now.
Getting the Status
You can also get the status bar’s status using the StatusBar’s GetStatusText() method. Let’s take a look:
You will note that to get the second field’s text, we had to tell GetStatusText explicitly by passing it a one.
Changing the Status Text
We’ve already looked at changing the status bar’s text with SetStatusText(). However, there are two more methods worth looking at: PushStatusText() and PopStatusText(). These use a stack so that when you call PushStatusText(), it puts the current status into memory on a stack and displays the string that you passed to it. When you call PopStatusText(), it will restore the previously stored text. However if you call SetStatusText() between the push and the pop, then the memory will be erased and pop will not restore the status string.
Note that PushStatusText() and PopStatusText() default to pushing and popping the first field. You will need to specify a different field to push and pop if you need to do that. Give this code a try and see what happens!
Wrapping Up
This article covered a lot of material. You learned how to create a StatusBar widget for your Frame. You learned how to split up the status bar into multiple fields of multiple widths. You also learned how to get the text from it and change the text too. I will also note that when you create a menubar, you can set each menu with a string that will show up in the status bar (if you have one) when you mouse over the menu item. I will leave that as an exercise for the reader to try though.
I recently decided to start putting together some fun example desktop applications using Python. I’ve been using wxPython to create the cross platform applications. My first one is called Boomslang XML and is a basic XML editor.
The name, Boomslang, comes from a large venomous snake. It’s name basically means “tree snake”, which I thought was appropriate since the user interface uses a tree widget to represent the structure of the XML document.
The current features in Boomslang include the following:
Opening / Editing multiple XML files
Auto save on edit of the XML
Recent file support
Some keyboard shortcuts (accelerators)
Add new XML nodes or attributes
Edit nodes and attributes
Delete nodes
Currently this is fairly beta, but I thought other people might find it interesting. I am aware of a couple of issues with it currently, such as the inability to delete attributes or not being able to add an XML node with spaces in it But I will get those fixed soon. In the meantime, feel free to check out the project over on Github.
Note: This project was tested with Python 2 and 3, wxPython 2.9, 3.0, and 4.0 using the lxml package on Windows 7, Xubuntu 16.04 and Mac OSX Sierra.
Every now and then, I see someone asking how to get the text for each item in a row of a ListCtrl in report mode. The ListCtrl does not make it very obvious how you would get the text in row one, column three for example. In this article we will look at how we might accomplish this task.
Getting Data from Any Column
Let’s start by creating a simple ListCtrl and using a button to populate it. Then we’ll add a second button for extracting the contents of the ListCtrl:
import wx
class MyForm(wx.Frame):
def__init__(self):
wx.Frame.__init__(self, None, wx.ID_ANY, "List Control Tutorial")# Add a panel so it looks the correct on all platforms
panel = wx.Panel(self, wx.ID_ANY)self.index = 0self.list_ctrl = wx.ListCtrl(panel, size=(-1,100),
style=wx.LC_REPORT
|wx.BORDER_SUNKEN)self.list_ctrl.InsertColumn(0, 'Subject')self.list_ctrl.InsertColumn(1, 'Due')self.list_ctrl.InsertColumn(2, 'Location', width=125)
btn = wx.Button(panel, label="Add Line")
btn2 = wx.Button(panel, label="Get Data")
btn.Bind(wx.EVT_BUTTON, self.add_line)
btn2.Bind(wx.EVT_BUTTON, self.get_data)
sizer = wx.BoxSizer(wx.VERTICAL)
sizer.Add(self.list_ctrl, 0, wx.ALL|wx.EXPAND, 5)
sizer.Add(btn, 0, wx.ALL|wx.CENTER, 5)
sizer.Add(btn2, 0, wx.ALL|wx.CENTER, 5)
panel.SetSizer(sizer)def add_line(self, event):
line = "Line %s"%self.indexself.list_ctrl.InsertStringItem(self.index, line)self.list_ctrl.SetStringItem(self.index, 1, "01/19/2010")self.list_ctrl.SetStringItem(self.index, 2, "USA")self.index += 1def get_data(self, event):
count = self.list_ctrl.GetItemCount()
cols = self.list_ctrl.GetColumnCount()for row inrange(count):
for col inrange(cols):
item = self.list_ctrl.GetItem(itemId=row, col=col)print(item.GetText())# Run the programif __name__ == "__main__":
app = wx.App(False)
frame = MyForm()
frame.Show()
app.MainLoop()
Let’s take a moment to break this code down a bit. The first button’s event handler is the first piece of interesting code. It demonstrates how to insert data into the ListCtrl. As you can see, that’s pretty straightforward as all we need to do to add a row is call InsertStringItem and then set each column’s text using SetStringItem. There are other types of items that we can insert into a ListCtrl besides a String Item, but that’s outside the scope of this article.
Next we should take a look at the get_data event handler. It grabs the row count using the ListCtrl’s GetItemCount method. We also get the number of columns in the ListCtrl via GetColumnCount. Finally we loop over the rows and extract each cell, which in ListCtrl parlance is known as an “item”. We use the ListCtrl’s GetItem method of this task. Now that we have the item, we can call the item’s GetText method to extract the text and print it to stdout.
Associating Objects to Rows
An easier way to do this sort of thing would be to associate an object to each row. Let’s take a moment to see how this might be accomplished:
import wx
class Car(object):
""""""def__init__(self, make, model, year, color="Blue"):
"""Constructor"""self.make = make
self.model = model
self.year = year
self.color = color
class MyPanel(wx.Panel):
""""""def__init__(self, parent):
"""Constructor"""
wx.Panel.__init__(self, parent)
rows = [Car("Ford", "Taurus", "1996"),
Car("Nissan", "370Z", "2010"),
Car("Porche", "911", "2009", "Red")]self.list_ctrl = wx.ListCtrl(self, size=(-1,100),
style=wx.LC_REPORT
|wx.BORDER_SUNKEN)self.list_ctrl.Bind(wx.EVT_LIST_ITEM_SELECTED, self.onItemSelected)self.list_ctrl.InsertColumn(0, "Make")self.list_ctrl.InsertColumn(1, "Model")self.list_ctrl.InsertColumn(2, "Year")self.list_ctrl.InsertColumn(3, "Color")
index = 0self.myRowDict = {}for row in rows:
self.list_ctrl.InsertStringItem(index, row.make)self.list_ctrl.SetStringItem(index, 1, row.model)self.list_ctrl.SetStringItem(index, 2, row.year)self.list_ctrl.SetStringItem(index, 3, row.color)self.myRowDict[index] = row
index += 1
sizer = wx.BoxSizer(wx.VERTICAL)
sizer.Add(self.list_ctrl, 0, wx.ALL|wx.EXPAND, 5)self.SetSizer(sizer)def onItemSelected(self, event):
""""""
currentItem = event.m_itemIndex
car = self.myRowDict[currentItem]print(car.make)print(car.model)print(car.color)print(car.year)class MyFrame(wx.Frame):
""""""def__init__(self):
"""Constructor"""
wx.Frame.__init__(self, None, wx.ID_ANY, "List Control Tutorial")
panel = MyPanel(self)self.Show()if __name__ == "__main__":
app = wx.App(False)
frame = MyFrame()
app.MainLoop()
In this example, we have a Car class that we will use to create Car object from. These Car objects will then be associated with a row in the ListCtrl. Take a look at MyPanel‘s __init__ method and you will see that we create a list of row objects and then loop over the row objects and insert them into the ListCtrl using the object’s attributes for the text values. You will also note that we have created a class attribute dictionary that use for associating the row’s index to the Car object that was inserted into the row.
We also bind the ListCtrl to EVT_LIST_ITEM_SELECTED so when an item is selected, it will call the onItemSelected method and print out the data from the row. You will note that we get the row’s index by using event.m_itemIndex. The rest of the code should be self-explanatory.
Wrapping Up
Now you know a couple of different approaches for extracting all the data from a ListCtrl. Personally, I really like using the ObjectListView widget. I feel that is superior to the ListCtrl as it has these kinds of features built-in. But it’s not included with wxPython so it’s an extra install.
The wxPython toolkit supports using keyboard shortcuts via the concept of Accelerators and Accelerator Tables. You can also bind directly to key presses, but in a lot of cases, you will want to go with Accelerators. The accelerator gives to the ability to add a keyboard shortcut to your application, such as the ubiquitous “CTRL+S” that most applications use for saving a file. As long as your application has focus, this keyboard shortcut can be added trivially.
Note that you will normally add an accelerator table to your wx.Frame instance. If you happen to have multiple frames in your application, then you may need to add an accelerator table to multiple frames depending on your design.
Let’s take a look at a simple example:
import wx
class MyForm(wx.Frame):
def__init__(self):
wx.Frame.__init__(self, None, title="Accelerator Tutorial",
size=(500,500))# Add a panel so it looks the correct on all platforms
panel = wx.Panel(self, wx.ID_ANY)
randomId = wx.NewId()self.Bind(wx.EVT_MENU, self.onKeyCombo, id=randomId)
accel_tbl = wx.AcceleratorTable([(wx.ACCEL_CTRL, ord('Q'),
randomId )])self.SetAcceleratorTable(accel_tbl)def onKeyCombo(self, event):
""""""print"You pressed CTRL+Q!"# Run the programif __name__ == "__main__":
app = wx.App(False)
frame = MyForm()
frame.Show()
app.MainLoop()
This can end up looking a bit ugly if you have a lot of keyboard shortcuts that you need to add to your application as you end upw tih a list of tuples that just looks kind of odd. You will find this way or writing an AcceleratorTable more often than not though. However there are other ways to add entries to your AcceleratorTable. Let’s take a look at an example from wxPython’s documentation:
Here we create a list of four wx.AcceleratorEntry() objects using a list comprehension. Then we access each of the entries in the list using the Python list’s index to call each entry’s Set method. The rest of the code is pretty similar to what you saw before. Let’s take a moment to make this code actually runnable:
import wx
class MyForm(wx.Frame):
def__init__(self):
wx.Frame.__init__(self, None, title="AcceleratorEntry Tutorial",
size=(500,500))# Add a panel so it looks the correct on all platforms
panel = wx.Panel(self, wx.ID_ANY)
exit_menu_item = wx.MenuItem(id=wx.NewId(), text="Exit",
helpString="Exit the application")
about_menu_item = wx.MenuItem(id=wx.NewId(), text='About')
ID_NEW_WINDOW = wx.NewId()
ID_ABOUT = wx.NewId()self.Bind(wx.EVT_MENU, self.on_new_window, id=ID_NEW_WINDOW)self.Bind(wx.EVT_MENU, self.on_about, id=ID_ABOUT)
entries = [wx.AcceleratorEntry()for i inrange(4)]
entries[0].Set(wx.ACCEL_CTRL, ord('N'),
ID_NEW_WINDOW, exit_menu_item)
entries[1].Set(wx.ACCEL_CTRL, ord('X'), wx.ID_EXIT)
entries[2].Set(wx.ACCEL_SHIFT, ord('A'), ID_ABOUT,
about_menu_item)
entries[3].Set(wx.ACCEL_NORMAL, wx.WXK_DELETE, wx.ID_CUT)
accel_tbl = wx.AcceleratorTable(entries)self.SetAcceleratorTable(accel_tbl)def on_new_window(self, event):
""""""print("You pressed CTRL+N!")def on_about(self, event):
print('You pressed SHIFT+A')# Run the programif __name__ == "__main__":
app = wx.App(False)
frame = MyForm()
frame.Show()
app.MainLoop()
First of all, I want to note that I don’t have all the accelerators hooked up. For example, “CTRL+X” won’t actually exit the program. But I did go ahead and hook up “CTRL+N” and “SHIFT+A”. Try running the code and see how it works.
You can also be slightly more explicit and create your AcceleratorEntry() objects one by one instead of using a list comprehension. Let’s modify our code a bit and see how that works:
import wx
class MyForm(wx.Frame):
def__init__(self):
wx.Frame.__init__(self, None,
title="AcceleratorEntry Tutorial",
size=(500,500))# Add a panel so it looks the correct on all platforms
panel = wx.Panel(self, wx.ID_ANY)
exit_menu_item = wx.MenuItem(id=wx.NewId(), text="Exit",
helpString="Exit the application")
about_menu_item = wx.MenuItem(id=wx.NewId(), text='About')
ID_NEW_WINDOW = wx.NewId()
ID_ABOUT = wx.NewId()self.Bind(wx.EVT_MENU, self.on_new_window, id=ID_NEW_WINDOW)self.Bind(wx.EVT_MENU, self.on_about, id=ID_ABOUT)
entry_one = wx.AcceleratorEntry(wx.ACCEL_CTRL, ord('N'),
ID_NEW_WINDOW,
exit_menu_item)
entry_two = wx.AcceleratorEntry(wx.ACCEL_SHIFT, ord('A'),
ID_ABOUT,
about_menu_item)
entries = [entry_one, entry_two]
accel_tbl = wx.AcceleratorTable(entries)self.SetAcceleratorTable(accel_tbl)def on_new_window(self, event):
""""""print("You pressed CTRL+N!")def on_about(self, event):
print('You pressed SHIFT+A')# Run the programif __name__ == "__main__":
app = wx.App(False)
frame = MyForm()
frame.Show()
app.MainLoop()
Frankly I think like this version the best as it’s the most explicit. The “Zen of Python” is always about advocating doing things explicitly over implicitly so I think this also follows that paradigm well.
Wrapping Up
Now you know a couple of different ways to create keyboard shortcuts (accelerators) for your application. They are very handy and can enhance your application’s usefulness.
I recently came across a question on StackOverflow where the user wanted to know how to drag images onto their image control in wxPython and have the dragged image resize into a thumbnail. This piqued my interest and I decided to figure out how to do it.
I knew that you could create a thumbnail in Python using the Pillow package. So if you’d like to follow along you will need to install Pillow and wxPython with pip:
pip install Pillow wxPython
Now that we have the latest versions of the packages we need, we can write some code. Let’s take a look:
Note: You will want to have wxPython 4 to ensure that this works correctly
importosimport wx
from PIL import Image
from wx.lib.pubsubimport pub
PhotoMaxSize = 240class DropTarget(wx.FileDropTarget):
def__init__(self, widget):
wx.FileDropTarget.__init__(self)self.widget = widget
def OnDropFiles(self, x, y, filenames):
image = Image.open(filenames[0])
image.thumbnail((PhotoMaxSize, PhotoMaxSize))
image.save('thumbnail.png')
pub.sendMessage('dnd', filepath='thumbnail.png')returnTrueclass PhotoCtrl(wx.App):
def__init__(self, redirect=False, filename=None):
wx.App.__init__(self, redirect, filename)self.frame = wx.Frame(None, title='Photo Control')self.panel = wx.Panel(self.frame)
pub.subscribe(self.update_image_on_dnd, 'dnd')self.createWidgets()self.frame.Show()def createWidgets(self):
instructions = 'Browse for an image or Drag and Drop'
img = wx.Image(240,240)self.imageCtrl = wx.StaticBitmap(self.panel, wx.ID_ANY,
wx.Bitmap(img))
filedroptarget = DropTarget(self)self.imageCtrl.SetDropTarget(filedroptarget)
instructLbl = wx.StaticText(self.panel, label=instructions)self.photoTxt = wx.TextCtrl(self.panel, size=(200,-1))
browseBtn = wx.Button(self.panel, label='Browse')
browseBtn.Bind(wx.EVT_BUTTON, self.on_browse)self.mainSizer = wx.BoxSizer(wx.VERTICAL)self.sizer = wx.BoxSizer(wx.HORIZONTAL)self.mainSizer.Add(wx.StaticLine(self.panel, wx.ID_ANY),
0, wx.ALL|wx.EXPAND, 5)self.mainSizer.Add(instructLbl, 0, wx.ALL, 5)self.mainSizer.Add(self.imageCtrl, 0, wx.ALL, 5)self.sizer.Add(self.photoTxt, 0, wx.ALL, 5)self.sizer.Add(browseBtn, 0, wx.ALL, 5)self.mainSizer.Add(self.sizer, 0, wx.ALL, 5)self.panel.SetSizer(self.mainSizer)self.mainSizer.Fit(self.frame)self.panel.Layout()def on_browse(self, event):
"""
Browse for file
"""
wildcard = "JPEG files (*.jpg)|*.jpg"
dialog = wx.FileDialog(None, "Choose a file",
wildcard=wildcard,
style=wx.OPEN)if dialog.ShowModal() == wx.ID_OK:
self.photoTxt.SetValue(dialog.GetPath())
dialog.Destroy()self.on_view()def update_image_on_dnd(self, filepath):
self.on_view(filepath=filepath)def on_view(self, filepath=None):
ifnot filepath:
filepath = self.photoTxt.GetValue()
img = wx.Image(filepath, wx.BITMAP_TYPE_ANY)# scale the image, preserving the aspect ratio
W = img.GetWidth()
H = img.GetHeight()if W > H:
NewW = PhotoMaxSize
NewH = PhotoMaxSize * H / W
else:
NewH = PhotoMaxSize
NewW = PhotoMaxSize * W / H
img = img.Scale(NewW,NewH)self.imageCtrl.SetBitmap(wx.Bitmap(img))self.panel.Refresh()if __name__ == '__main__':
app = PhotoCtrl()
app.MainLoop()
When you run this code, you should see something like this:
The first class subclass’s wx.FileDropTarget and does the thumbnail creation magic. You will note that we override the OnDropFiles() method and create a thumbnail using the PhotoMaxSize variable. Then we use pubsub to tell our wxPython application to update itself. The other class is actually a subclass of wx.App and contains all the bits and pieces we need to display images. Frankly we don’t need to subclass wx.App. We could have just as easily sub-classed from wx.Frame for this example.
Regardless, all we did in this code is create a frame and a panel object, subscribed to a specific subscription with pubsub so it listens for a message from the DropTarget class and then updates the display. You will note that when the application object receives a message via pubsub, it will call the update_image_on_dnd() method which in turn will call the onView() method. This code basically just scales down the image passed to it so it will fit in our wx.StaticBitmap control. Of course, since we’re already passing in an image that should fit, we could probably add some logic to this method that skips the scaling in certain cases. But I left it in there for when the user opens an image using the browse button.
Anyway, once we have the image scaled the way we want, we call SetBitmap and refresh the panel. Give it a try and see what you can do to improve this example!
I was recently asked about how to implement drag-and-drop of items in a wx.ListCtrl or in ObjectListView. Unfortunately neither control has this built-in although I did find an article on the wxPython wiki that demonstrated one way to do drag-and-drop of the items in a ListCtrl.
However I did think that implementing some buttons to move items around in an ObjectListView widget should be fairly easy to implement. So that’s what this article will be focusing on.
Changing Item Order
If you don’t have wxPython and ObjectListView installed, then you will want to use pip to install them:
pip install wxPython objectlistview
Once that is done, open up your favorite text editor or IDE and enter the following code:
import wx
from ObjectListView import ObjectListView, ColumnDefn
class Book(object):
"""
Model of the Book object
Contains the following attributes:
'ISBN', 'Author', 'Manufacturer', 'Title'
"""def__init__(self, title, author, isbn, mfg):
self.isbn = isbn
self.author = author
self.mfg = mfg
self.title = title
def__repr__(self):
return"<Book: {title}>".format(title=self.title)class MainPanel(wx.Panel):
def__init__(self, parent):
wx.Panel.__init__(self, parent=parent, id=wx.ID_ANY)self.current_selection = Noneself.products = [Book("wxPython in Action", "Robin Dunn",
"1932394621", "Manning"),
Book("Hello World", "Warren and Carter Sande",
"1933988495", "Manning"),
Book("Core Python Programming", "Wesley Chun",
"0132269937", "Prentice Hall"),
Book("Python Programming for the Absolute Beginner",
"Michael Dawson", "1598631128",
"Course Technology"),
Book("Learning Python", "Mark Lutz",
"0596513984", "O'Reilly")]self.dataOlv = ObjectListView(self, wx.ID_ANY,
style=wx.LC_REPORT|wx.SUNKEN_BORDER)self.setBooks()# Allow the cell values to be edited when double-clickedself.dataOlv.cellEditMode = ObjectListView.CELLEDIT_SINGLECLICK# create up and down buttons
up_btn = wx.Button(self, wx.ID_ANY, "Up")
up_btn.Bind(wx.EVT_BUTTON, self.move_up)
down_btn = wx.Button(self, wx.ID_ANY, "Down")
down_btn.Bind(wx.EVT_BUTTON, self.move_down)# Create some sizers
mainSizer = wx.BoxSizer(wx.VERTICAL)
mainSizer.Add(self.dataOlv, 1, wx.ALL|wx.EXPAND, 5)
mainSizer.Add(up_btn, 0, wx.ALL|wx.CENTER, 5)
mainSizer.Add(down_btn, 0, wx.ALL|wx.CENTER, 5)self.SetSizer(mainSizer)def move_up(self, event):
"""
Move an item up the list
"""self.current_selection = self.dataOlv.GetSelectedObject()
data = self.dataOlv.GetObjects()ifself.current_selection:
index = data.index(self.current_selection)if index >0:
new_index = index - 1else:
new_index = len(data)-1
data.insert(new_index, data.pop(index))self.products = data
self.setBooks()self.dataOlv.Select(new_index)def move_down(self, event):
"""
Move an item down the list
"""self.current_selection = self.dataOlv.GetSelectedObject()
data = self.dataOlv.GetObjects()ifself.current_selection:
index = data.index(self.current_selection)if index <len(data) - 1:
new_index = index + 1else:
new_index = 0
data.insert(new_index, data.pop(index))self.products = data
self.setBooks()self.dataOlv.Select(new_index)def setBooks(self):
self.dataOlv.SetColumns([
ColumnDefn("Title", "left", 220, "title"),
ColumnDefn("Author", "left", 200, "author"),
ColumnDefn("ISBN", "right", 100, "isbn"),
ColumnDefn("Mfg", "left", 180, "mfg")])self.dataOlv.SetObjects(self.products)class MainFrame(wx.Frame):
def__init__(self):
wx.Frame.__init__(self, parent=None, id=wx.ID_ANY,
title="ObjectListView Demo", size=(800,600))
panel = MainPanel(self)self.Show()if __name__ == "__main__":
app = wx.App(False)
frame = MainFrame()
app.MainLoop()
The code we care about most in this example are the move_up() and move_down() methods. Each of these methods will check to see if you have an item in the ObjectListView widget selected. It will also grab the current contents of the widgets. If you have an item selected, then it will grab that item’s index from the ObjectListView widget’s data that we grabbed when we called GetObjects(). Then we can use that index to determine whether we should increment (move_down) or decrement (move_up) its index depending on which of the buttons we press.
After we update the list with the changed positions, then we update self.products, which is our class variable that we use in the setBooks() to update our ObjectListView widget. Finally we actually call setBooks() and we reset the selection since our original selection moved.
Wrapping Up
I thought this was a neat little project that didn’t take very long to put together. I will note that there is at least one issue with this implementation and that is that it doesn’t work correctly when you select multiple items in the control. You could probably fix this by disabling multiple selection in your ObjectListView widget or by figuring out the logic to make it work with multiple selections. But I will leave that up the reader to figure out. Have fun an happy coding!
I was contacted earlier this year by Apress about republishing my book, wxPython Cookbook, under their branding. I thought it might be fun to see what I could learn from a publisher so I went with them as I have enjoyed several of their books in the past. The biggest change to the book is that I ended up grouping recipes into chapters instead of having each recipe be a stand-alone chapter. I also added a few new recipes to help fill in when some chapters weren’t easily sorted into groups.
Anyway, Apress just released the book in the past couple of days:
You can find the book over on Amazon or on the Apress website. You can also see a preview of the book on Google.
You can get 20% off of the book from Apress by using the following code: wx20. This code is good on the paperback and the eBook versions of the book until June 2018.
The code for the book is hosted on Apress’s Github account. I also host a copy on Github.
Regardless, feel free to check it out. If you already bought a copy of the wxPython Cookbook, then you don’t need to get this one too since it’s basically the same thing with a bit more polish and a handful of new recipes. I have plans for some other books that I will be self-publishing hopefully in 2018, so keep an eye on the blog for news about that!
I recently had my self-published book, “wxPython Cookbook” picked up by Apress and republished as wxPython Recipes. Since they gave me a few complimentary paperback copies, I have decided to do a little contest.
Rules
Post a comment telling me why you would want a copy
The most clever or heartfelt commenter will be chosen by me
The contest will run starting now until Monday, January 15th @ 11:59 p.m. CST.
The winner will be contacted by yours truly and I will sign the book and ship it wherever you want me to.
For those of you who want to purchase the book, Apress gave me a lame 20% off coupon that you can use for either the eBook or Paperback on their website: wx20
Every now and then, someone will ask about how they can run the demo code from wxPython’s demo outside of the demo. In other words, they wonder how you can extract the code from the demo and run it in your own. I think I wrote about this very topic quite some time ago on the wxPython wiki, but I thought I should write on the topic here as well.
What to do about the log
The first issue that I always see is that the demo code is riddled with calls to some kind of log. It’s always writing to that log to help the developer see how different events get fired or how different methods get called. This is all well and good, but it makes just copying the code out of the demo difficult. Let’s take the code from the wx.ListBox demo as an example and see if we can make it work outside of the demo. Here is the demo code:
import wx
#----------------------------------------------------------------------# BEGIN Demo Codeclass FindPrefixListBox(wx.ListBox):
def__init__(self, parent, id, pos=wx.DefaultPosition, size=wx.DefaultSize,
choices=[], style=0, validator=wx.DefaultValidator):
wx.ListBox.__init__(self, parent, id, pos, size, choices, style, validator)self.typedText = ''self.log = parent.logself.Bind(wx.EVT_KEY_DOWN, self.OnKey)def FindPrefix(self, prefix):
self.log.WriteText('Looking for prefix: %s\n'% prefix)if prefix:
prefix = prefix.lower()
length = len(prefix)# Changed in 2.5 because ListBox.Number() is no longer supported.# ListBox.GetCount() is now the appropriate way to go.for x inrange(self.GetCount()):
text = self.GetString(x)
text = text.lower()if text[:length] == prefix:
self.log.WriteText('Prefix %s is found.\n'% prefix)return x
self.log.WriteText('Prefix %s is not found.\n'% prefix)return-1def OnKey(self, evt):
key = evt.GetKeyCode()if key >= 32and key <= 127:
self.typedText = self.typedText + chr(key)
item = self.FindPrefix(self.typedText)if item != -1:
self.SetSelection(item)elif key == wx.WXK_BACK: # backspace removes one character and backs upself.typedText = self.typedText[:-1]ifnotself.typedText:
self.SetSelection(0)else:
item = self.FindPrefix(self.typedText)if item != -1:
self.SetSelection(item)else:
self.typedText = ''
evt.Skip()def OnKeyDown(self, evt):
pass#---------------------------------------------------------------------------class TestListBox(wx.Panel):
def__init__(self, parent, log):
self.log = log
wx.Panel.__init__(self, parent, -1)
sampleList = ['zero', 'one', 'two', 'three', 'four', 'five',
'six', 'seven', 'eight', 'nine', 'ten', 'eleven',
'twelve', 'thirteen', 'fourteen']
wx.StaticText(self, -1, "This example uses the wx.ListBox control.", (45, 10))
wx.StaticText(self, -1, "Select one:", (15, 50))self.lb1 = wx.ListBox(self, 60, (100, 50), (90, 120), sampleList, wx.LB_SINGLE)self.Bind(wx.EVT_LISTBOX, self.EvtListBox, self.lb1)self.Bind(wx.EVT_LISTBOX_DCLICK, self.EvtListBoxDClick, self.lb1)self.lb1.Bind(wx.EVT_RIGHT_UP, self.EvtRightButton)self.lb1.SetSelection(3)self.lb1.Append("with data", "This one has data");self.lb1.SetClientData(2, "This one has data");
wx.StaticText(self, -1, "Select many:", (220, 50))self.lb2 = wx.ListBox(self, 70, (320, 50), (90, 120), sampleList, wx.LB_EXTENDED)self.Bind(wx.EVT_LISTBOX, self.EvtMultiListBox, self.lb2)self.lb2.Bind(wx.EVT_RIGHT_UP, self.EvtRightButton)self.lb2.SetSelection(0)
sampleList = sampleList + ['test a', 'test aa', 'test aab',
'test ab', 'test abc', 'test abcc',
'test abcd']
sampleList.sort()
wx.StaticText(self, -1, "Find Prefix:", (15, 250))
fp = FindPrefixListBox(self, -1, (100, 250), (90, 120), sampleList, wx.LB_SINGLE)
fp.SetSelection(0)def EvtListBox(self, event):
self.log.WriteText('EvtListBox: %s, %s, %s\n'%(event.GetString(),
event.IsSelection(),
event.GetSelection()# event.GetClientData()))
lb = event.GetEventObject()# data = lb.GetClientData(lb.GetSelection())# if data is not None:# self.log.WriteText('\tdata: %s\n' % data)def EvtListBoxDClick(self, event):
self.log.WriteText('EvtListBoxDClick: %s\n'%self.lb1.GetSelection())self.lb1.Delete(self.lb1.GetSelection())def EvtMultiListBox(self, event):
self.log.WriteText('EvtMultiListBox: %s\n'%str(self.lb2.GetSelections()))def EvtRightButton(self, event):
self.log.WriteText('EvtRightButton: %s\n'% event.GetPosition())if event.GetEventObject().GetId() == 70:
selections = list(self.lb2.GetSelections())
selections.reverse()for index in selections:
self.lb2.Delete(index)#----------------------------------------------------------------------# END Demo Code#----------------------------------------------------------------------
I’m not going to explain the demo code itself. Instead I will focus on the issue that this code presents when wanting to try running it outside of the demo. There is a runTest function at the end of the demo that I didn’t copy because that code won’t do anything if you copy it outside of the demo. You see, the demo code has some kind of wrapper around it that makes it work. You will need to add your own “wrapper” of sorts if you want to use demo code.
The main issue that this code presents is that a lot of the methods have a call to self.log.WriteText. You can’t really tell from the code what the log object is, but you do know that it has a WriteText method. In the demo, you will notice that when one of those methods fire, the WriteText calls seem to write to the text control at the bottom of the demo. So the log must be a text control widget!
There are a lot of different approaches to solving the log issue. Here are my top three:
Remove all the calls to self.log.WriteText
Create my own text control and pass it in
Create a simple class with a WriteText method
I have done the first choice on many occasions as it’s a simple way to get going. But for a tutorial it’s kind of boring, so instead we will choose the third option and create a class with a WriteText method! Add the following code to the same file that contains the code above:
#----------------------------------------------------------------------# Start Your own code here class FakeLog:
"""
The log in the demo is a text control, so just create a class
with an overridden WriteText function
"""def WriteText(self, string):
print(string)# Create a frame that can wrap your demo code (works in most cases)class MyFrame(wx.Frame):
def__init__(self):
wx.Frame.__init__(self, None, title='Listbox demo',
size=(800,600))
log = FakeLog()
panel = TestListBox(self, log=log)self.Show()if __name__ == '__main__':
app = wx.App(False)
frame = MyFrame()
app.MainLoop()
Here we just create a FakeLog with a WriteText method that accepts a string as its sole parameter. All that method does is print the string to stdout. Then we create a subclass of wx.Frame, initialize our fake log and the demo code and show our frame. Now we have a working piece of demo code that’s not in the demo! You can get the full code over on Github if you’d like to.
Other Demo Issues
There are some other demos that don’t follow the exact same API that the ListBox demo does. For example, if you try using the class I created above for the wx.Button demo, you will find that its log object calls a write() method instead of a WriteText() method. The solution is obvious in this case in that we just need to add a second method to our fake logging class:
class FakeLog:
"""
The log in the demo is a text control, so just create a class
with an overridden WriteText function
"""def WriteText(self, string):
print(string)def write(self, string):
print(string)
Now our demo running code is a bit more flexible. However when I had one of my readers testing this code out, they noticed an issue with the wx.ListCtrl demo. The issue is that it imports a module called “images”. There are actually several demos that reference this module. You will just need to copy images.py from the demo and put it in the same location as the script that you are writing so you can import it.
Note: I have had one report that the images.py file included with the latest beta of wxPython 4 didn’t work for them and they had to grab a copy from an older version of the demo. I haven’t had this issue myself, but keep that in mind.
Wrapping Up
Now you should have the tools you need to make most of the demos from the wxPython demo work in your own code. Go grab some code and give it a try! Happy coding!
A lot of beginner tutorials start with “Hello World” examples. There are plenty of websites that use a calculator application as a kind of “Hello World” for GUI beginners. Calculators are a good way to learn because they have a set of widgets that you need to lay out in an orderly fashion. They also require a certain amount of logic to make them work correctly. For this calculator, let’s focus on being able to do the following:
Addition
Subtraction
Multiplication
Division
I think that supporting these four functions is a great starting place and also give you plenty of room for enhancing the application on your own.
Figuring Out the Logic
One of the first items that you will need to figure out is how to actually execute the equations that you build. For example, let’s say that you have the following equation:
1 + 2 * 5
What is the solution? If you read it left-to-right, the solution would seem to be 3 * 5 or 15. But multiplication has a higher precedence than addition, so it would actually be 10 + 1 or 11. How do you figure out precedence in code? You could spend a lot of time creating a string parser that groups numbers by the operand or you could use Python’s built-in `eval` function. The eval() function is short for evaluate and will evaluate a string as if it was Python code.
A lot of Python programmers actually discourage the user of eval(). Let’s find out why.
Is eval() Evil?
The eval() function has been called “evil” in the past because it allows you to run strings as code, which can open up your application’s to nefarious evil-doers. You have probably read about SQL injection where some websites don’t properly escape strings and accidentally allowed dishonest people to edit their database tables by running SQL commands via strings. The same concept can happen in Python when using the eval() function. A common example of how eval could be used for evil is as follows:
eval("__import__('os').remove('file')")
This code will import Python’s os module and call its remove() function, which would allow your users to delete files that you might not want them to delete. There are a couple of approaches for avoiding this issue:
Don’t use eval()
Control what characters are allowed to go to eval()
Since you will be creating the user interface for this application, you will also have complete control over how the user enters characters. This actually can protect you from eval’s insidiousness in a straight-forward manner. You will learn two methods of using wxPython to control what gets passed to eval(), and then you will learn how to create a custom eval() function at the end of the article.
Designing the Calculator
Let’s take a moment and try to design a calculator using the constraints mentioned at the beginning of the chapter. Here is the sketch I came up with:
Calculator mockup
Note that you only care about basic arithmetic here. You won’t have to create a scientific calculator, although that might be a fun enhancement to challenge yourself with. Instead, you will create a nice, basic calculator.
Let’s get started!
Creating the Initial Calculator
Whenever you create a new application, you have to consider where the code will go. Does it go in the wx.Frame class, the wx.Panel class, some other class or what? It is almost always a mix of different classes when it comes to wxPython. As is the case with most wxPython applications, you will want to start by coming up with a name for your application. For simplicity’s sake, let’s call it wxcalculator.py for now.
The first step is to add some imports and subclass the Frame widget. Let’s take a look:
This code is very similar to what you have seen in the past. You subclass wx.Frame and give it a title and initial size. Then you instantiate the panel class, CalcPanel (not shown) and you call the SetSizeHints() method. This method takes the smallest (width, height) and the largest (width, height) that the frame is allowed to be. You may use this to control how much your frame can be resized or in this case, prevent any resizing. You can also modify the frame’s style flags in such a way that it cannot be resized too.
Take a look at the no_resize variable. It is creating a wx.DEFAULT_FRAME_STYLE and then using bitwise operators to remove the resizable border and the maximize button from the frame.
Let’s move on and create the CalcPanel:
class CalcPanel(wx.Panel):

    def __init__(self, parent):
        super().__init__(parent)
        self.last_button_pressed = None
        self.create_ui()
I mentioned this in an earlier chapter, but I think it bears repeating here. You don’t need to put all your interfacer creation code in the init method. This is an example of that concept. Here you instantiate the class, set the last_button_pressed attribute to None and then call create_ui(). That is all you need to do here.
Of course, that begs the question. What goes in the create_ui() method? Well, let’s find out!
Here you create the sizer that you will need to help organize the user interface. You will also create a wx.Font object, which is used to modifying the default font of widgets like wx.TextCtrl or wx.StaticText. This is helpful when you want a larger font size or a different font face for your widget than what comes as the default.
These next three lines create the wx.TextCtrl, set it to right-justified (wx.TE_RIGHT), set the font and `Disable()` the widget. The reason that you want to disable the widget is because you don’t want the user to be able to type any string of text into the control.
As you may recall, you will be using eval() for evaluating the strings in that widget, so you can’t allow the user to abuse that. Instead, you want fine-grained control over what the user can enter into that widget.
Some calculator applications have a running total widget underneath the actual “display”. A simple way to add this widget is via the wx.StaticText widget.
Now let’s add main buttons you will need to use a calculator effectively:
Here you create a list of lists. In this data structure, you have the primary buttons used by your calculator. You will note that the there is a blank string in the last list that will be used to create a button that doesn’t do anything. This is to keep the layout correct. Theoretically, you could update this calculator down the road such that that button could be percentage or do some other function.
The next step is to create a the buttons, which you can do by looping over the list. Each nested list represents a row of buttons. So for each row of buttons, you will create a horizontally oriented wx.BoxSizer and then loop over the row of widgets to add them to that sizer. Once every button is added to the row sizer, you will add that sizer to your main sizer. Note that each of these button’s is bound to the `update_equation` event handler as well.
Now you need to add the equals button and the button that you may use to clear your calculator:
In this code snippet you create the “equals” button which you then bind to the on_total event handler method. You also create the “Clear” button, for clearing your calculator and starting over. The last line sets the panel’s sizer.
Let’s move on and learn what most of the buttons in your calculator are bound to:
def update_equation(self, event):
    operators = ['/', '*', '-', '+']
    btn = event.GetEventObject()
    label = btn.GetLabel()
    current_equation = self.solution.GetValue()

    if label not in operators:
        if self.last_button_pressed in operators:
            self.solution.SetValue(current_equation + ' ' + label)
        else:
            self.solution.SetValue(current_equation + label)
    elif label in operators and current_equation is not '' \
         and self.last_button_pressed not in operators:
        self.solution.SetValue(current_equation + ' ' + label)

    self.last_button_pressed = label

    for item in operators:
        if item in self.solution.GetValue():
            self.update_solution()
            break
This is an example of binding multiple widgets to the same event handler. To get information about which widget has called the event handler, you can call the `event` object’s GetEventObject() method. This will return whatever widget it was that called the event handler. In this case, you know you called it with a wx.Button instance, so you know that wx.Button has a `GetLabel()` method which will return the label on the button. Then you get the current value of the solution text control.
Next you want to check if the button’s label is an operator (i.e. /, *, -, +). If it is, you will change the text controls value to whatever is currently in it plus the label. On the other hand, if the label is not an operator, then you want to put a space between whatever is currently in the text box and the new label. This is for presentation purposes. You could technically skip the string formatting if you wanted to.
The last step is to loop over the operands and check if any of them are currently in the equation string. If they are, then you will call the update_solution() method and break out of the loop.
Now you need to write the update_solution() method:
Here is where the “evil” eval() makes its appearance. You will extract the current value of the equation from the text control and pass that string to eval(). Then convert that result back to a string so you can set the text control to the newly calculated solution. You want to wrap the whole thin in a try/except statement to catch errors, such as the ZeroDivisionError. The last except statement is known as a bare except and should really be avoided in most cases. For simplicity, I left it in there, but feel free to delete those last two lines if they offend you.
The next method you will want to take a look at is the on_clear() method:
This code is pretty straight-forward. All you need to do is call your solution text control’s Clear() method to empty it out. You will also want to clear the `running_total` widget, which is an instance of wx.StaticText. That widget does not have a Clear() method, so instead you will call SetLabel() and pass in an empty string.
The last method you will need to create is the on_total() event handler, which will calculate the total and also clear out your running total widget:
def on_total(self, event):
    solution = self.update_solution()
    if solution:
        self.running_total.SetLabel('')
Here you can call the update_solution() method and get the result. Assuming that all went well, the solution will appear in the main text area and the running total will be emptied.
Here is what the calculator looks like when I ran it on a Mac:
wxPython Calculator on Mac OS
And here is what the calculator looks like on Windows 10:
wxPython Calculator on Windows 10
Let’s move on and learn how you might allow the user to use their keyboard in addition to your widgets to enter an equation.
Using Character Events
Most calculators will allow the user to use the keyboard when entering values. In this section, I will show you how to get started adding this ability to your code. The simplest method to use to make this work is to bind the wx.TextCtrl to the wx.EVT_TEXT event. I will be using this method for this example. However another way that you could do this would be to catch wx.EVT_KEY_DOWN and then analyze the key codes. That method is a bit more complex though.
The first item that we need to change is our CalcPanel‘s constructor:
Here you add a whitelist attribute and a couple of simple flags, self.on_key_called and self.empty. The white list are the only characters that you will allow the user to type in your text control. You will learn about the flags when we actually get to the code that uses them.
But first, you will need to modify the create_ui() method of your panel class. For brevity, I will only reproduce the first few lines of this method:
Feel free to download the full source from Github or refer to the code in the previous section. The main differences here in regards to the text control is that you are no longer disabling it and you are binding it to an event: wx.EVT_TEXT.
Let’s go ahead an write the on_key() method:
def on_key(self, event):
    if self.on_key_called:
        self.on_key_called = False
        return

    key = event.GetString()
    self.on_key_called = True

    if key in self.whitelist:
        self.update_equation(key)
Here you check to see if the self.on_key_called flag is True. If it is, we set it back to False and `return` early. The reason for this is that when you use your mouse to click a button, it will cause EVT_TEXT to fire. The `update_equation()` method will get the contents of the text control which will be the key we just pressed and add the key back to itself, resulting in a double value. This is one way to workaround that issue.
You will also note that to get the key that was pressed, you can call the event object’s GetString() method. Then you will check to see if that key is in the white list. If it is, you will update the equation.
The next method you will need to update is update_equation():
def update_equation(self, text):
    operators = ['/', '*', '-', '+']
    current_equation = self.solution.GetValue()

    if text not in operators:
        if self.last_button_pressed in operators:
            self.solution.SetValue(current_equation + ' ' + text)
        elif self.empty and current_equation:
            # The solution is not empty
            self.empty = False
        else:
            self.solution.SetValue(current_equation + text)
    elif text in operators and current_equation is not '' \
         and self.last_button_pressed not in operators:
        self.solution.SetValue(current_equation + ' ' + text)

    self.last_button_pressed = text
    self.solution.SetInsertionPoint(-1)

    for item in operators:
        if item in self.solution.GetValue():
            self.update_solution()
            break
Here you add a new elif that checks if the self.empty flag is set and if the current_equation has anything in it. In other words, if it is supposed to be empty and it’s not, then we set the flag to False because it’s not empty. This prevents a duplicate value when the keyboard key is pressed. So basically you need two flags to deal with duplicate values that can be caused because you decided to allow users to use their keyboard.
The other change to this method is to add a call to SetInsertionPoint() on your text control, which will put the insertion point at the end of the text control after each update.
The last required change to the panel class happens in the on_clear() method:
This change was done by adding two new lines to the end of the method. The first is to reset self.empty back to True. The second is to call the text control’s SetFocus() method so that the focus is reset to the text control after it has been cleared.
You could also add this SetFocus() call to the end of the on_calculate() and the on_total() methods. This should keep the text control in focus at all times. Feel free to play around with that on your own.
Creating a Better eval()
Now that you have looked at a couple of different methods of keeping the “evil” eval() under control, let’s take a few moments to learn how you can create a custom version of eval() on your own. Python comes with a couple of handy built-in modules called ast and operator. The ast module is an acronym that stands for “Abstract Syntax Trees” and is used “for processing trees of the Python abstract syntax grammar” according to the documentation. You can think of it as a data structure that is a representation of code. You can use the ast module to create a compiler in Python.
The operator module is a set of functions that correspond to Python’s operators. A good example would be operator.add(x, y) which is equivalent to the expression x+y. You can use this module along with the `ast` module to create a limited version of eval().
Let’s find out how:
import ast
import operator

allowed_operators = {ast.Add: operator.add, ast.Sub: operator.sub,
                     ast.Mult: operator.mul, ast.Div: operator.truediv}

def noeval(expression):
    if isinstance(expression, ast.Num):
        return expression.n
    elif isinstance(expression, ast.BinOp):
        print('Operator: {}'.format(expression.op))
        print('Left operand: {}'.format(expression.left))
        print('Right operand: {}'.format(expression.right))
        op = allowed_operators.get(type(expression.op))
        if op:
            return op(noeval(expression.left),
                      noeval(expression.right))
    else:
        print('This statement will be ignored')

if __name__ == '__main__':
    print(ast.parse('1+4', mode='eval').body)
    print(noeval(ast.parse('1+4', mode='eval').body))
    print(noeval(ast.parse('1**4', mode='eval').body))
    print(noeval(ast.parse("__import__('os').remove('path/to/file')", mode='eval').body))
Here you create a dictionary of allowed operators. You map ast.Add to operator.add, etc. Then you create a function called `noeval` that accepts an `ast` object. If the expression is just a number, you return it. However if it is a BinOp instance, than you print out the pieces of the expression. A BinOp is made up of three parts:
The left part of the expression
The operator
The right hand of the expression
What this code does when it finds a BinOp object is that it then attempts to get the type of ast operation. If it is one that is in our allowed_operators dictionary, then you call the mapped function with the left and right parts of the expression and return the result.
Finally if the expression is not a number or one of the approved operators, then you just ignore it. Try playing around with this example a bit with various strings and expressions to see how it works.
Once you are done playing with this example, let’s integrate it into your calculator code. For this version of the code, you can call the Python script wxcalculator_no_eval.py. The top part of your new file should look like this:
The main differences here is that you now have a couple of new imports (i.e. ast and operator) and you will need to add a Python dictionary called self.allowed_operators. Next you will want to create a new method called noeval():
This method is pretty much exactly the same as the function you created in the other script. It has been modified slightly to call the correct class methods and attributes however. The other change you will need to make is in the update_solution() method:
Now the calculator code will use your custom eval() method and keep you protected from the potentially harmfulness of eval(). The code that is in Github has the added protection of only allowing the user to use the onscreen UI to modify the contents of the text control. However you can easily change it to enable the text control and try out this code without worrying about eval() causing you any harm.
Wrapping Up
In this chapter you learned several different approaches to creating a calculator using wxPython. You also learned a little bit about the pros and cons of using Python’s built-in eval() function. Finally, you learned that you can use Python’s ast and operator modules to create a finely-grained version of eval() that is safe for you to use. Of course, since you are controlling all input into eval(), you can also control the real version quite easily though your UI that you generate with wxPython.
Take some time and play around with the examples in this article. There are many enhancements that could be made to make this application even better. When you find bugs or missing features, challenge yourself to try to fix or add them.
Let’s say you finished up a wonderful GUI application using wxPython. How do you share it with the world? This is always the dilemma when you finish an amazing program. Fortunately, there are several ways you can share your code. If you want to share your code with other developers, than Github or a similar website is definitely a good way to do. I won’t be covering using Git or Mercurial here. Instead what you will learn here is how to turn your application into an executable.
By turning your code into an executable, you can allow a user to just download the binary and run it without requiring them to download Python, your source code and your dependencies. All of those things will be bundled up into the executable instead.
There are many tools you can use to generate an executable:
You will be using PyInstaller in this tutorial. The main benefit to using PyInstaller is that it can generate executables for Windows, Mac and Linux. Note that it does not support cross-compiling. What that means is that you cannot run PyInstaller on Linux to create a Windows executable. Instead, PyInstaller will only create an executable for the OS that it is ran on. In other words, if you run PyInstaller on Windows, it will create a Windows executable only.
Installing PyInstaller
Installing the PyInstaller package is nice and straightforward. All you need is pip.
Here is how you would install PyInstaller to your system Python:
pip install pyinstaller
You could also install PyInstaller to a virtual Python environment using Python’s venv module or the virtualenv package.
Generating an Executable
The nice thing about PyInstaller is that it is very easy to use out of the box. All you need to do is run the `pyinstaller` command followed by the path to the main file of the application that you want to convert to an executable.
Here is a non-working example:
pyinstaller path/to/main/script.py
If the PyInstaller application is not found, you may have to specify a full path to it. By default, PyInstaller installs to Python’s **Scripts** sub-folder, which is going to be in your system Python folder or in your virtual environment.
Let’s take one of the simple applications from my upcoming book and turn it into an executable. For example, you could use image_viewer_slideshow.py from chapter 3:
# image_viewer_slideshow.py

import glob
import os
import wx

class ImagePanel(wx.Panel):

    def __init__(self, parent):
        super().__init__(parent)
        self.max_size = 240
        self.photos = []
        self.current_photo = 0
        self.total_photos = 0
        self.layout()

        self.slideshow_timer = wx.Timer(self)
        self.Bind(wx.EVT_TIMER, self.on_next, self.slideshow_timer)

    def layout(self):
        """
        Layout the widgets on the panel
        """

        self.main_sizer = wx.BoxSizer(wx.VERTICAL)
        btn_sizer = wx.BoxSizer(wx.HORIZONTAL)

        img = wx.Image(self.max_size, self.max_size)
        self.image_ctrl = wx.StaticBitmap(self, wx.ID_ANY,
                                             wx.Bitmap(img))
        self.main_sizer.Add(self.image_ctrl, 0, wx.ALL|wx.CENTER, 5)
        self.image_label = wx.StaticText(self, label="")
        self.main_sizer.Add(self.image_label, 0, wx.ALL|wx.CENTER, 5)

        btn_data = [("Previous", btn_sizer, self.on_previous),
                    ("Slide Show", btn_sizer, self.on_slideshow),
                    ("Next", btn_sizer, self.on_next)]
        for data in btn_data:
            label, sizer, handler = data
            self.btn_builder(label, sizer, handler)

        self.main_sizer.Add(btn_sizer, 0, wx.CENTER)
        self.SetSizer(self.main_sizer)

    def btn_builder(self, label, sizer, handler):
        """
        Builds a button, binds it to an event handler and adds it to a sizer
        """
        btn = wx.Button(self, label=label)
        btn.Bind(wx.EVT_BUTTON, handler)
        sizer.Add(btn, 0, wx.ALL|wx.CENTER, 5)

    def on_next(self, event):
        """
        Loads the next picture in the directory
        """
        if not self.photos:
            return

        if self.current_photo == self.total_photos - 1:
            self.current_photo = 0
        else:
            self.current_photo += 1
        self.update_photo(self.photos[self.current_photo])

    def on_previous(self, event):
        """
        Displays the previous picture in the directory
        """
        if not self.photos:
            return

        if self.current_photo == 0:
            self.current_photo = self.total_photos - 1
        else:
            self.current_photo -= 1
        self.update_photo(self.photos[self.current_photo])

    def on_slideshow(self, event):
        """
        Starts and stops the slideshow
        """
        btn = event.GetEventObject()
        label = btn.GetLabel()
        if label == "Slide Show":
            self.slideshow_timer.Start(3000)
            btn.SetLabel("Stop")
        else:
            self.slideshow_timer.Stop()
            btn.SetLabel("Slide Show")

    def update_photo(self, image):
        """
        Update the currently shown photo
        """
        img = wx.Image(image, wx.BITMAP_TYPE_ANY)
        # scale the image, preserving the aspect ratio
        W = img.GetWidth()
        H = img.GetHeight()
        if W > H:
            NewW = self.max_size
            NewH = self.max_size * H / W
        else:
            NewH = self.max_size
            NewW = self.max_size * W / H
        img = img.Scale(NewW, NewH)

        self.image_ctrl.SetBitmap(wx.Bitmap(img))
        self.Refresh()

    def reset(self):
        img = wx.Image(self.max_size,
                       self.max_size)
        bmp = wx.Bitmap(img)
        self.image_ctrl.SetBitmap(bmp)
        self.current_photo = 0
        self.photos = []


class MainFrame(wx.Frame):

    def __init__(self):
        super().__init__(None, title='Image Viewer',
                                        size=(400, 400))
        self.panel = ImagePanel(self)
        self.create_toolbar()
        self.Show()

    def create_toolbar(self):
        """
        Create a toolbar
        """
        self.toolbar = self.CreateToolBar()
        self.toolbar.SetToolBitmapSize((16,16))

        open_ico = wx.ArtProvider.GetBitmap(
            wx.ART_FILE_OPEN, wx.ART_TOOLBAR, (16,16))
        openTool = self.toolbar.AddTool(
            wx.ID_ANY, "Open", open_ico, "Open an Image Directory")
        self.Bind(wx.EVT_MENU, self.on_open_directory, openTool)

        self.toolbar.Realize()

    def on_open_directory(self, event):
        """
        Open a directory dialog
        """
        with wx.DirDialog(self, "Choose a directory",
                          style=wx.DD_DEFAULT_STYLE) as dlg:

            if dlg.ShowModal() == wx.ID_OK:
                self.folderPath = dlg.GetPath()

                photos = glob.glob(os.path.join(self.folderPath, '*.jpg'))
                self.panel.photos = photos
                if photos:
                    self.panel.update_photo(photos[0])
                    self.panel.total_photos = len(photos)
                else:
                    self.panel.reset()


if __name__ == '__main__':
    app = wx.App(redirect=False)
    frame = MainFrame()
    app.MainLoop()
If you wanted to turn it into an executable, you would run the following:
pyinstaller image_viewer_slideshow.py
Make sure that when you run this command, your current working directory is the one that contains the script you are converting to an executable. PyInstaller will be creating its output in whatever the current working directory is.
When you run this command, you should see something like this in your terminal:
PyInstaller will create two folders in the same folder as the script that you are converting called **dist** and **build**. The **dist** folder is where you will find your executable if PyInstaller completes successfully. There will be many other files in the **dist** folder besides your executable. These are files that are required for your executable to run.
Now let’s try running your newly created executable. When I ran my copy, I noticed that a terminal / console was appearing behind my application.
Image Viewer with Console in Background
This is normal as the default behavior of PyInstaller is to build your application as if it were a command-line application, not a GUI.
You will need to add the –noconsole flag to remove the console:
pyinstaller image_viewer_slideshow.py --noconsole
Now when you run the result, you should no longer see a console window appearing behind your application.
It can be complicated to distribute lots of files, so PyInstaller has another command that you can use to bundle everything up into a single executable. That command is `–onefile`. As an aside, a lot of the commands that you use with PyInstaller have shorter aliases. For example, there is a shorter alias for `–noconsole` that you can also use called: -w. Note the single dash in `-w`.
So let’s take that information and have PyInstaller create a single file executable with no console:
dist folder.
The spec file
PyInstaller has the concept of specification files. They are kind of like a setup.py script, which is something that you use with Python’s distutils. These spec files tell PyInstaller how to build your executable. PyInstaller will generate one for you automatically with the same name as the passed in script, but with a .spec extension. So if you passed in image_viewer_slideshow.py, then you should see a image_viewer_slideshow.spec file after running PyInstaller. This spec file will be created in the same location as your application file.
Here is the contents of the spec file that was created from the last run of PyInstaller above:
While PyInstaller worked fine with the image viewer example, you may find that it won’t work out of the box if you had other dependencies, such as NumPy or Pandas. If you run into issues with PyInstaller, it has very verbose logs that you can use to help you figure out the issue. One good location is the `build/cli/warn-cli.txt` file. You may also want to rebuild without the `-w` command so that you can see what is being printed to stdout in the console window.
There are also options for changing the log level during building that may help you uncover issues.
If none of those work, try Google or go to PyInstaller’s support page and get help there.
Creating Executables for Mac
While the same commands should work on Mac OSX as it does on Windows, I found that I needed to run the following command to generate a working executable:
pyinstaller image_viewer_slideshow.py --windowed
The output that PyInstaller generates will be slightly different and the result is an application file.
Another popular option for generating applications on Mac is a Python package called py2app.
Creating Executables for Linux
For Linux, it is usually recommended that you build the executable with an old version of glibc because the newer glibc versions are backwards compatible. By building with an old version of Linux, you can usually target a wider variety of Linux versions. But your mileage may vary.
After the files are generated, you can just tar them up into a gzipped tarball (.tax.gz). You could even using the archiving application you created in this book to do that for you, if you wanted.
An alternative would be to learn how to create a .deb or related file that most Linux versions can install.
Learning More About PyInstaller
This article is not meant to be an in-depth guide to PyInstaller. It will likely change much faster than wxPython, so it is recommended that you read the documentation for PyInstaller instead. It will always be the most up-to-date location to get the information you need on the project.
What About Installers?
Windows users know that most of the time you have an installer application that you can run to install your application on your computer and put some shortcuts here and there. There are several useful free programs that you can use to create a Windows Installer as well as some paid ones
Here are the two freeware applications I see mentioned the most:
I have used Inno Setup to create a Windows installer on several occasions. It is easy to use and requires only a little reading of its documentation to get it working. I haven’t used NSIS before, but I suspect it is quite easy to use as well.
Let’s use Inno Setup as an example and see how to generate an installer with it.
Creating an Installer with Inno Setup
Inno Setup is a nice freeware application that you can use to create professional looking installer programs. It works on most versions of Windows. I personally have used it for quite a few years. While Inno Setup is not open source, it is still a really nice program. You will need to download and install it from there website.
Once installed, you can use this tool to create an installer for the executable you created earlier in this chapter.
To get started, just run Inno Setup and you should see the following:
Inno Setup’s Startup Page
While Inno Setup defaults to opening an existing file, what you want to do is choose the second option from the top: “Create a new script file using the Script Wizard”. Then press **OK**.
You should now see the first page of the Inno Setup Script Wizard. Just hit **Next** here since there’s nothing else you can really do.
Now you should see something like this:
Inno Setup Script Wizard Application Information Page
This is where you enter your applications name, its version information, the publisher’s name and the application’s website. I pre-filled it with some examples, but you can enter whatever you want to here.
Go ahead and press Next and you should see page 3:
Inno Setup Script Wizard Application Folder Page
This page of the wizard is where you can set the application’s install directory. On Windows, most applications install to **Program Files**, which is also the default here. This is also where you set the folder name for your application. This is the name of the folder that will appear in Program Files. Alternatively, you can check the box at the bottom that indicates that your application doesn’t need a folder at all.
Let’s go to the next page:
Inno Setup Script Wizard Application Files Page
Here is where you will choose the main executable file. In this case, you want to choose the executable you created with PyInstaller. If you didn’t create the executable using the –onefile flag, then you can add the other files using the Add file(s)… button. If your application requires any other special files, like a SQLite database file or images, this is also where you would want to add them.
By default, this page will allow the user to run your application when the installer finishes. A lot of installers do this, so it’s actually expected by most users.
This is the Application Shortcuts page and it allows you to manage what shortcuts are created for your application and where they should go. The options are pretty self-explanatory. I usually just use the defaults, but you are welcome to change them however you see fit.
The Documentation Page of the wizard is where you can add your application’s license file. For example, if you were putting out an open source application, you can add the GPL or MIT or whatever license file you need there. If this were a commercial application, this is where you would add your End-Users License Agreement (EULA) file.
Let’s see what’s next:
Inno Setup Script Wizard Setup Languages Page
Here you can set up which setup languages should be included. Inno Setup supports quite a few languages, with English as the default choice.
Now let’s find out what compiler settings are:
Inno Setup Script Wizard Compiler Settings Page
The Compiler Settings page let’s you name the output setup file, which defaults to simply **setup**. You can set the output folder here, add a custom setup file icon and even add password protection to the setup file. I usually just leave the defaults alone, but this is an opportunity to add some branding to the setup if you have a nice icon file handy.
The next page is for the preprocessor:
Inno Setup Script Wizard Preprocessor Page
The preprocessor is primarily for catching typos in the Inno Setup script file. It basically adds some helpful options at compile time to your Inno Setup script.
Click Next and you should see the last page of the wizard:
Inno Setup Script Wizard End Page
Click Finish and Inno Setup will generate an Inno Setup Script (.iss) file. When it is finished, it will ask you if you would like to compile the file.
Go ahead and accept that dialog and you should see the following:
Inno Setup Script
This is the Inno Setup Script editor with your newly generated script pre-loaded into it. The top half is the script that was generated and the bottom half shows the compiler’s output. In this screenshot, it shows that the setup file was generated successfully but it also displays a warning that you might want to rename the setup file.
At this point, you should have a working installer executable that will install your program and any files it depends on to the right locations. It will also create shortcuts in the Windows Start menu and whichever other locations you specified in the wizard.
The script file itself can be edited. It is just a text file and the syntax is well documented on Inno Setup’s website.
Code Signing
Windows and Mac OSX prefer that applications are signed by a corporation or the developer. Otherwise you will see a warning that you are using an unsigned piece of code or software. The reason this matters is that it protects your application from being modified by someone else. You can think of code signing as a kind of embedded MD5 hash in your application. A signed application can be traced back to whomever signed it, which makes it more trust-worthy.
If you want to sign code on Mac OSX, you can use XCode
Windows has several options for signing their code. Here is a URL for getting your application certified for Windows
You can also purchase a certificate from various companies that specialize in code signing, such as digicert.
There is also the concept of self-signed certificates, but that is not for production or for end users. You would only self-sign for internal testing, proof-of-concept, etc. You can look up how to do that on your own.
Wrapping Up
You have now learned how to generate executables using PyInstaller on Windows, Mac and Linux. The command to generate the executable is the same across all platforms. While you cannot create a Windows executable by running PyInstaller on Linux, it is still quite useful for creating executable for the target operating system.
You also learned how to use Inno Setup to create an installer for Windows. You can now use these skills to create executables for your own applications or for some of the other applications that you created in this book!
The Publish-Subscribe pattern is pretty common in computer science and very useful too. The wxPython GUI toolkit has had an implementation of it for a very long time in wx.lib.pubsub. This implementation is based on the PyPubSub package. While you could always download PyPubSub and use it directly instead, it was nice to be able to just run wxPython without an additional dependency.
However, as of wxPython 4.0.4, wx.lib.pubsub is now deprecated and will be removed in a future version of wxPython. So now you will need to download PyPubSub or PyDispatcher if you want to use the Publish-Subscribe pattern easily in wxPython.
Installing PyPubSub
You can install PyPubSub using pip.
Here’s how to do it:
pip install pypubsub
PyPubSub should install quite quickly. Once it’s done, let’s find out how to use it!
Using PyPubSub
Let’s take an example from my previous article on this topic and update it for using PyPubSub instead:
import wx
from pubsub import pub


class OtherFrame(wx.Frame):
    """"""

    def __init__(self):
        """Constructor"""
        super().__init__(None, title="Secondary Frame")
        panel = wx.Panel(self)

        msg = "Enter a Message to send to the main frame"
        instructions = wx.StaticText(panel, label=msg)
        self.msg_txt = wx.TextCtrl(panel, value="")
        close_btn = wx.Button(panel, label="Send and Close")
        close_btn.Bind(wx.EVT_BUTTON, self.on_send_and_slose)

        sizer = wx.BoxSizer(wx.VERTICAL)
        flags = wx.ALL|wx.CENTER
        sizer.Add(instructions, 0, flags, 5)
        sizer.Add(self.msg_txt, 0, flags, 5)
        sizer.Add(close_btn, 0, flags, 5)
        panel.SetSizer(sizer)

    def on_send_and_slose(self, event):
        """
        Send a message and close frame
        """
        msg = self.msg_txt.GetValue()
        pub.sendMessage("panel_listener", message=msg)
        pub.sendMessage("panel_listener", message="test2",
                        arg2="2nd argument!")
        self.Close()


class MyPanel(wx.Panel):
    """"""

    def __init__(self, parent):
        """Constructor"""
        super().__init__(parent)
        pub.subscribe(self.my_listener, "panel_listener")

        btn = wx.Button(self, label="Open Frame")
        btn.Bind(wx.EVT_BUTTON, self.on_open_frame)

    def my_listener(self, message, arg2=None):
        """
        Listener function
        """
        print(f"Received the following message: {message}")
        if arg2:
            print(f"Received another arguments: {arg2}")

    def on_open_frame(self, event):
        """
        Opens secondary frame
        """
        frame = OtherFrame()
        frame.Show()


class MyFrame(wx.Frame):
    """"""

    def __init__(self):
        """Constructor"""
        wx.Frame.__init__(self, None,
                          title="New PubSub API Tutorial")
        panel = MyPanel(self)
        self.Show()


if __name__ == "__main__":
    app = wx.App(False)
The main difference here between using the built-in PubSub is the import.
All you need to do is replace this:
from wx.lib.pubsub import pub
with this:
from pubsub import pub
As long as you are using wxPython 2.9 or greater that is. If you were stuck using wxPython 2.8, then you will probably want to check out one of my previous articles on this topic to see how the PubSub API changed.
If you are using wxPython 2.9 or greater, then the change is super easy and almost painless.
As usual, you subscribe to a topic:
pub.subscribe(self.myListener, "panelListener")
And then you publish to that topic:
pub.sendMessage("panelListener", message=msg)
Give it a try and see how easy it is to add to your own code!
Wrapping Up
I personally really liked using wx.lib.pubsub, so I will probably keep using it with PyPubSub. However if you’ve ever wanted to try another package, like PyDispatcher, this would be as good a time as any to do so.
Growing up, I have always found the universe and space in general to be exciting. It is fun to dream about what worlds remain unexplored. I also enjoy seeing photos from other worlds or thinking about the vastness of space. What does this have to do with Python though? Well, the National Aeronautics and Space Administration (NASA) has a web API that allows you to search their image library.
Technically, you do not need an API key to make requests against NASA’s services. However they do have rate limiting in place for developers who access their site without an API key. Even with a key, you are limited to a default of 1000 requests per hour. If you go over your allocation, you will be temporarily blocked from making requests. You can contact NASA to request a higher rate limit though.
Interestingly, the documentation doesn’t really say how many requests you can make without an API key.
The API documentation disagrees with NASA’s Image API documentation about which endpoints to hit, which makes working with their website a bit confusing.
For example, you will see the API documentation talking about this URL:
When you start out using an unfamiliar API, it is always best to begin by reading the documentation for that interface. Another approach would be to do a quick Internet search and see if there is a Python package that wraps your target API. Unfortunately, there does not seem to be any maintained NASA libraries for Python. When this happens, you get to create your own.
If you run this in a debugger, you can print out the JSON that is returned.
Here is a snippet of what was returned:
'items': [{'data':
              [{'center': 'HQ',
                 'date_created': '2009-07-18T00:00:00Z',
                 'description': 'On the eve of the '
                                'fortieth anniversary of '
                                "Apollo 11's first human "
                                'landing on the Moon, '
                                'Apollo 11 crew member, '
                                'Buzz Aldrin speaks during '
                                'a lecture in honor of '
                                'Apollo 11 at the National '
                                'Air and Space Museum in '
                                'Washington, Sunday, July '
                                '19, 2009. Guest speakers '
                                'included Former NASA '
                                'Astronaut and U.S. '
                                'Senator John Glenn, NASA '
                                'Mission Control creator '
                                'and former NASA Johnson '
                                'Space Center director '
                                'Chris Kraft and the crew '
                                'of Apollo 11.  Photo '
                                'Credit: (NASA/Bill '
                                'Ingalls)',
                 'keywords': ['Apollo 11',
                              'Apollo 40th Anniversary',
                              'Buzz Aldrin',
                              'National Air and Space '
                              'Museum (NASM)',
                              'Washington, DC'],
                 'location': 'National Air and Space '
                             'Museum',
                 'media_type': 'image',
                 'nasa_id': '200907190008HQ',
                 'photographer': 'NASA/Bill Ingalls',
                 'title': 'Glenn Lecture With Crew of '
                          'Apollo 11'}],
       'href': 'https://images-assets.nasa.gov/image/200907190008HQ/collection.json',
       'links': [{'href': 'https://images-assets.nasa.gov/image/200907190008HQ/200907190008HQ~thumb.jpg',
                  'rel': 'preview',
                  'render': 'image'}]}
Now that you know what the format of the JSON is, you can try parsing it a bit.
Let’s add the following lines of code to your Python script:
This will extract the first item in the list of items from the JSON response. Then you can extract the nasa_id, which is required to get all the images associated with this particular result. Now you can add that nasa_id to a new URL end point and make a new request.
The last two lines in your Python code will extract the URLs from the JSON. Now you have all the pieces you need to write a basic user interface!
Designing the User Interface
There are many different ways you could design your image downloading application. You will be doing what is simplest as that is almost always the quickest way to create a prototype. The nice thing about prototyping is that you end up with all the pieces you will need to create a useful application. Then you can take your knowledge and either enhance the prototype or create something new with the knowledge you have gained.
Here’s a mockup of what you will be attempting to create:
NASA Image Search Mockup
As you can see, you will want an application with the following features:
A search bar
A widget to hold the search results
A way to display an image when a result is chosen
The ability to download the image
Let’s learn how to create this user interface now!
Creating the NASA Search Application
Rapid prototyping is an idea in which you will create a small, runnable application as quickly as you can. Rather than spending a lot of time getting all the widgets laid out, let’s add them from top to bottom in the application. This will give you something to work with more quickly than creating a series of nested sizers will.
Let’s start by creating a script called nasa_search_ui.py:
# nasa_search_ui.py

import os
import requests
import wx

from download_dialog import DownloadDialog
from ObjectListView import ObjectListView, ColumnDefn
from urllib.parse import urlencode, quote_plus
Here you import a few new items that you haven’t seen as of yet. The first is the requests package. This is a handy package for downloading files and doing things on the Internet with Python. Many developers feel that it is better than Python’s own urllib. You will need to install it to use it though. You will also need to instal ObjectListView.
Here is how you can do that with pip:
pip install requests ObjectListView
The other piece that is new are the imports from urllib.parse. You will be using this module for encoding URL parameters. Lastly, the DownloadDialog is a class for a small dialog that you will be creating for downloading NASA images.
Since you will be using ObjectListView in this application, you will need a class to represent the objects in that widget:
The Result class is what you will be using to hold that data that makes up each row in your ObjectListView. The item parameter is a portion of JSON that you are receiving from NASA as a response to your query. In this class, you will need to parse out the information you require.
In this case, you want the following fields:
Title
Location of image
NASA’s internal ID
Description of the photo
The photographer’s name
The date the image was created
The thumbnail URL
Some of these items aren’t always included in the JSON response, so you will use the dictionary’s get() method to return an empty string in those cases.
The MainPanel is where the bulk of your code will be. Here you do some housekeeping and create a search_results to hold a list of Result objects when the user does a search. You also set the max_size of the thumbnail image, the font to be used, the sizer and you get some StandardPaths as well.
Now let’s add the following code to the __init__():
Here you create a header label for the application using wx.StaticText. Then you add a wx.SearchCtrl, which is very similar to a wx.TextCtrl except that it has special buttons built into it. You also bind the search button’s click event (EVT_SEARCHCTRL_SEARCH_BTN) and EVT_TEXT_ENTER to a search related event handler (on_search).
This code sets up the ObjectListView in much the same way as some of my other articles use it. You customize the empty message by calling SetEmptyListMsg() and you also bind the widget to EVT_LIST_ITEM_SELECTED so that you do something when the user selects a search result.
Now let’s add the rest of the code to the __init__() method:
These final few lines of code add a title text control and an image widget that will update when a result is selected. You also add a download button to allow the user to select which image size they would like to download. NASA usually gives several different versions of the image from thumbnail all the way up to the original TIFF image.
The first event handler to look at is on_download():
def on_download(self, event):
    selection = self.search_results_olv.GetSelectedObject()
    if selection:
        with DownloadDialog(selection) as dlg:
            dlg.ShowModal()
Here you call GetSelectedObject() to get the user’s selection. If the user hasn’t selected anything, then this method exits. On the other hand, if the user has selected an item, then you instantiate the DownloadDialog and show it to the user to allow them to download something.
Now let’s learn how to do a search:
def on_search(self, event):
    search_term = event.GetString()
    if search_term:
        query = {'q': search_term, 'media_type': 'image'}
        full_url = base_url + '?' + urlencode(query, quote_via=quote_plus)
        r = requests.get(full_url)
        data = r.json()
        self.search_results = []
        for item in data['collection']['items']:
            if item.get('data') and len(item.get('data')) > 0:
                data = item['data'][0]
                if data['title'].strip() == '':
                    # Skip results with blank titles
                    continue
                result = Result(item)
                self.search_results.append(result)
        self.update_search_results()
The on_search() event handler will get the string that the user has entered into the search control or return an empty string. Assuming that the user actually enters something to search for, you use NASA’s general search query, q and hard code the media_type to image. Then you encode the query into a properly formatted URL and use requests.get() to request a JSON response.
Next you attempt to loop over the results of the search. Note that is no data is returned, this code will fail and cause an exception to be thrown. But if you do get data, then you will need to parse it to get the bits and pieces you need.
You will skip items that don’t have the title field set. Otherwise you will create a Result object and add it to the search_results list. At the end of the method, you tell your UI to update the search results.
Before we get to that function, you will need to create on_selection():
Once again, you get the selected item, but this time you take that selection and update the title text control with the selection’s title text. Then you check to see if there is a thumbnail and update that accordingly if there is one. When there is no thumbnail, you set it back to an empty image as you do not want it to keep showing a previously selected image.
The next method to create is update_image():
def update_image(self, url):
    filename = url.split('/')[-1]
    tmp_location = os.path.join(self.paths.GetTempDir(), filename)
    r = requests.get(url)
    with open(tmp_location, "wb") as thumbnail:
        thumbnail.write(r.content)

    if os.path.exists(tmp_location):
        img = wx.Image(tmp_location, wx.BITMAP_TYPE_ANY)
        W = img.GetWidth()
        H = img.GetHeight()
        if W > H:
            NewW = self.max_size
            NewH = self.max_size * H / W
        else:
            NewH = self.max_size
            NewW = self.max_size * W / H
        img = img.Scale(NewW,NewH)
    else:
        img = wx.Image(240, 240)

    self.image_ctrl.SetBitmap(wx.Bitmap(img))
    self.Refresh()
    self.Layout()
The update_image() accepts a URL as its sole argument. It takes this URL and splits off the filename. Then it creates a new download location, which is the computer’s temp directory. Your code then downloads the image and checks to be sure the file saved correctly. If it did, then the thumbnail is loaded using the max_size that you set; otherwise you set it to use a blank image.
The last couple of lines Refresh() and Layout() the panel so that the widget appear correctly.
Here you create the frame, set the title and initial size and add the panel. Then you show the frame.
This is what the main UI will look like:
NASA Image Search Main App
Now let’s learn what goes into making a download dialog!
The Download Dialog
The download dialog will allow the user to download one or more of the images that they have selected. There are almost always at least two versions of every image and sometimes five or six.
The first piece of code to learn about is the first few lines:
Here you once again import requests and set up a wildcard that you will use when saving the images.
Now let’s create the dialog’s __init__():
class DownloadDialog(wx.Dialog):

    def __init__(self, selection):
        super().__init__(None, title='Download images')
        self.paths = wx.StandardPaths.Get()
        main_sizer = wx.BoxSizer(wx.VERTICAL)
        self.list_box = wx.ListBox(self, choices=[], size=wx.DefaultSize)
        urls = self.get_image_urls(selection)
        if urls:
            choices = {url.split('/')[-1]: url for url in urls if 'jpg' in url}
            for choice in choices:
                self.list_box.Append(choice, choices[choice])
        main_sizer.Add(self.list_box, 1, wx.EXPAND|wx.ALL, 5)

        save_btn = wx.Button(self, label='Save')
        save_btn.Bind(wx.EVT_BUTTON, self.on_save)
        main_sizer.Add(save_btn, 0, wx.ALL|wx.CENTER, 5)
        self.SetSizer(main_sizer)
In this example, you create a new reference to StandardPaths and add a wx.ListBox. The list box will hold the variants of the photos that you can download. It will also automatically add a scrollbar should there be too many results to fit on-screen at once. You call get_image_urls with the passed in selection object to get a list of urls. Then you loop over the urls and extract the ones that have jpg in their name. This does result in you missing out on alternate image files types, such as PNG or TIFF.
This gives you an opportunity to enhance this code and improve it. The reason that you are filtering the URLs is that the results usually have non-image URLs in the mix and you probably don’t want to show those as potentially downloadable as that would be confusing to the user.
The last widget to be added is the “Save” button. You could add a “Cancel” button as well, but the dialog has an exit button along the top that works, so it’s not required.
Now it’s time to learn what get_image_urls() does:
This event handler is activated when the user presses the “Save” button. When the user tries to save something without selecting an item in the list box, it will return -1. Should that happen, you show them a MessageDialog to tell them that they might want to select something. When they do select something, you will show them a wx.FileDialog that allows them to choose where to save the file and what to call it.
The event handler calls the save() method, so that is your next project:
def save(self, path):
    selection = self.list_box.GetSelection()
    r = requests.get(
        self.list_box.GetClientData(selection))
    try:
        with open(path, "wb") as image:
            image.write(r.content)

        message = 'File saved successfully'
        with wx.MessageDialog(None, message=message,
                              caption='Save Successful',
                              style=wx.ICON_INFORMATION) as dlg:
            dlg.ShowModal()
    except:
        message = 'File failed to save!'
        with wx.MessageDialog(None, message=message,
                              caption='Save Failed',
                              style=wx.ICON_ERROR) as dlg:
            dlg.ShowModal()
Here you get the selection again and use the requests package to download the image. Note that there is no check to make sure that the user has added an extension, let along the right extension. You can add that yourself when you get a chance.
Anyway, when the file is finished downloading, you will show the user a message letting them know.
If an exception occurs, you can show them a dialog that let’s them know that too!
Here is what the download dialog looks like:
NASA Image Download Dialog
Now let’s add some new functionality!
Adding Advanced Search
There are several fields that you can use to help narrow your search. However you don’t want to clutter your user interface with them unless the user really wants to use those filters. To allow for that, you can add an “Advanced Search” option.
Adding this option requires you to rearrange your code a bit, so let’s copy your nasa_search_ui.py file and your download_dialog.py module to a new folder called version_2.
Now rename nasa_search_ui.py to main.py to make it more obvious which script is the main entry point for your program. To make things more modular, you will be extracting your search results into its own class and have the advanced search in a separate class. This means that you will have three panels in the end:
The main panel
The search results panel
The advanced search panel
Here is what the main dialog will look like when you are finished:
NASA Image Search with Advanced Search Option
Let’s go over each of these separately.
The main.py Script
The main module is your primary entry point for your application. An entry point is the code that your user will run to launch your application. It is also the script that you would use if you were to bundle up your application into an executable.
Let’s take a look at how your main module starts out:
# main.py

import wx

from advanced_search import RegularSearch
from regular_search import SearchResults
from pubsub import pub


class MainPanel(wx.Panel):

    def __init__(self, parent):
        super().__init__(parent)
        pub.subscribe(self.update_ui, 'update_ui')

        self.main_sizer = wx.BoxSizer(wx.VERTICAL)
        search_sizer = wx.BoxSizer()
This example imports both of your search-related panels:
AdvancedSearch
RegularSearch
It also uses pubsub to subscribe to an update topic.
Here you add the title for the page along with the search control widget as you did before. You also add the new Advanced Search button and use a new sizer to contain the search widget and the button. You then add that sizer to your main sizer.
In this example, you instantiate the RegularSearch and the AdvancedSearch panels. Since the RegularSearch is the default, you hide the AdvancedSearch from the user on startup.
The on_search() method will get called when the user presses “Enter / Return” on their keyboard or when they press the search button icon in the search control widget. If the user has entered a search string into the search control, a search query will be constructed and then sent off using pubsub.
Let’s find out what happens when the user presses the Advanced Search button:
When on_advanced_search() fires, it hides the search widget, the regular search panel and the advanced search button. Next, it shows the advanced search panel and calls Layout() on the main_sizer. This will cause the panels to switch out and resize to fit properly within the frame.
The last method to create is update_ui():
def update_ui(self):
    """
    Hide advanced search and re-show original screen

    Called by pubsub when advanced search is invoked
    """
    self.advanced_search_panel.Hide()
    self.search.Show()
    self.search_panel.Show()
    self.advanced_search_btn.Show()
    self.main_sizer.Layout()
The update_ui() method is called when the user does an Advanced Search. This method is invoked by pubsub. It will do the reverse of on_advanced_search() and un-hide all the widgets that were hidden when the advanced search panel was shown. It will also hide the advanced search panel.
The frame code is the same as it was before, so it is not shown here.
Let’s move on and learn how the regular search panel is created!
The regular_search.py Script
The regular_search module is your refactored module that contains the ObjectListView that will show your search results. It also has the Download button on it.
The following methods / classes will not be covered as they are the same as in the previous iteration:
on_download()
on_selection()
update_image()
update_search_results()
The Result class
Let’s get started by seeing how the first few lines in the module are laid out:
# regular_search.py

import os
import requests
import wx

from download_dialog import DownloadDialog
from ObjectListView import ObjectListView, ColumnDefn
from pubsub import pub
from urllib.parse import urlencode, quote_plus

base_url = 'https://images-api.nasa.gov/search'
Here you have all the imports you had in the original nasa_search_ui.py script from version_1. You also have the base_url that you need to make requests to NASA’s image API. The only new import is for pubsub.
Let’s go ahead and create the RegularSearch class:
This code will initialize the search_results list to an empty list and set the max_size of the image. It also sets up a sizer and the ObjectListView widget that you use for displaying the search results to the user. The code is actually quite similar to the first iteration of the code when all the classes were combined.
The first item here is to add a spacer to the main_sizer. Then you add the title and the img related widgets. The last widget to be added is still the download button.
The reset_image() method is for resetting the wx.StaticBitmap back to an empty image. This can happen when the user uses the regular search first, selects an item and then decides to do an advanced search. Resetting the image prevents the user from seeing a previously selected item and potentially confusing the user.
The last method you need to add is load_search_results():
def load_search_results(self, query):
    full_url = base_url + '?' + urlencode(query, quote_via=quote_plus)
    r = requests.get(full_url)
    data = r.json()
    self.search_results = []
    for item in data['collection']['items']:
        if item.get('data') and len(item.get('data')) > 0:
            data = item['data'][0]
            if data['title'].strip() == '':
                # Skip results with blank titles
                continue
            result = Result(item)
            self.search_results.append(result)
    self.update_search_results()
    self.reset_image()
The load_search_results() method is called using pubsub. Both the main and the advanced_search modules call it by passing in a query dictionary. Then you encode that dictionary into a formatted URL. Next you use requests to send a JSON request and you then extract the results. This is also where you call reset_image() so that when a new set of results loads, there is no result selected.
Now you are ready to create an advanced search!
The advanced_search.py Script
The advanced_search module is a wx.Panel that has all the widgets you need to do an advanced search against NASA’s API. If you read their documentation, you will find that there are around a dozen filters that can be applied to a search.
The code to set up the various filters is all pretty similar. You create a text control for the filter, then you pass it into ui_helper() along with a string that is a label for the text control widget. Repeat until you have all the filters in place.
At the end, you set the sizer to the main_sizer. Note that not all the filters that are in NASA’s API are implemented in this code. For example, I didn’t add media_type because this application will be hard-coded to only look for images. However if you wanted audio or video, you could update this application for that. I also didn’t include the year_start and year_end filters. Feel free to add those if you wish.
Now let’s move on and create the ui_helper() method:
The ui_helper() takes in label text and the text control widget. It then creates a wx.BoxSizer and a wx.StaticText. The wx.StaticText is added to the sizer, as is the passed-in text control widget. Finally the new sizer is added to the main_sizer and then you’re done. This is a nice way to reduce repeated code.
The last item to create in this class is on_search():
When the user presses the Search button, this event handler gets called. It creates the search query based on what the user has entered into each of the fields. Then the handler will send out two messages using pubsub. The first message will update the UI so that the advanced search is hidden and the search results are shown. The second message will actually execute the search against NASA’s API.
Here is what the advanced search page looks like:
NASA Image Search with Advanced Search Page
Now let’s update the download dialog.
The download_dialog.py Script
The download dialog has a couple of minimal changes to it. Basically you need to add an import of Python’s os module and then update the save() function.
Add the following lines to the beginning of the function:
This code was added to account for the case where the user does not specify the extension of the image in the saved file name.
Wrapping Up
This article covered a lot of fun new information. You learned one approach for working with an open API that doesn’t have a Python wrapper already around it. You discovered the importance of reading the API documentation and then added a user interface to that API. Then you learned how to parse JSON and download images from the Internet.
While it is not covered here, Python has a json module that you could use as well.
Here are some ideas for enhancing this application:
Caching search results
Downloading thumbnails in the background
Downloading links in the background
You could use threads to download the thumbnails and the larger images as well as for doing the web requests in general. This would improve the performance of your application. You may have noticed that the application became slightly unresponsive, depending on your Internet connectivity. This is because when it is doing a web request or downloading a file, it blocks the UI’s main loop. You should give threads a try if you find that sort of thing bothersome.