Creating GUI Applications with wxPython is a book that will teach you how to use wxPython to create applications by actually creating several mini-programs. I have found that while learning how the various widgets work in wxPython is valuable, it is even better to learn by creating a simple application that does something useful.
In this book, you will be creating the following applications:
A simple image viewer
A database viewer
A database editor
Calculator
An Archiving application (tar)
PDF Merging application
XML Editor
File search utility
Simple FTP application
NASA Image downloader
As you learn how to create these applications, you will also learn how wxPython works. You will go over how wxPython’s event system works, how to use threads in wxPython, make use of sizers and much, much more!
The eBook version is on sale on Leanpub for $14.99 until May 15th. You can also purchase the book on Gumroad, or get the paperback or Kindle version on Amazon.
There are many widgets that are included with the wxPython GUI toolkit. One of them is a fairly handy widget called wx.StaticBox. This widget accepts a string and then will draw a box with the string in the upper left-hand corned of the box. However this only works when you use it in conjunction with wx.StaticBoxSizer.
Here is an example of what one might look like:
Now let’s go ahead and write the code you would use to create the example above:
import wx

class MyPanel(wx.Panel):

    def __init__(self, parent):
        super().__init__(parent)
        box = wx.StaticBox(self, -1, "This is a wx.StaticBox")
        bsizer = wx.StaticBoxSizer(box, wx.VERTICAL)

        t = wx.StaticText(self, -1, "Controls placed \"inside\" the box are really its siblings")
        bsizer.Add(t, 0, wx.TOP|wx.LEFT, 10)

        border = wx.BoxSizer()
        border.Add(bsizer, 1, wx.EXPAND|wx.ALL, 25)
        self.SetSizer(border)


class MyFrame(wx.Frame):

    def __init__(self):
        super().__init__(None, title='Test')
        panel = MyPanel(self)
        self.Show()

if __name__ == '__main__':
    app = wx.App(False)
    frame = MyFrame()
    app.MainLoop()
This code is based on the wx.StaticBox demo code from wxPython’s demo application. Basically you create the wx.StaticBox, add it to an instance of wx.StaticBoxSizer and then add that to a wx.BoxSizer and you’re done.
But what if you wanted a more complicated layout within the box?
Let’s take a look at that use-case next!
Nesting Sizers in wx.StaticBoxSizer
More often then not, you will want more than a single widget inside of your box widget. When that happens, you will need to use sizers inside of your wx.StaticBoxSizer.
Here is an example:
Let’s go ahead and take a look at the code for this example:
In this case, you need to create two vertically oriented wx.BoxSizers to hold the four widgets in two columns. You add those sizers to a horizontally oriented wx.BoxSizer as well. If you wanted to simplify this a bit, you could use a wx.GridSizer instead of these BoxSizers.
Regardless of the approach, you end up with a nicely laid out application.
Wrapping Up
Using the wx.StaticBox widget is pretty straight-forward overall. I think it could be simpler if the widget and the sizer were combined into one class though. Anyway, if you’d like to learn more about this widget, you should see the documentation. Have fun and happy coding!
I was recently working on a GUI application that had a wx.Notebook in it. When the user changed tabs in the notebook, I wanted the application to do an update based on the newly shown (i.e. selected) tab. I quickly discovered that while it is easy to catch the tab change event, getting the right tab is not as obvious.
This article will walk you through my mistake and show you two solutions to the issue.
Here is an example of what I did originally:
# simple_note.py

import random
import wx


class TabPanel(wx.Panel):

    def __init__(self, parent, name):
        """"""
        super().__init__(parent=parent)
        self.name = name

        colors = ["red", "blue", "gray", "yellow", "green"]
        self.SetBackgroundColour(random.choice(colors))

        btn = wx.Button(self, label="Press Me")
        sizer = wx.BoxSizer(wx.VERTICAL)
        sizer.Add(btn, 0, wx.ALL, 10)
        self.SetSizer(sizer)


class DemoFrame(wx.Frame):
    """
    Frame that holds all other widgets
    """


    def __init__(self):
        """Constructor"""
        super().__init__(None, wx.ID_ANY,
                         "Notebook Tutorial",
                         size=(600,400)
                         )
        panel = wx.Panel(self)

        self.notebook = wx.Notebook(panel)
        self.notebook.Bind(wx.EVT_NOTEBOOK_PAGE_CHANGED, self.on_tab_change)
        tabOne = TabPanel(self.notebook, name='Tab 1')
        self.notebook.AddPage(tabOne, "Tab 1")

        tabTwo = TabPanel(self.notebook, name='Tab 2')
        self.notebook.AddPage(tabTwo, "Tab 2")

        sizer = wx.BoxSizer(wx.VERTICAL)
        sizer.Add(self.notebook, 1, wx.ALL|wx.EXPAND, 5)
        panel.SetSizer(sizer)
        self.Layout()

        self.Show()

    def on_tab_change(self, event):
        # Works on Windows and Linux, but not Mac
        current_page = self.notebook.GetCurrentPage()
        print(current_page.name)
        event.Skip()


if __name__ == "__main__":
    app = wx.App(False)
    frame = DemoFrame()
    app.MainLoop()
This code works correctly on Linux and Windows. However when you run it on Mac OSX, the current page that is reported is always the tab that you were on before you selected the current page. It's kind of like an off-by-one error but in a GUI.
After trying our a couple of ideas on my own, I decided to ask the wxPython Google group for help.
They had two workarounds:
Use GetSelection() along with the notebook's GetPage() method
Use the FlatNotebook widget
Using GetSelection()
Using the event object's GetSelection() method will return the index of the currently selected tab. Then you can use the notebook's GetPage() method to get the actual page. This was the suggestion that Robin Dunn, the maintainer of wxPython, gave to me.
Here is the code updated to use that fix:
# simple_note2.py

import random
import wx


class TabPanel(wx.Panel):

    def __init__(self, parent, name):
        """"""
        super().__init__(parent=parent)
        self.name = name

        colors = ["red", "blue", "gray", "yellow", "green"]
        self.SetBackgroundColour(random.choice(colors))

        btn = wx.Button(self, label="Press Me")
        sizer = wx.BoxSizer(wx.VERTICAL)
        sizer.Add(btn, 0, wx.ALL, 10)
        self.SetSizer(sizer)


class DemoFrame(wx.Frame):
    """
    Frame that holds all other widgets
    """


    def __init__(self):
        """Constructor"""
        super().__init__(None, wx.ID_ANY,
                         "Notebook Tutorial",
                         size=(600,400)
                         )
        panel = wx.Panel(self)

        self.notebook = wx.Notebook(panel)
        self.notebook.Bind(wx.EVT_NOTEBOOK_PAGE_CHANGED, self.on_tab_change)
        tabOne = TabPanel(self.notebook, name='Tab 1')
        self.notebook.AddPage(tabOne, "Tab 1")

        tabTwo = TabPanel(self.notebook, name='Tab 2')
        self.notebook.AddPage(tabTwo, "Tab 2")

        sizer = wx.BoxSizer(wx.VERTICAL)
        sizer.Add(self.notebook, 1, wx.ALL|wx.EXPAND, 5)
        panel.SetSizer(sizer)
        self.Layout()

        self.Show()

    def on_tab_change(self, event):
        # Works on Windows, Linux and Mac
        current_page = self.notebook.GetPage(event.GetSelection())
        print(current_page.name)
        event.Skip()

if __name__ == "__main__":
    app = wx.App(False)
    frame = DemoFrame()
    app.MainLoop()
That was a fairly simple fix, but kind of annoying because it's not obvious why you need to do that.
Using FlatNotebook
The other option was to swap out the wx.Notebook for the FlatNotebook. Let's see how that looks:
# simple_note.py

import random
import wx
import wx.lib.agw.flatnotebook as fnb


class TabPanel(wx.Panel):

    def __init__(self, parent, name):
        """"""
        super().__init__(parent=parent)
        self.name = name

        colors = ["red", "blue", "gray", "yellow", "green"]
        self.SetBackgroundColour(random.choice(colors))

        btn = wx.Button(self, label="Press Me")
        sizer = wx.BoxSizer(wx.VERTICAL)
        sizer.Add(btn, 0, wx.ALL, 10)
        self.SetSizer(sizer)


class DemoFrame(wx.Frame):
    """
    Frame that holds all other widgets
    """


    def __init__(self):
        """Constructor"""
        super().__init__(None, wx.ID_ANY,
                         "Notebook Tutorial",
                         size=(600,400)
                         )
        panel = wx.Panel(self)

        self.notebook = fnb.FlatNotebook(panel)
        self.notebook.Bind(wx.EVT_NOTEBOOK_PAGE_CHANGED, self.on_tab_change)
        tabOne = TabPanel(self.notebook, name='Tab 1')
        self.notebook.AddPage(tabOne, "Tab 1")

        tabTwo = TabPanel(self.notebook, name='Tab 2')
        self.notebook.AddPage(tabTwo, "Tab 2")

        sizer = wx.BoxSizer(wx.VERTICAL)
        sizer.Add(self.notebook, 1, wx.ALL|wx.EXPAND, 5)
        panel.SetSizer(sizer)
        self.Layout()

        self.Show()

    def on_tab_change(self, event):
        # Works on Windows, Linux and Mac
        current_page = self.notebook.GetCurrentPage()
        print(current_page.name)
        event.Skip()


if __name__ == "__main__":
    app = wx.App(False)
    frame = DemoFrame()
    app.MainLoop()
Now you can go back to using the notebook's GetCurrentPage() method. You can also use self.notebook.GetPage(event.GetSelection()) like you do in the other workaround, but I feel like GetCurrentPage() is just more obvious what it is that you are doing.
Wrapping Up
This is one of the few times that I was caught by a strange gotcha in wxPython. You will come across these sorts of things from time to time when you are programming code that is meant to run across multiple platforms. It's always worth checking the documentation to make sure you're not using a method that is not supported on all platforms. Then you will want to do some research and testing on your own. But once you have done your due diligence, don't be afraid to ask for help. I will always seek assistance over wasting many hours of my own time, especially when it is something like this where my solution worked in 2 out of 3 cases.
Last month, I released a new book entitled Creating GUI Applications with wxPython. In celebration of a successful launch, I have decided to do a little contest.
Rules
Tweet about the contest and include my handle: @driscollis
Send me a direct message on Twitter or via my contact form with a link to your Tweet
If you don’t have Twitter, feel free to message me through the website and I’ll enter you anyway
The contest will run starting now until Friday, June 21st @ 11:59 p.m. CST.
Runners up will receive a free copy of the eBook. The grand prize will be a signed paperback copy + the eBook version!
The Portable Document Format (PDF) is a well-known format popularized by Adobe. It purports to create a document that should render the same across platforms.
Python has several libraries that you can use to work with PDFs:
ReportLab – Creating PDFs
PyPDF2 – Manipulating preexisting PDFs
pdfrw – Also for manipulating preexisting PDFs, but also works with ReportLab
PDFMiner – Extracts text from PDFs
There are several more Python PDF-related packages, but those four are probably the most well known. One common task of working with PDFs is the need for merging or concatenating multiple PDFs into one PDF. Another common task is taking a PDF and splitting out one or more of its pages into a new PDF.
You will be creating a graphical user interface that does both of these tasks using PyPDF2.
This tutorial is from my book, Creating GUI Applications with wxPython. You can get it here:
The full code for this tutorial can be found on Github in the chapter 10 folder.
Installing PyPDF2
The PyPDF2 package can be installed using pip:
pip install pypdf2
This package is pretty small, so the installation should be quite quick.
Now that PyPDF2 is installed, you can design your UI!
Designing the Interface
This application is basically two programs contained in one window. You need a way of displaying a merging application and a splitting application. Having an easy way to switch between the two would be nice. You can design your own panel swapping code or you can use one of wxPython’s many notebook widgets.
To keep things simpler, let’s use a wx.Notebook for this application.
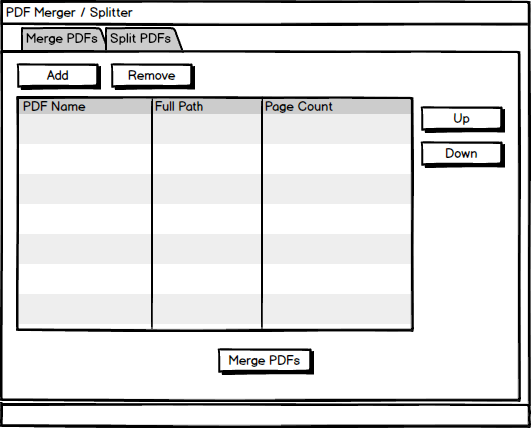
Here is a mockup of the merging tab:
The PDF Merger Mockup
You will be loading up PDF files into a list control type widget. You also want a way to re-order the PDFs. And you need a way to remove items from the list. This mockup shows all the pieces you need to accomplish those goals.
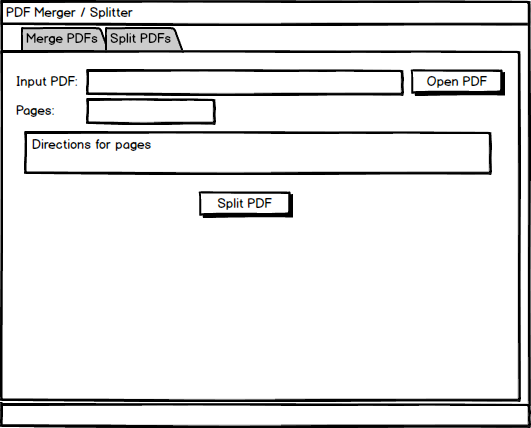
Next is a mockup of the splitting tab:
The PDF Splitter Mockup
Basically what you want is a tool that shows what the input PDF is and what page(s) are to be split off. The user interface for this is pretty plain, but it should work for your needs.
Now let’s create this application!
Creating the Application
Let’s put some thought into your code’s organization. Each tab should probably be in its own module. You should also have a main entry point to run your application. That means you can reasonably have at least three Python files.
Here is what you will be creating:
The main module
The merge panel module
The split panel module
Let’s start with the main module!
The Main Module
As the main entry point of your application, the main module has a lot of responsibility. It will hold your other panels and could be a hub between the panels should they need to communicate. Most of the time, you would use pubsub for that though.
Let’s go ahead and write your first version of the code:
# main.py

import wx

from merge_panel import MergePanel
from split_panel import SplitPanel
The imports for the main module are nice and short. All you need is wx, the MergePanel and the SplitPanel. The latter two are ones that you will write soon.
Let’s go ahead and write the MainPanel code though:
The MainPanel is where all the action is. Here you instantiate a wx.Notebook and add the MergePanel and the SplitPanel to it. Then you add the notebook to the sizer and you’re done!
As usual, you construct your frame, add a panel and show it to the user. You also set the size of the frame. You might want to experiment with the initial size as it may be too big or too small for your setup.
Now let’s move on and learn how to merge PDFs!
The merge_panel Module
The merge_panel module contains all the code you need for creating a user interface around merging PDF files. The user interface for merging is a bit more involved than it is for splitting.
Let’s get started!
# merge_panel.py

import os
import glob
import wx

from ObjectListView import ObjectListView, ColumnDefn
from PyPDF2 import PdfFileReader, PdfFileWriter

wildcard = "PDFs (*.pdf)|*.pdf"
Here you need to import Python’s os module for some path-related activities and the glob module for searching duty. You will also need ObjectListView for displaying PDF information and PyPDF2 for merging the PDFs together.
The last item here is the wildcard which is used when adding files to be merged as well as when you save the merged file.
To make the UI more friendly, you should add drag-and-drop support:
class DropTarget(wx.FileDropTarget):

    def __init__(self, window):
        super().__init__()
        self.window = window

    def OnDropFiles(self, x, y, filenames):
        self.window.update_on_drop(filenames)
        return True
You may recognize this code from the Archiver chapter. In fact, it’s pretty much unchanged. You still need to subclass wx.FileDropTarget and pass it the widget that you want to add drag-and-drop support to. You also need to override OnDropFile() to have it call a method using the widget you passed in. For this example, you are passing in the panel object itself.
You will also need to create a class for holding information about the PDFs. This class will be used by your ObjectListView widget.
Here it is:
class Pdf:

    def __init__(self, pdf_path):
        self.full_path = pdf_path
        self.filename = os.path.basename(pdf_path)
        try:
            with open(pdf_path, 'rb') as f:
                pdf = PdfFileReader(f)
                number_of_pages = pdf.getNumPages()
        except:
            number_of_pages = 0
        self.number_of_pages = str(number_of_pages)
The __init__() is nice and short this time around. You set up a list of pdfs for holding the PDF objects to be merged. You also instantiate and add the DropTarget to the panel. Then you create the main_sizer and call create_ui(), which will add all the widgets you need.
The create_ui() method is a bit long. The code will be broken up to make it easier to digest. The code above will add two buttons:
An Add file button
A Remove file button
These buttons go inside of a horizontally-oriented sizer along the top of the merge panel. You also bind each of these buttons to their own event handlers.
Now let’s add the widget for displaying PDFs to be merged:
Here you add two more buttons. One for moving items up and one for moving items down. These two buttons are added to a vertically-oriented sizer, move_btn_sizer, which in turn is added to the row_sizer. Finally the row_sizer is added to the main_sizer.
Here’s the last few lines of the create_ui() method:
You will be calling this method with a path to a PDF that you wish to merge with another PDF. This method will create an instance of the Pdf class and append it to the pdfs list.
Now you’re ready to create load_pdfs():
def load_pdfs(self, path):
    pdf_paths = glob.glob(path + '/*.pdf')
    for path in pdf_paths:
        self.add_pdf(path)
    self.update_pdfs()
This method takes in a folder rather than a file. It then uses glob to find all the PDFs in that folder. You will loop over the list of files that glob returns and use add_pdf() to add them to the pdfs list. Then you call update_pdfs() which will update the UI with the newly added PDF files.
Let’s find out what happens when you press the merge button:
def on_merge(self, event):
    """
    TODO - Move this into a thread
    """
    objects = self.pdf_olv.GetObjects()
    if len(objects) < 2:
        with wx.MessageDialog(
            None,
            message='You need 2 or more files to merge!',
            caption='Error',
            style= wx.ICON_INFORMATION) as dlg:
            dlg.ShowModal()
        return
    with wx.FileDialog(
        self, message="Choose a file",
        defaultDir='~',
        defaultFile="",
        wildcard=wildcard,
        style=wx.FD_SAVE | wx.FD_CHANGE_DIR
        ) as dlg:
        if dlg.ShowModal() == wx.ID_OK:
            path = dlg.GetPath()
    if path:
        _, ext = os.path.splitext(path)
        if '.pdf' not in ext.lower():
            path = f'{path}.pdf'
        self.merge(path)
The on_merge() method is the event handler that is called by your merge button. The docstring contains a TODO message to remind you to move the merging code to a thread. Technically the code you will be moving is actually in the merge() function, but as long as you have some kind of reminder, it doesn't matter all that much.
Anyway, you use GetObjects() to get all the PDFs in the ObjectListView widget. Then you check to make sure that there are at least two PDF files. If not, you will let the user know that they need to add more PDFs! Otherwise you will open up a wx.FileDialog and have the user choose the name and location for the merged PDF.
Finally you check if the user added the .pdf extension and add it if they did not. Then you call merge().
The merge() method is conveniently the next method you should create:
def merge(self, output_path):
    pdf_writer = PdfFileWriter()

    objects = self.pdf_olv.GetObjects()

    for obj in objects:
        pdf_reader = PdfFileReader(obj.full_path)
        for page in range(pdf_reader.getNumPages()):
            pdf_writer.addPage(pdf_reader.getPage(page))

    with open(output_path, 'wb') as fh:
        pdf_writer.write(fh)

    with wx.MessageDialog(None, message='Save completed!',
                          caption='Save Finished',
                         style= wx.ICON_INFORMATION) as dlg:
        dlg.ShowModal()
Here you create a PdfFileWriter() object for writing out the merged PDF. Then you get the list of objects from the ObjectListView widget rather than the pdfs list. This is because you can reorder the UI so the list may not be in the correct order. The next step is to loop over each of the objects and get its full path out. You will open the path using PdfFileReader and loop over all of its pages, adding each page to the pdf_writer.
Once all the PDFs and all their respective pages are added to the pdf_writer, you can write out the merged PDF to disk. Then you open up a wx.MessageDialog that lets the user know that the PDFs have merged.
While this is happening, you may notice that your UI is frozen. That is because it can take a while to read all those pages into memory and then write them out. This is the reason why this part of your code should be done in a thread. You will be learning about that refactor later on in this chapter.
Now let's create on_add_file():
def on_add_file(self, event):
    paths = None
    with wx.FileDialog(
        self, message="Choose a file",
        defaultDir='~',
        defaultFile="",
        wildcard=wildcard,
        style=wx.FD_OPEN | wx.FD_MULTIPLE
        ) as dlg:
        if dlg.ShowModal() == wx.ID_OK:
            paths = dlg.GetPaths()
    if paths:
        for path in paths:
            self.add_pdf(path)
        self.update_pdfs()
This code will open up a wx.FileDialog and let the user choose one or more files. Then it returns them as a list of paths. You can then loop over those paths and use add_path() to add them to the pdfs list.
Now let's find out how to reorder the items in the ObjectListView widget:
def on_move(self, event):
    btn = event.GetEventObject()
    label = btn.GetLabel()
    current_selection = self.pdf_olv.GetSelectedObject()
    data = self.pdf_olv.GetObjects()
    if current_selection:
        index = data.index(current_selection)
        new_index = self.get_new_index(
            label.lower(), index, data)
        data.insert(new_index, data.pop(index))
        self.pdfs = data
        self.update_pdfs()
        self.pdf_olv.Select(new_index)
Both the up and down buttons are bound to the on_move() event handler. You can get access to which button called this handler via event.GetEventObject(), which will return the button object. Then you can get the button's label. Next you need to get the current_selection and a list of the objects, which is assigned to data. Now you can use the index attribute of the list object to find the index of the current_selection.
Once you have that information, you pass the button label, the index and the data list to get_new_index() to calculate which direction the item should go. Once you have the new_index, you can insert it and remove the old index using the pop() method. Then reset the pdfs list to the data list so they match. The last two steps are to update the widget and re-select the item that you moved.
Let's take a look at how to get that new index now:
def get_new_index(self, direction, index, data):
    if direction == 'up':
        if index > 0:
            new_index = index - 1
        else:
            new_index = len(data)-1
    else:
        if index < len(data) - 1:
            new_index = index + 1
        else:
            new_index = 0
    return new_index
Here you use the button label, direction, to determine which way to move the item. If it's "up", then you check if the index is greater than zero and subtract one. If it is zero, then you take the entire length of the list and subtract one, which should move the item back to the other end of the list.
If you user hit the "down" button, then you check to see if the index is less than the length of the data minus one. In that case, you add one to it. Otherwise you set the new_index to zero.
The code is a bit confusing to look at, so feel free to add some print functions in there and then run the code to see how it works.
The next new thing to learn is how to remove an item:
def on_remove(self, event):
    current_selection = self.pdf_olv.GetSelectedObject()
    if current_selection:
        index = self.pdfs.index(current_selection)
        self.pdfs.pop(index)
        self.pdf_olv.RemoveObject(current_selection)
This method will get the current_selection, pop() it from the pdfs list and then use the RemoveObject() method to remove it from the ObjectListView widget.
Now let's take a look at the code that is called when you drag-and-drop items onto your application:
def update_on_drop(self, paths):
    for path in paths:
        _, ext = os.path.splitext(path)
        if os.path.isdir(path):
            self.load_pdfs(path)
        elif os.path.isfile(path) and ext.lower() == '.pdf':
            self.add_pdf(path)
            self.update_pdfs()
In this case, you loop over the paths and check to see if the path is a directory or a file. They could also be a link, but you will ignore those. If the path is a directory, then you call load_pdfs() with it. Otherwise you check to see if the file has an extension of .pdf and if it does, you call add_pdf() with it.
This method adds or resets the column names and widths. It also adds the PDF list via SetObjects().
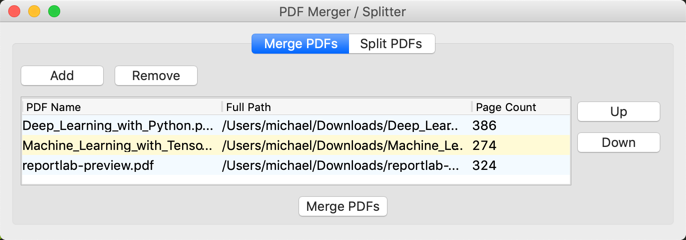
Here is what the merge panel looks like:
The PDF Merger Tab
Now you are ready to create the split_panel!
The split_panel Module
The split_panel module is a bit simpler than the merge_panel was. You really only need a couple of text controls, some labels and a button.
Let's see how all of that ends up laying out:
# split_panel.py

import os
import string
import wx

from PyPDF2 import PdfFileReader, PdfFileWriter

wildcard = "PDFs (*.pdf)|*.pdf"
Here you import Python's os and string modules. You will also be needing PyPDF2 again and the wildcard variable will be useful for opening and saving PDFs.
You will also need the CharValidator class from the calculator chapter.
It is reproduced for you again here:
class CharValidator(wx.Validator):
    '''
    Validates data as it is entered into the text controls.
    '''

    def __init__(self, flag):
        wx.Validator.__init__(self)
        self.flag = flag
        self.Bind(wx.EVT_CHAR, self.OnChar)

    def Clone(self):
        '''Required Validator method'''
        return CharValidator(self.flag)

    def Validate(self, win):
        return True

    def TransferToWindow(self):
        return True

    def TransferFromWindow(self):
        return True

    def OnChar(self, event):
        keycode = int(event.GetKeyCode())
        if keycode < 256:
            key = chr(keycode)
            if self.flag == 'no-alpha' and key in string.ascii_letters:
                return
            if self.flag == 'no-digit' and key in string.digits:
                return
        event.Skip()
The CharValidator class is useful for validating that the user is not entering any letters into a text control. You will be using it for splitting options, which will allow the user to choose which pages they want to split out of the input PDF.
But before we get to that, let's create the SplitPanel:
class SplitPanel(wx.Panel):

    def __init__(self, parent):
        super().__init__(parent)
        font = wx.Font(12, wx.SWISS, wx.NORMAL, wx.NORMAL)
        main_sizer = wx.BoxSizer(wx.VERTICAL)
The first few lines of the __init__() create a wx.Font instance and the main_sizer.
This bit of code adds a row of widgets that will be contained inside of row_sizer. Here you have a nice label, a text control for holding the input PDF path and the "Open PDF" button. After adding each of these to the row_sizer, you will then add that sizer to the main_sizer.
Now let's add a second row of widgets:
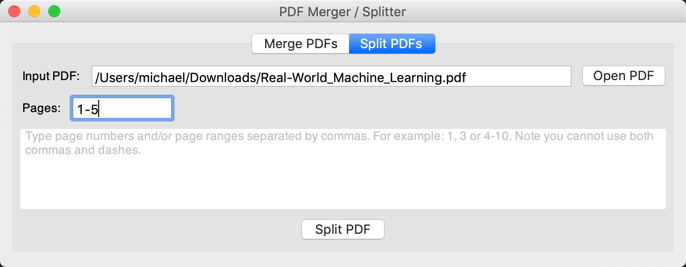
msg = 'Type page numbers and/or page ranges separated by commas.' \
    ' For example: 1, 3 or 4-10. Note you cannot use both commas ' \
    'and dashes.'
directions_txt = wx.TextCtrl(
    self, value=msg,
    style=wx.TE_MULTILINE | wx.NO_BORDER)
directions_txt.SetFont(font)
directions_txt.Disable()
main_sizer.Add(directions_txt, 0, wx.ALL | wx.EXPAND, 5)
These lines of code create a multi-line text control that has no border. It contains the directions of use for the pdf_split_options text control and appears beneath that widget as well. You also Disable() the directions_txt to prevent the user from changing the directions.
There are four more lines to add to the __init__():
These last few lines will add the "Split PDF" button, bind it to an event handler and add the button to a sizer. Then you set the sizer for the panel.
Now that you have the UI itself written, you need to start writing the other methods:
def on_choose(self, event):
    path = None
    with wx.FileDialog(
        self, message="Choose a file",
        defaultDir='~',
        defaultFile="",
        wildcard=wildcard,
        style=wx.FD_OPEN | wx.FD_CHANGE_DIR
        ) as dlg:
        if dlg.ShowModal() == wx.ID_OK:
            path = dlg.GetPath()
    if path:
        self.pdf_path.SetValue(path)
The on_choose() event handler is called when the user presses the "Open PDF" button. It will load a wx.FileDialog and if the user chooses a PDF, it will set the pdf_path text control with that user's choice.
Now let's get to the meat of the code:
def on_split(self, event):
    output_path = None
    input_pdf = self.pdf_path.GetValue()
    split_options = self.pdf_split_options.GetValue()
    if not input_pdf:
        message='You must choose an input PDF!'
        self.show_message(message)
        return
When the user presses the "Split PDF" button, on_split() is called. You will start off by checking if the user has chosen a PDF to split at all. If they haven't, tell them to do so using the show_message() method and return.
Next you need to check to see if the PDF path that the user chose still exists:
if not os.path.exists(input_pdf):
    message = f'Input PDF {input_pdf} does not exist!'
    self.show_message(message)
    return
If the PDF does not exist, let the user know of the error and don't do anything.
Now you need to check if the user put anything into split_options:
if not split_options:
    message = 'You need to choose what page(s) to split off'
    self.show_message(message)
    return
If the user didn't set the split_options then your application won't know what pages to split off. So tell the user.
The next check is to make sure the user does not have both commas and dashes:
if ',' in split_options and '-' in split_options:
    message = 'You cannot have both commas and dashes in options'
    self.show_message(message)
    return
You could theoretically support both commas and dashes, but that will make the code more complex. If you want to add that, feel free. For now, it is not supported.
Another item to check is if there is more than one dash:
if split_options.count('-') > 1:
    message = 'You can only use one dash'
    self.show_message(message)
    return
Users are tricky and it is easy to bump a button twice, so make sure to let the user know that this is not allowed.
The user could also enter a single negative number:
if '-' in split_options:
    page_begin, page_end = split_options.split('-')
    if not page_begin or not page_end:
        message = 'Need both a beginning and ending page'
        self.show_message(message)
        return
In that case, you can check to make sure it splits correctly or you can try to figure out where in the string the negative number is. In this case, you use the split method to figure it out.
The last check is to make sure that the user has entered a number and not just a dash or comma:
if not any(char.isdigit() for char in split_options):
    message = 'You need to enter a page number to split off'
    self.show_message(message)
    return
You can use Python's any builtin for this. You loop over all the characters in the string and ask them if they are a digit. If they aren't, then you show a message to the user.
Now you are ready to create the split PDF file itself:
with wx.FileDialog(
    self, message="Choose a file",
    defaultDir='~',
    defaultFile="",
    wildcard=wildcard,
    style=wx.FD_SAVE | wx.FD_CHANGE_DIR
    ) as dlg:
    if dlg.ShowModal() == wx.ID_OK:
        output_path = dlg.GetPath()
This bit of code will open the save version of the wx.FileDialog and let the user pick a name and location to save the split PDF.
The last piece of code for this function is below:
if output_path:
    _, ext = os.path.splitext(output_path)
    if '.pdf' not in ext.lower():
        output_path = f'{output_path}.pdf'
    split_options = split_options.strip()
    self.split(input_pdf, output_path, split_options)
Once you have the output_path, you will check to make sure the user added the .pdf extension. If they didn't, then you will add it for them. Then you will strip off any leading or ending white space in split_options and call split().
Now let's create the code used to actually split a PDF:
def split(self, input_pdf, output_path, split_options):
    pdf = PdfFileReader(input_pdf)
    pdf_writer = PdfFileWriter()
    if ',' in split_options:
        pages = [page for page in split_options.split(',')
                 if page]
        for page in pages:
            pdf_writer.addPage(pdf.getPage(int(page)))
    elif '-' in split_options:
        page_begin, page_end = split_options.split('-')
        page_begin = int(page_begin)
        page_end = int(page_end)
        page_begin = self.get_actual_beginning_page(page_begin)

        for page in range(page_begin, page_end):
            pdf_writer.addPage(pdf.getPage(page))
    else:
        # User only wants a single page
        page_begin = int(split_options)
        page_begin = self.get_actual_beginning_page(page_begin)
        pdf_writer.addPage(pdf.getPage(page_begin))
Here you create a PdfFileReader object called pdf and a PdfFileWriter object called pdf_writer. Then you check split_options to see if the user used commas or dashes. If the user went with a comma separated list, then you loop over the pages and add them to the writer.
If the user used dashes, then you need to get the beginning page and the ending page. Then you call the get_actual_beginning_page() method to do a bit of math because page one when using PyPDF is actually page zero. Once you have the normalized numbers figured out, you can loop over the range of pages using Python's range function and add the pages to the writer object.
The else statement is only used when the user enters a single page number that they want to split off. For example, they might just want page 2 out of a 20 page document.
The last step is to write the new PDF to disk:
# Write PDF to disk
with open(output_path, 'wb') as out:
    pdf_writer.write(out)

# Let user know that PDF is split
message = f'PDF split successfully to {output_path}'
self.show_message(message, caption='Split Finished',
                          style=wx.ICON_INFORMATION)
This code will create a new file using the path the user provided. Then it will write out the pages that were added to pdf_writer and display a dialog to the user letting them know that they now have a new PDF.
Let's take a quick look at the logic you need to add to the get_actual_beginning_page() method:
def get_actual_beginning_page(self, page_begin):
    if page_begin < 0 or page_begin == 1:
        page_begin = 0
    if page_begin > 1:
        # Take off by one error into account
        page_begin -= 1
    return page_begin
Here you take in the beginning page and check if the page number is zero, one or greater than one. Then you do a bit of math to avoid off-by-one errors and return the actual beginning page number.
Now let's create show_message():
def show_message(self, message, caption='Error', style=wx.ICON_ERROR):
    with wx.MessageDialog(None, message=message,
                          caption=caption,
                          style=style) as dlg:
        dlg.ShowModal()
This is a helpful function for wrapping the creation and destruction of a wx.MessageDialog. It accepts the following arguments:
message
caption
style flag
Then it uses Python's with statement to create an instance of the dialog and show it to the user.
Here is what the split panel looks like when you are finished coding:
The PDF Splitter Tab
Now you are ready to learn about threads and wxPython!
Using Threads in wxPython
Every GUI toolkit handles threads differently. The wxPython GUI toolkit has three thread-safe methods that you should use if you want to use threads:
wx.CallAfter
wx.CallLater
wx.PostEvent
You can use these methods to post information from the thread back to wxPython.
Let's update the merge_panel so that it uses threads!
Enhancing PDF Merging with Threads
Python comes with several concurrency-related modules. You will be using the threading module here. Take the original code and copy it into a new folder called version_2_threaded or refer to the pre-made folder in the Github repository for this chapter.
Let's start by updating the imports in merge_panel:
# merge_panel.py

import os
import glob
import wx

from ObjectListView import ObjectListView, ColumnDefn
from pubsub import pub
from PyPDF2 import PdfFileReader, PdfFileWriter
from threading import Thread

wildcard = "PDFs (*.pdf)|*.pdf"
The only differences here are this import line: from threading import Thread and the addition of pubsub. That gives us ability to subclass Thread.
The MergeThread class will take in the list of objects from the ObjectListView widget as well as the output_path. At the end of the __init__() you tell the thread to start(), which actually causes the run() method to execute.
Let's override that:
def run(self):
    pdf_writer = PdfFileWriter()
    page_count = 1

    for obj in self.objects:
        pdf_reader = PdfFileReader(obj.full_path)
        for page in range(pdf_reader.getNumPages()):
            pdf_writer.addPage(pdf_reader.getPage(page))
            wx.CallAfter(pub.sendMessage, 'update',
                         msg=page_count)
            page_count += 1

    # All pages are added, so write it to disk
    with open(self.output_path, 'wb') as fh:
        pdf_writer.write(fh)

    wx.CallAfter(pub.sendMessage, 'close')
Here you create a PdfFileWriter class and then loop over the various PDFs, extracting their pages and adding them to the writer object as you did before. After a page is added, you use wx.CallAfter to send a message using pubsub back to the GUI thread. In this message, you send along the current page count of added pages. This will update a dialog that has a progress bar on it.
After the file is finished writing out, you send another message via pubsub to tell the progress dialog to close.
To create a progress widget, you can use wxPython's wx.Gauge. In the code above, you subclass that widget and subscribe it to the update message. Whenever it receives an update, it will change the gauge's value accordingly.
You will need to put this gauge into a dialog, so let's create that next:
The MergeProgressDialog subscribes the dialog to the "close" message. It also adds a label and the gauge / progress bar to itself. Then it starts the MergeThread. When the "close" message gets emitted, the close() method is called and the dialog will be closed.
The other change you will need to make is in the MergePanel class, specifically the merge() method:
def merge(self, output_path, objects):
    with MergeProgressDialog(objects, output_path) as dlg:
        dlg.ShowModal()

    with wx.MessageDialog(None, message='Save completed!',
                          caption='Save Finished',
                         style= wx.ICON_INFORMATION) as dlg:
        dlg.ShowModal()
Here you update the method to accept the objects parameter and create the MergeProgressDialog with that and the output_path. Note that you will need to change on_merge() to pass in the objects list in addition to the path to make this work. Once the merge is finished, the dialog will automatically close and destroy itself. Then you will create the same wx.MessageDialog as before and show that to the user to let them know the merged PDF is ready.
You can use the code here to update the split_panel to use threads too if you would like to. This doesn't have to happen necessarily unless you think you will be splitting off dozens or hundreds of pages. Most of the time, it should be quick enough that the user wouldn't notice or care much when splitting the PDF.
Wrapping Up
Splitting and merging PDFs can be done using PyPDF2. You could also use pdfrw if you wanted to. There are plenty of ways to improve this application as well.
Here are a few examples:
Put splitting into a thread
Add toolbar buttons
Add keyboard shortcuts
Add a statusbar
However you learned a lot in this chapter. You learned how to merge and split PDFs. You also learned how to use threads with wxPython. Finally this code demonstrated adding some error handling to your inputs, specifically in the split_panel module.
This week I came across someone who was wondering if there was a way to allow the user to edit the contents of a wx.ComboBox. By editing the contents, I mean change the names of the pre-existing choices that the ComboBox contains, not adding new items to the widget.
While editing the contents of the selected item in a ComboBox works out of the box, the widget will not save those edits automatically. So if you edit something and then choose a different option in the ComboBox, the edited item will revert back to whatever it was previously and your changes will be lost.
Let’s find out how you can create a ComboBox that allows this functionality!
The first step when trying something new out is to write some code. You’ll need to create an instance of wx.ComboBox and pass it a list of choices as well as set the default choice. Of course, you cannot create a single widget in isolation. The widget must be inside of a parent widget. In wxPython, you almost always want the parent to be a wx.Panel that is inside of a wx.Frame.
Let’s write some code and see how this all lays out:
import wx

class MainPanel(wx.Panel):

    def __init__(self, parent):
        super().__init__(parent)

        self.cb_value = 'One'

        self.combo_contents = ['One', 'Two', 'Three']
        self.cb = wx.ComboBox(self, choices=self.combo_contents,
                              value=self.cb_value, size=(100, -1))

        self.cb.Bind(wx.EVT_TEXT, self.on_text_change)
        self.cb.Bind(wx.EVT_COMBOBOX, self.on_selection)

    def on_text_change(self, event):
        current_value = self.cb.GetValue()
        if current_value != self.cb_value and current_value not in self.combo_contents:
            # Value has been edited
            index = self.combo_contents.index(self.cb_value)
            self.combo_contents.pop(index)
            self.combo_contents.insert(index, current_value)
            self.cb.SetItems(self.combo_contents)
            self.cb.SetValue(current_value)
            self.cb_value = current_value

    def on_selection(self, event):
        self.cb_value = self.cb.GetValue()

class MainFrame(wx.Frame):

    def __init__(self):
        super().__init__(None, title='ComboBox Changing Demo')
        panel = MainPanel(self)
        self.Show()


if __name__ == "__main__":
    app = wx.App(False)
    frame = MainFrame()
    app.MainLoop()
The main part of the code that you are interested in is inside the MainPanel class. Here you create the widget, set its choices list and a couple of other parameters. Next you will need to bind the ComboBox to two events:
wx.EVT_TEXT – For text change events
wx.EVT_COMBOBOX – For changing item selection events
The first event, wx.EVT_TEXT, is fired when you change the text in the widget by typing and it also fires when you change the selection. The other event only fires when you change selections. The wx.EVT_TEXT event fires first, so it has precedence over wx.EVT_COMBOBOX.
When you change the text, on_text_change() is called. Here you will check if the current value of the ComboBox matches the value that you expect it to be. You also check to see if the current value matches the choice list that is currently set. This allows you to see if the user has changed the text. If they have, then you want to grab the index of the currently selected item in your choice list.
Then you use the list’s pop() method to remove the old string and the insert() method to add the new string in its place. Now you need to call the widget’s SetItems() method to update its choices list. Then you set its value to the new string and update the cb_value instance variable so you can check if it changes again later.
The on_selection() method is short and sweet. All it does is update cb_value to whatever the current selection is.
Give the code a try and see how it works!
Wrapping Up
Adding the ability to allow the user to update the wx.ComboBox‘s contents isn’t especially hard. You could even subclass wx.ComboBox and create a version where it does that for you all the time. Another enhancement that might be fun to add is to have the widget load its choices from a config file or a JSON file. Then you could update on_text_change() to save your changes to disk and then your application could save the choices and reload them the next time you start your application.
In this tutorial, you will learn how to improve the image viewer application that you created in the previous video tutorial to make it load up a folder of images.
Then you will add some buttons so that the user can go forwards and backwards through the images or play a slideshow of the images.
In this tutorial, you will learn how to add a wx.Notebook to your GUI application using wxPython. The notebook widget is how you would add a tabbed interface to your application.
In this video tutorial, you will learn how to add icons to your wxPython application’s title bar. This is a nice feature to add to your application to give your program some branding.
In this tutorial, I talk about some of Python’s most popular GUI frameworks. You will learn the basics of graphical user interfaces. Then you will learn how to create a simple image viewer using wxPython. Finally, you will see how to rewrite the image viewer using PySimpleGUI.
Have you ever needed to search for a file on your computer? Most operating systems have a way to do this. Windows Explorer has a search function and there’s also a search built-in to the Start Menu now. Other operating systems like Mac and Linux are similar. There are also applications that you can download that are sometimes faster at searching your hard drive than the built-in ones are.
In this article, you will be creating a simple file search utility using wxPython.
You will want to support the following tasks for the file search tool:
Search by file type
Case sensitive searches
Search in sub-directories
You can download the source code from this article on GitHub.
Let’s get started!
Designing Your File Search Utility
It is always fun to try to recreate a tool that you use yourself. However in this case, you will just take the features mentioned above and create a straight-forward user interface. You can use a wx.SearchCtrl for searching for files and an ObjectListView for displaying the results. For this particular utility, a wx.CheckBox or two will work nicely for telling your application to search in sub-directories or if the search term is case-sensitive or not.
Here is a mockup of what the application will eventually look like:
File Search Mockup
Now that you have a goal in mind, let’s go ahead and start coding!
Creating the File Search Utility
Your search utility will need two modules. The first module will be called main and it will hold your user interface and most of the application’s logic. The second module is named search_threads and it will contain the logic needed to search your file system using Python’s threading module. You will use pubsub to update the main module as results are found.
The main script
The main module has the bulk of the code for your application. If you go on and enhance this application, the search portion of the code could end up having the majority of the code since that is where a lot of the refinement of your code should probably go.
Regardless, here is the beginning of main:
# main.py

import os
import sys
import subprocess
import time
import wx

from ObjectListView import ObjectListView, ColumnDefn
from pubsub import pub
from search_threads import SearchFolderThread, SearchSubdirectoriesThread
This time around, you will be using a few more built-in Python modules, such as os, sys, subprocess and time. The other imports are pretty normal, with the last one being a couple of classes that you will be creating based around Python’s Thread class from the threading module.
For now though, let’s just focus on the main module.
The SearchResult class is used for holding information about the results from your search. It is also used by the ObjectListView widget. Currently, you will use it to hold the full path to the search result as well as the file’s modified time. You could easily enhance this to also include file size, creation time, etc.
Now let’s create the MainPanel which houses most of UI code:
The __init__() method gets everything set up. Here you create the main_sizer, an empty list of search_results and a listener or subscription using pubsub. You also call create_ui() to add the user interface widgets to the panel.
There are quite a few widgets to add to this user interface. To start off, you add a row of widgets that consists of a label, a text control and a button. This series of widgets allows the user to choose which directory they want to search using the button. The text control will hold their choice.
This row of widgets contains another label, a text control and two instances of wx.Checkbox. These are the filter widgets which control what you are searching for. You can filter based on any of the following:
The file type
Search sub-directories (when checked) or just the chosen directory
The search term is case-sensitive
The latter two options are represented by using the wx.Checkbox widget.
The wx.SearchCtrl is the widget to use for searching. You could quite easily use a wx.TextCtrl instead though. Regardless, in this case you bind to the press of the Enter key and to the mouse click of the magnifying class within the control. If you do either of these actions, you will call search().
Now let’s add the last two widgets and you will be done with the code for create_ui():
The results of your search will appear in your ObjectListView widget. You also need to add a button that will attempt to show the result in the containing folder, kind of like how Mozilla Firefox has a right-click menu called “Open Containing Folder” for opening downloaded files.
The next method to create is on_choose_folder():
def on_choose_folder(self, event):
with wx.DirDialog(self, "Choose a directory:",
style=wx.DD_DEFAULT_STYLE,
) as dlg:
if dlg.ShowModal() == wx.ID_OK:
self.directory.SetValue(dlg.GetPath())
You need to allow the user to select a folder that you want to conduct a search in. You could let the user type in the path, but that is error-prone and you might need to add special error checking. Instead, you opt to use a wx.DirDialog, which prevents the user from entering a non-existent path. It is possible for the user to select the folder, then delete the folder before executing the search, but that would be an unlikely scenario.
Now you need a way to open a folder with Python:
def on_show_result(self, event):
"""
Attempt to open the folder that the result was found in
"""
result = self.search_results_olv.GetSelectedObject()
if result:
path = os.path.dirname(result.path)
try:
if sys.platform == 'darwin':
subprocess.check_call(['open', '--', path])
elif 'linux' in sys.platform:
subprocess.check_call(['xdg-open', path])
elif sys.platform == 'win32':
subprocess.check_call(['explorer', path])
except:
if sys.platform == 'win32':
# Ignore error on Windows as there seems to be
# a weird return code on Windows
return
message = f'Unable to open file manager to {path}'
with wx.MessageDialog(None, message=message,
caption='Error',
style= wx.ICON_ERROR) as dlg:
dlg.ShowModal()
The on_show_result() method will check what platform the code is running under and then attempt to launch that platform’s file manager. Windows uses Explorer while Linux uses xdg-open for example.
During testing, it was noticed that on Windows, Explorer returns a non-zero result even when it opens Explorer successfully, so in that case you just ignore the error. But on other platforms, you can show a message to the user that you were unable to open the folder.
The next bit of code you need to write is the on_search() event handler:
def on_search(self, event):
search_term = self.search_ctrl.GetValue()
file_type = self.file_type.GetValue()
file_type = file_type.lower()
if '.' not in file_type:
file_type = f'.{file_type}'
if not self.sub_directories.GetValue():
# Do not search sub-directories
self.search_current_folder_only(search_term, file_type)
else:
self.search(search_term, file_type)
When you click the “Search” button, you want it to do something useful. That is where the code above comes into play. Here you get the search_term and the file_type. To prevent issues, you put the file type in lower case and you will do the same thing during the search.
Next you check to see if the sub_directories check box is checked or not. If sub_directories is unchecked, then you call search_current_folder_only(); otherwise you call search().
Let’s see what goes into search() first:
def search(self, search_term, file_type):
"""
Search for the specified term in the directory and its
sub-directories
"""
folder = self.directory.GetValue()
if folder:
self.search_results = []
SearchSubdirectoriesThread(folder, search_term, file_type,
self.case_sensitive.GetValue())
Here you grab the folder that the user has selected. In the event that the user has not chosen a folder, the search button will not do anything. But if they have chosen something, then you call the SearchSubdirectoriesThread thread with the appropriate parameters. You will see what the code in that class is in a later section.
But first, you need to create the search_current_folder_only() method:
def search_current_folder_only(self, search_term, file_type):
"""
Search for the specified term in the directory only. Do
not search sub-directories
"""
folder = self.directory.GetValue()
if folder:
self.search_results = []
SearchFolderThread(folder, search_term, file_type,
self.case_sensitive.GetValue())
This code is pretty similar to the previous function. Its only difference is that it executes SearchFolderThread instead of SearchSubdirectoriesThread.
The next function to create is update_search_results():
def update_search_results(self, result):
"""
Called by pubsub from thread
"""
if result:
path, modified_time = result
self.search_results.append(SearchResult(path, modified_time))
self.update_ui()
When a search result is found, the thread will post that result back to the main application using a thread-safe method and pubsub. This method is what will get called assuming that the topic matches the subscription that you created in the __init__(). Once called, this method will append the result to search_results and then call update_ui().
The update_ui() method defines the columns that are shown in your ObjectListView widget. It also calls SetObjects() which will update the contents of the widget and show your search results to the user.
To wrap up the main module, you will need to write the Search class:
This class creates the MainPanel which holds most of the widgets that the user will see and interact with. It also sets the initial size of the application along with its title. There is also a status bar that will be used to communicate to the user when a search has finished and how long it took for said search to complete.
Here is what the application will look like:
Now let’s move on and create the module that holds your search threads.
The search_threads Module
The search_threads module contains the two Thread classes that you will use for searching your file system. The thread classes are actually quite similar in their form and function.
Let’s get started:
# search_threads.py
import os
import time
import wx
from pubsub import pub
from threading import Thread
These are the modules that you will need to make this code work. You will be using the os module to check paths, traverse the file system and get statistics from files. You will use pubsub to communicate with your application when your search returns results.
This thread takes in the folder to search in, the search_term to look for, a file_type filter and whether or not the search term is case_sensitive. You take these in and assign them to instance variables of the same name. The point of this thread is only to search the contents of the folder that is passed-in, not its sub-directories.
You will also need to override the thread’s run() method:
def run(self):
start = time.time()
for entry in os.scandir(self.folder):
if entry.is_file():
if self.case_sensitive:
path = entry.name
else:
path = entry.name.lower()
if self.search_term in path:
_, ext = os.path.splitext(entry.path)
data = (entry.path, entry.stat().st_mtime)
wx.CallAfter(pub.sendMessage, 'update', result=data)
end = time.time()
# Always update at the end even if there were no results
wx.CallAfter(pub.sendMessage, 'update', result=[])
wx.CallAfter(pub.sendMessage, 'status', search_time=end-start)
Here you collect the start time of the thread. Then you use os.scandir() to loop over the contents of the folder. If the path is a file, you will check to see if the search_term is in the path and has the right file_type. Should both of those return True, then you get the requisite data and send it to your application using wx.CallAfter(), which is a thread-safe method.
Finally you grab the end_time and use that to calculate the total run time of the search and then send that back to the application. The application will then update the status bar with the search time.
The SearchSubdirectoriesThread thread is used for searching not only the passed-in folder but also its sub-directories. It accepts the same arguments as the previous class.
Here is what you will need to put in its run() method:
def run(self):
start = time.time()
for root, dirs, files in os.walk(self.folder):
for f in files:
full_path = os.path.join(root, f)
if not self.case_sensitive:
full_path = full_path.lower()
if self.search_term in full_path and os.path.exists(full_path):
_, ext = os.path.splitext(full_path)
data = (full_path, os.stat(full_path).st_mtime)
wx.CallAfter(pub.sendMessage, 'update', result=data)
end = time.time()
# Always update at the end even if there were no results
wx.CallAfter(pub.sendMessage, 'update', result=[])
wx.CallAfter(pub.sendMessage, 'status', search_time=end-start)
For this thread, you need to use os.walk() to search the passed in folder and its sub-directories. Besides that, the conditional statements are virtually the same as the previous class.
Wrapping Up
Creating search utilities is not particularly difficult, but it can be time-consuming. Figuring out the edge cases and how to account for them is usually what takes the longest when creating software. In this article, you learned how to create a utility to search for files on your computer.
Here are a few enhancements that you could add to this program:
Add the ability to stop the search
Prevent multiple searches from occurring at the same time
Add other filters
Related Reading
Want to learn how to create more GUI applications with wxPython? Then check out these resources below:
You learned how to create a file search GUI with wxPython in an earlier tutorial. In this article, you will learn how to create a text search utility with wxPython.
If you’d like to learn more about creating GUI applications, you should check out my book Creating GUI Applications with wxPython on Leanpub, Gumroad, or Amazon.
You can download the source code from this article on GitHub.
Now, let’s get started!
The Text Search Utility
A text search utility is a tool that can search inside of other files for words or phrases, like the popular GNU grep tool. There are some tools that can also search Microsoft Word, PDF file contents and more. You will focus only on searching text files. These include files like XML, HTML, Python files and other code files in addition to regular text files.
There is a nice Python package that does the text search for us called grin. Since this book is using Python 3, you will want to use grin3 as that is the version of grin that is compatible with Python 3.
You will add a light-weight user interface on top of this package that allows you to use it to search text files.
Installing the Dependencies
You can install grin3 by using pip:
pip install grin3
Once installed, you will be able to run grin or grind from the command line on Mac or Linux. You may need to add it to your path if you are on Windows.
Warning: The previous version of grin3 is grin. If you install that into Python 3 and attempt to run it, you will see errors raised as grin is NOT Python 3 compatible. You will need to uninstall grin and install grin3 instead.
Now you can design your user interface!
Designing a Text Search Utility
You can take the code from the file search utility earlier in this chapter and modify the user interface for use with the text search. You don’t care about the search term being case-sensitive right now, so you can remove that widget. You can also remove the sub-directories check box since grin will search sub-directories by default and that’s what you want anyway.
You could filter by file-type still, but to keep things simple, let’s remove that too. However you will need a way to display the files that were found along with the lines that contain the found text. To do that, you will need to add a multi-line text control in addition to the ObjectListView widget.
With all that in mind, here is the mockup:
It’s time to start coding!
Creating a Text Search Utility
Your new text searching utility will be split up into three modules:
The main module
The search_thread module
The preference module
The main module will contain the code for the main user interface. The search_thread module will contain the logic for searching for text using grin. And lastly, the preferences will be used for creating a dialog that you can use to save the location of the grin executable.
You can start by creating the main module now.
The main Module
The main module not only holds the user interface, but it will also check to make sure you have grin installed so that it will work. It will also launch the preferences dialog and show the user the search results, if any.
Here are the first few lines of code:
# main.py
import os
import sys
import subprocess
import time
import wx
from configparser import ConfigParser, NoSectionError
from ObjectListView import ObjectListView, ColumnDefn
from preferences import PreferencesDialog
from pubsub import pub
from search_thread import SearchThread
This main module has many of the same imports as the previous version of the main module. However in this one, you will be using Python’s configparser module as well as creating a PreferencesDialog and a SearchThread. The rest of the imports should be pretty self-explanatory.
You will need to copy the SearchResult class over and modify it like this:
class SearchResult:
def __init__(self, path, modified_time, data):
self.path = path
self.modified = time.strftime('%D %H:%M:%S',
time.gmtime(modified_time))
self.data = data
The class now accepts a new argument, data, which holds a string that contains references to all the places where the search term was found in the file. You will show that information to the user when the user selects a search result.
But first, you need to create the UI:
class MainPanel(wx.Panel):

    def __init__(self, parent):
        super().__init__(parent)
        self.search_results = []
        self.main_sizer = wx.BoxSizer(wx.VERTICAL)
        self.create_ui()
        self.SetSizer(self.main_sizer)
        pub.subscribe(self.update_search_results, 'update')
module_path = os.path.dirname(os.path.abspath( __file__ ))
self.config = os.path.join(module_path, 'config.ini')
if not os.path.exists(self.config):
message = 'Unable to find grin3 for text searches. ' \
'Install grin3 and open preferences to ' \
'configure it: pip install grin3'
self.show_error(message)
The MainPanel sets up an empty search_results list as before. It also creates the UI via a call to create_ui() and adds a pubsub subscription. But there is some new code added for getting the script’s path and checking for a config file. If the config file does not exist, you show a message to the user letting them know that they need to install grin3 and configure the application using the Preferences menu.
Now let’s see how the user interface code has changed:
This code will create a horizontal row_sizer and add three widgets: a label, a text control that holds the folder to search in and a button for choosing said folder. This series of widgets are the same as the previous ones in the other code example.
Once again, you create an instance of wx.SearchCtrl and bind it to the same events and the same event handler. The event handler’s code will be different, but you will see how that changes soon.
The on_selection event handler fires when the user selects a search result in the ObjectListView widget. You grab that selection and then set the value of the text control to the data attribute. The data attribute is a list of strings, so you need to use the string’s join() method to join all those lines together using a newline character: \n. You want each line to be on its own line to make the results easier to read.
You can copy the on_show_result() method from the file search utility to this one as there are no changes needed for that method.
The next bit of new code to write is the on_search() method:
The on_search() method is quite a bit simpler this time in that you only need to get the search_term. You don’t have any filters in this version of the application, which certainly reduces the code clutter. Once you have your term to search for, you call search().
Speaking of which, that is the next method to create:
def search(self, search_term):
    """
    Search for the specified term in the directory and its
    sub-directories
    """
    folder = self.directory.GetValue()
    config = ConfigParser()
    config.read(self.config)
    try:
        grin = config.get("Settings", "grin")
    except NoSectionError:
        self.show_error('Settings or grin section not found')
        return

    if not os.path.exists(grin):
        self.show_error(f'Grin location does not exist {grin}')
        return
    if folder:
        self.search_results = []
        SearchThread(folder, search_term)
The search() code will get the folder path and create a config object. It will then attempt to open the config file. If the config file does not exist or it cannot read the “Settings” section, you will show an error message. If the “Settings” section exists, but the path to the grin executable does not, you will show a different error message. But if you make it past these two hurdles and the folder itself is set, then you’ll start the SearchThread. That code is saved in another module, so you’ll have to wait to learn about that.
For now, let’s see what goes in the show_error() method:
def show_error(self, message):
    with wx.MessageDialog(None, message=message,
                          caption='Error',
                          style= wx.ICON_ERROR) as dlg:
        dlg.ShowModal()
This method will create a wx.MessageDialog and show an error to the user with the message that was passed to it. The function is quite handy for showing errors. You can update it a bit if you’d like to show other types of messages as well though.
When a search completes, it will send a pubsub message out that will cause the following code to execute:
def update_search_results(self, results):
    """
    Called by pubsub from thread
    """
    for key in results:
        if os.path.exists(key):
            stat = os.stat(key)
            modified_time = stat.st_mtime
            result = SearchResult(key, modified_time, results[key])
            self.search_results.append(result)

    if results:
        self.update_ui()
    else:
        search_term = self.search_ctrl.GetValue()
        self.search_results_olv.ClearAll()
        msg = f'No Results Found for: "{search_term}"'
        self.search_results_olv.SetEmptyListMsg(msg)
This method takes in a dict of search results. It then loops over the keys in the dict and verifies that the path exists. If it does, then you use os.stat() to get information about the file and create a SearchResult object, which you then append() to your search_results.
When a search returns no results, you will want to clear out the search results widget and notify the user that their search didn’t find anything.
The update_ui() code is pretty much exactly the same as the previous code:
The only difference here is that the columns are a bit wider than they are in the file search utility. This is because a lot of the results that were found during testing tended to be rather long strings.
The code for the wx.Frame has also changed as you now have a menu to add:
Here you create the Search frame and set the size a bit wider than you did for the other utility. You also create the panel, create a subscriber and create a menu. The update_status() method is the same as last time.
The truly new bit was the call to create_menu() which is what’s also next:
In this code you create the MenuBar and add a file_menu. Within that menu, you add two menu items; one for preferences and one for exiting the application.
You can create the exit code first:
def on_exit(self, event):
    self.Close()
This code will execute if the user goes into the File menu and chooses “Exit”. When they do that, your application will Close(). Since the frame is the top level window, when it closes, it will also destroy itself.
The final piece of code in this class is for creating the preferences dialog:
def on_preferences(self, event):
    with PreferencesDialog() as dlg:
        dlg.ShowModal()
Here you instantiate the PreferencesDialog and show it to the user. When the user closes the dialog, it will be automatically destroyed.
You will need to add the following code to the end of the file for your code to run:
When you are done coding the rest of this application, it will look like this:
Note that regular expressions are allowed by grin when you do a search, so you can enter them in your GUI as well.
The next step is to create the threading code!
The search_thread Module
The search_thread module contains your logic for searching for text within files using the grin3 executable. You only need one subclass of Thread in this module as you will always search subdirectories.
The first step is to create the imports:
# search_thread.py

import os
import subprocess
import time
import wx

from configparser import ConfigParser
from pubsub import pub
from threading import Thread
For the search_thread module, you will need access to the os, subprocess and time modules. The new one being the subprocess module because you will be launching an external application. The other new addition here is the ConfigParser, which you use to get the executable’s path from the config file.
Let’s continue and create the SearchThread itself:
The __init__() method takes in the target folder and the search_term to look for. It also recreates the module_path to derive the location of the config file.
The last step is to start() the thread. When that method is called, it rather incongruously calls the run() method.
Let’s override that next:
def run(self):
    start = time.time()
    config = ConfigParser()
    config.read(self.config)
    grin = config.get("Settings", "grin")
    cmd = [grin, self.search_term, self.folder]
    output = subprocess.check_output(cmd, encoding='UTF-8')
    current_key = ''
    results = {}
    for line in output.split('\n'):
        if self.folder in line:
            # Remove the colon off the end of the line
            current_key = line[:-1]
            results[current_key] = []
        elif not current_key:
            # key not set, so skip it
            continue
        else:
            results[current_key].append(line)
    end = time.time()
    wx.CallAfter(pub.sendMessage,
                 'update',
                 results=results)
    wx.CallAfter(pub.sendMessage, 'status', search_time=end-start)
Here you add a start time and get the config which should be created at this point. Next you create a list of commands. The grin utility takes the search term and the directory to search as its main arguments. There are actually other arguments you could add to make the search more targeted, but that would require additional UI elements and your objective is to keep this application nice and simple.
The next step is to call subprocess.check_output() which takes the list of commands. You also set the encoding to UTF-8. This tells the subprocess module to return a string rather than byte-strings and it also verifies that the return value is zero.
The results that are returned now need to be parsed. You can loop over each line by splitting on the newline character. Each file path should be unique, so those will become the keys to your results dictionary. Note that you will need to remove the last character from the line as the key has a colon on the end. This makes the path invalid, so removing that is a good idea. Then for each line of data following the path, you append it to the value of that particular key in the dictionary.
Once done, you send out two messages via pubsub to update the UI and the status bar.
Now it’s time to create the last module!
The preferences Module
The preferences module contains the code you will need for creating the PreferencesDialog which will allow you to configure where the grin executable is on your machine.
Let’s start with the imports:
# preferences.py

import os
import wx

from configparser import ConfigParser
Fortunately, the import section of the module is short. You only need the os, wx and configparser modules to make this work.
Now that you have that part figured out, you can create the dialog itself by going into the File -> Preferences menu:
Here you create the __init__() method and get the module_path so that you can find the config. Then you verify that the config exists. If it doesn’t, then you create the config file, but don’t set the executable location.
You do attempt to get its location via config.get(), but if it is blank in the file, then you will end up with an empty string.
The last three lines set up a sizer and call create_ui().
In this code, you create a row of widgets. A label, a text control that holds the executable’s path and a button for browsing to that path. You add all of these to the sizer which is then nested inside of the main_sizer. Then you add a “Save” button at the bottom of the dialog.
Here is the code for creating a config from scratch:
def create_config(self):
    config = ConfigParser()
    config.add_section("Settings")
    config.set("Settings", 'grin', '')

    with open(self.config, 'w') as config_file:
        config.write(config_file)
When the config does not exist, this code will get called. It instantiates a ConfigParser object and then adds the appropriate sections and settings to it. Then it writes it out to disk in the appropriate location.
The save() method is probably the next most important piece of code to write:
def save(self, event):
    grin_location = self.grin_location.GetValue()
    if not grin_location:
        self.show_error('Grin location not set!')
        return
    if not os.path.exists(grin_location):
        self.show_error(f'Grin location does not exist {grin_location}')
        return

    config = ConfigParser()
    config.read(self.config)
    config.set("Settings", "grin", grin_location)
    with open(self.config, 'w') as config_file:
        config.write(config_file)
    self.Close()
Here you get the location of the grin application from the text control and show an error if it is not set. You also show an error if the location does not exist. But if it is set and it does exist, then you open the config file back up and save that path to the config file for use by the main application. Once the save is finished, you Close() the dialog.
This last regular method is for showing errors:
def show_error(self, message):
    with wx.MessageDialog(None, message=message,
                          caption='Error',
                          style= wx.ICON_ERROR) as dlg:
        dlg.ShowModal()
This code is actually exactly the same as the show_error() method that you have in the main module. Whenever you see things like this in your code, you know that you should refactor it. This method should probably go into its own module that is then imported into the main and preferences modules. You can figure out how to do that on your own though.
Finally, you need to create the only event handler for this class:
def on_browse(self, event):
    """
    Browse for the grin file
    """
    wildcard = "All files (*.*)|*.*"
    with wx.FileDialog(None, "Choose a file",
                       wildcard=wildcard,
                       style=wx.ID_OPEN) as dialog:
        if dialog.ShowModal() == wx.ID_OK:
            self.grin_location.SetValue(dialog.GetPath())
This event handler is called when the user presses the “Browse” button to go find the grin executable. When they find the file, they can pick it and the text control will be set to its location.
Now that you have the dialog all coded up, here is what it looks like:
I don't know about you, but I enjoy listening to music. As an avid music fan, I also like to rip my CDs to MP3 so I can listen to my music on the go a bit easier. There is still a lot of music that is unavailable to buy digitally. Unfortunately, when you rip a lot of music, you will sometimes end up with errors in the MP3 tags. Usually, there is a mis-spelling in a title or a track isn't tagged with the right artist. While you can use many open source and paid programs to tag MP3 files, it's also fun to write your own.
That is the topic of this article. In this article, you will write a simple MP3 tagging application. This application will allow you to view an MP3 file's current tags as well as edit the following tags:
Artist
Album
Track Name
Track Number
The first step in your adventure is finding the right Python package for the job!
Finding an MP3 Package
There are several Python packages that you can use for editing MP3 tags. Here are a few that I found when I did a Google search:
eyeD3
mutagen
mp3-tagger
pytaglib
You will be using eyeD3 for this chapter. It has a nice API that is fairly straight-forward. Frankly, I found most of the APIs for these packages to be brief and not all that helpful. However, eyeD3 seemed a bit more natural in the way it worked than the others that I tried, which is why it was chosen.
By the way, the package name, eyeD3, refers to the ID3 specification for metadata related to MP3 files.
However, the mutagen package is definitely a good fallback option because it supports many other types of audio metadata. If you happen to be working with other audio file types besides MP3, then you should definitely give mutagen a try.
Installing eyeD3
The eyeD3 package can be installed with pip. If you have been using a virtual environment (venv or virtualenv) for this book, make sure you have it activated before you install eyeD3:
python3 -m pip install eyeD3
Once you have eyeD3 installed, you might want to check out its documentation:
Now let's get started and make a neat application!
Designing the MP3 Tagger
Your first step is to figure out what you want the user interface to look like. You will need the following features to make a useful application:
Some way to import MP3s
A way to display some of the metadata of the files
A method of editing the metadata
Here is a simple mockup of what the main interface might look like:
MP3 Tagger GUI Mockup
This user interface doesn't show how to actually edit the MP3, but it implies that the user would need to press the button at the bottom to start editing. This seems like a reasonable way to start.
Let's code the main interface first!
Creating the Main Application
Now comes the fun part, which is writing the actual application. You will be using ObjectListView again for this example for displaying the MP3's metadata. Technically you could use one of wxPython's list control widgets. If you'd like a challenge, you should try changing the code in this chapter to using one of those.
Note: The code for this article can be downloaded on GitHub
Anyway, you can start by creating a file named main.py and entering the following:
Here you have the imports you need. You also created a class called Mp3 which will be used by the ObjectListView widget. The first four instance attributes in this class are the metadata that will be displayed in your application and are defaulted to strings. The last instance attribute, id3, will be the object returned from eyed3 when you load an MP3 file into it.
Not all MP3s are created equal. Some have no tags whatsoever and others may have only partial tags. Because of those issues, you will check to see if id3.tag exists. If it does not, then the MP3 has no tags and you will need to call id3.initTag() to add blank tags to it. If id3.tag does exist, then you will want to make sure that the tags you are interested in also exist. That is what the first part of the if statement attempts to do when it calls the normalize_mp3() function.
The other item here is that if there are no dates set, then the best_release_date attribute will return None. So you need to check that and set it to some default if it happens to be None.
Let's go ahead and create the normalize_mp3() method now:
def normalize_mp3(self, tag):
    try:
        if tag:
            return tag
        else:
            return 'Unknown'
    except:
        return 'Unknown'
This will check to see if the specified tag exists. If it does, it simply returns the tag's value. If it does not, then it returns the string: 'Unknown'
The last method you need to implement in the Mp3 class is update():
This method is called at the end of the outer else in the class's __init__() method. It is used to update the instance attributes after you have initialized the tags for the MP3 file.
There may be some edge cases that this method and the __init__() method will not catch. You are encouraged to enhance this code yourself to see if you can figure out how to fix those kinds of issues.
Now let's go ahead and create a subclass of wx.Panel called TaggerPanel:
The TaggerPanel is nice and short. Here you set up an instance attribute called mp3s that is initialized as an empty list. This list will eventually hold a list of instances of your Mp3 class. You also create your ObjectListView instance here and add a button for editing MP3 files.
Speaking of editing, let's create the event handler for editing MP3s:
def edit_mp3(self, event):
    selection = self.mp3_olv.GetSelectedObject()
    if selection:
        with editor.Mp3TagEditorDialog(selection) as dlg:
            dlg.ShowModal()
            self.update_mp3_info()
Here you will use the GetSelectedObject() method from the ObjectListView widget to get the selected MP3 that you want to edit. Then you make sure that you got a valid selection and open up an editor dialog which is contained in your editor module that you will write soon. The dialog accepts a single argument, the eyed3 object, which you are calling selection here.
Note that you will need to call update_mp3_info() to apply any updates you made to the MP3's tags in the editor dialog.
Now let's learn how to load a folder that contains MP3 files:
def load_mp3s(self, path):
    if self.mp3s:
        # clear the current contents
        self.mp3s = []
    mp3_paths = glob.glob(path + '/*.mp3')
    for mp3_path in mp3_paths:
        id3 = eyed3.load(mp3_path)
        mp3_obj = Mp3(id3)
        self.mp3s.append(mp3_obj)
    self.update_mp3_info()
In this example, you take in a folder path and use Python's glob module to search it for MP3 files. Assuming that you find the files, you then loop over the results and load them into eyed3. Then you create an instance of your Mp3 class so that you can show the user the MP3's metadata. To do that, you call the update_mp3_info() method. The if statement at the beginning of the method is there to clear out the mp3s list so that you do not keep appending to it indefinitely.
Let's go ahead and create the update_mp3_info() method now:
The update_mp3_info() method is used for displaying MP3 metadata to the user. In this case, you will be showing the user the Artist, Album title, Track name (title) and the Year the song was released. To actually update the widget, you call the SetObjects() method at the end.
Now let's move on and create the TaggerFrame class:
Here you create an instance of the aforementioned TaggerPanel class, create a menu and show the frame to the user. This is also where you would set the initial size of the application and the title of the application. Just for fun, I am calling it Serpent, but you can name the application whatever you want to.
In this small piece of code, you create a menubar object. Then you create the file menu with a single menu item that you will use to open a folder on your computer. This menu item is bound to an event handler called on_open_folder(). To show the menu to the user, you will need to call the frame's SetMenuBar() method.
The last piece of the puzzle is to create the on_open_folder() event handler:
def on_open_folder(self, event):
    with wx.DirDialog(self, "Choose a directory:",
                      style=wx.DD_DEFAULT_STYLE,
                      ) as dlg:
        if dlg.ShowModal() == wx.ID_OK:
            self.panel.load_mp3s(dlg.GetPath())
You will want to open a wx.DirDialog here using Python's with statement and show it modally to the user. This prevents the user from interacting with your application while they choose a folder. If the user presses the OK button, you will call the panel instance's load_mp3s() method with the path that they have chosen.
For completeness, here is how you will run the application:
You are always required to create a wx.App instance so that your application can respond to events.
Your application won't run yet as you haven't created the editor module yet.
Let's learn how to do that next!
Editing MP3s
Editing MP3s is the point of this application, so you definitely need to have a way to accomplish that. You could modify the ObjectListView widget so that you can edit the data there or you can open up a dialog with editable fields. Both are valid approaches. For this version of the application, you will be doing the latter.
Let's get started by creating the Mp3TagEditorDialog class:
# editor.py

import wx

class Mp3TagEditorDialog(wx.Dialog):

    def __init__(self, mp3):
        title = f'Editing "{mp3.id3.tag.title}"'
        super().__init__(parent=None, title=title)

        self.mp3 = mp3
        self.create_ui()
Here you instantiate your class and grab the MP3's title from its tag to make the title of the dialog refer to which MP3 you are editing. Then you set an instance attribute and call the create_ui() method to create the dialog's user interface.
Here you create a series of wx.TextCtrl widgets that you pass to a function called create_row(). You also add the "Save" button at the end and bind it to the save() event handler. Finally you add a "Cancel" button. The way you create the Cancel button is kind of unique. All you need to do is pass wx.Button a special id: wx.ID_CANCEL. This will add the right label to the button and automatically make it close the dialog for you without actually binding it to a function.
This is one of the convenience functions built-in to the wxPython toolkit. As long as you don't need to do anything special, this functionality is great.
Now let's learn what to put into the create_row() method:
In this example, you create a horizontal sizer and an instance of wx.StaticText with the label that you passed in. Then you add both of these widgets to a list of tuples where each tuple contains the arguments you need to pass to the main sizer. This allows you to add multiple widgets to a sizer at once via the AddMany() method.
The last piece of code you need to create is the save() event handler:
def save(self, event):
    current_track_num = self.mp3.id3.tag.track_num
    if current_track_num:
        new_track_num = (int(self.track_number.GetValue()),
                         current_track_num[1])
    else:
        new_track_num = (int(self.track_number.GetValue()), 0)

    artist = self.artist.GetValue()
    album = self.album.GetValue()
    title = self.title.GetValue()

    self.mp3.id3.tag.artist = artist if artist else 'Unknown'
    self.mp3.id3.tag.album = album if album else 'Unknown'
    self.mp3.id3.tag.title = title if title else 'Unknown'
    self.mp3.id3.tag.track_num = new_track_num
    self.mp3.id3.tag.save()
    self.mp3.update()
    self.Close()
Here you check if the track number was set in the MP3's tag. If it was, then you update it to the new value you set it to. On the other hand, if the track number is not set, then you need to create the tuple yourself. The first number in the tuple is the track number and the second number is the total number of tracks on the album. If the track number is not set, then you can't know the total number of track reliably programmatically, so you just set it to zero by default.
The rest of the function is setting the various MP3 object's tag attributes to what is in the dialog's text controls. Once all the attributes are set, you can call the save() method on the eyed3 MP3 object, tell the Mp3 class instance to update itself and close the dialog. Note that if you try to pass in an empty value for artist, album or title, it will be replaced with the string Unknown.
Now you have all the pieces that you need and you should be able to run the program.
Here is what the main application looked like on my machine:
MP3 Tagger GUI
And here is what the editor dialog looked like:
MP3 Editor dialog
Now let's learn how to add a few enhancements to your program!
Adding New Features
Most applications of this type will allow the user to drag-and-drop files or folders onto them. They also usually have a toolbar for opening folders in addition to the menu. You learned how to do both of these in the previous chapter. You will now add these features to this program as well.
Let's start by creating our DropTarget class to main.py:
import os

class DropTarget(wx.FileDropTarget):

    def __init__(self, window):
        super().__init__()
        self.window = window

    def OnDropFiles(self, x, y, filenames):
        self.window.update_on_drop(filenames)
        return True
Adding the drag-and-drop feature requires you to sub-class wx.FileDropTarget. You need to pass in the widget that will be the drop target as well. In this case, you want the wx.Panel to be the drop target. Then you override OnDropFiles so that it calls the update_on_drop() method. This is a new method that you will be adding shortly.
But before you do that, you need to update the beginning of your TaggerPanel class:
Here you create an instance of DropTarget and then set the panel as the drop target via the SetDropTarget() method. The benefit of doing this is that now you can drag and drop files or folder pretty much anywhere on your application and it will work.
Note that the above code is not the full code for the __init__() method, but only shows the changes in context. See the source code on Github for the full version.
Here you pass in the path of the MP3 file that you want to add to the user interface. It will take that path and load it with eyed3 and add that to your mp3s list.
The edit_mp3() method is unchanged for this version of the application, so it is not reproduced here.
Now let's move on and create another new method called find_mp3s():
def find_mp3s(self, folder):
    mp3_paths = glob.glob(folder + '/*.mp3')
    for mp3_path in mp3_paths:
        self.add_mp3(mp3_path)
This code and the code in the add_mp3s() method might look a bit familiar to you. It is originally from the load_mp3() method that you created earlier. You are moving this bit of code into its own function. This is known as refactoring your code. There are many reasons to refactor your code. In this case, you are doing so because you will need to call this function from multiple places. Rather than copying this code into multiple functions, it is almost always better to separate it into its own function that you can call.
Now let's update the load_mp3s() method so that it calls the new one above:
def load_mp3s(self, path):
    if self.mp3s:
        # clear the current contents
        self.mp3s = []
    self.find_mp3s(path)
    self.update_mp3_info()
This method has been reduced to two lines of code. The first calls the find_mp3s() method that you just wrote while the second calls the update_mp3_info(), which will update the user interface (i.e. the ObjectListView widget).
The DropTarget class is calling the update_on_drop() method, so let's write that now:
def update_on_drop(self, paths):
    for path in paths:
        if os.path.isdir(path):
            self.load_mp3s(path)
        elif os.path.isfile(path):
            self.add_mp3(path)
            self.update_mp3_info()
The update_on_drop() method is the reason you did the refactoring earlier. It also needs to call the load_mp3s(), but only when the path that is passed in is determined to be a directory. Otherwise you check to see if the path is a file and load it up.
But wait! There's an issue with the code above. Can you tell what it is?
The problem is that when the path is a file, you aren't checking to see if it is an MP3. If you run this code as is, you will cause an exception to be raised as the eyed3 package will not be able to turn all file types into Mp3 objects.
Let's fix that issue:
def update_on_drop(self, paths):
    for path in paths:
        _, ext = os.path.splitext(path)
        if os.path.isdir(path):
            self.load_mp3s(path)
        elif os.path.isfile(path) and ext.lower() == '.mp3':
            self.add_mp3(path)
            self.update_mp3_info()
You can use Python's os module to get the extension of files using the splitext() function. It will return a tuple that contains two items: The path to the file and the extension.
Now that you have the extension, you can check to see if it is .mp3 and only update the UI if it is. By the way, the splitext() function returns an empty string when you pass it a directory path.
The next bit of code that you need to update is the TaggerFrame class so that you can add a toolbar:
The only change to the code above is to add a call to the create_tool_bar() method. You will almost always want to create the toolbar in a separate method as there is typically several lines of code per toolbar button. For applications with many buttons in the toolbar, you should probably separate that code out even more and put it into a class or module of its own.
Let's go ahead and write that method:
def create_tool_bar(self):
    self.toolbar = self.CreateToolBar()

    add_folder_ico = wx.ArtProvider.GetBitmap(
        wx.ART_FOLDER_OPEN, wx.ART_TOOLBAR, (16, 16))
    add_folder_tool = self.toolbar.AddTool(
        wx.ID_ANY, 'Add Folder', add_folder_ico,
        'Add a folder to be archived')
    self.Bind(wx.EVT_MENU, self.on_open_folder,
              add_folder_tool)
    self.toolbar.Realize()
To keep things simple, you add a single toolbar button that will open a directory dialog via the on_open_folder() method.
When you run this code, your updated application should now look like this:
MP3 Tagger GUI (empty)
Feel free to add more toolbar buttons, menu items, a status bar or other fun enhancements to this application.
Wrapping Up
This article taught you a little about some of Python's MP3 related packages that you can use to edit MP3 tags as well as other tags for other music file formats. You learned how to create a nice main application that opens an editing dialog. The main application can be used to display relevant MP3 metadata to the user. It also serves to show the user their updates should they decide to edit one or more tags.
The wxPython tookit has support for playing back certain types of audio file formats including MP3. You could create an MP3 player using these capabilities and make this application a part of that.
Download the Source
You can download the source code for the examples in this article on GitHub
Related Articles
Want to learn more about what you can create with wxPython? Check out the following articles:
When you first get started as a programmer or software developer, you usually start by writing code that prints to your console or standard out. A lot of students are also starting out by writing front-end programs, which are typically websites written with HTML, JavaScript and CSS. However, most beginners do not learn how to create a graphical user interface until much later in their classwork.
Graphical user interfaces (GUI) are programs that are usually defined as created for the desktop. The desktop refers to Windows, Linux and MacOS. It could be argued that GUIs are also created for mobile and web as well though. For the purposes of this article, you will learn about creating desktop GUIs. The concepts you learn in this article can be applied to mobile and web development to some degree as well.
A graphical user interface is made up of some kind of window that the user interacts with. The window holds other shapes inside it. These consist of buttons, text, pictures, tables, and more. Collectively, these items are known as "widgets".
There are many different GUI toolkits for Python. Here is a list of some of the most popular:
Tkinter
wxPython
PyQt
Kivy
You will be learning about wxPython in this article. The reason that wxPython was chosen is that the author has more experience with it than any other and wxPython has a very friendly and helpful community.
In this article, you will be learning:
Learning About Event Loops
How to Create Widgets
How to Lay Out Your Application
How to Add Events
How to Create an Application
This article does not attempt to cover everything there is to know about wxPython. However, you will learn enough to see the power of wxPython as well as discover how much fun it is to create a desktop GUI of your very own.
Note: Some of the examples in this chapter come from my book, Creating GUI Applications with wxPython.
Let's get started!
Installing wxPython
Installing wxPython is usually done with pip. If you are installing on Linux, you may need to install some prerequisites before installing wxPython. You can see the most up-to-date set of requirements on the wxPython Github page.
On Mac OSX, you may need the XCode compiler to install wxPython.
Here is the command you would use to install wxPython using pip:
python3 -m pip install wxpython
Assuming everything worked, you should now be able to use wxPython!
Learning About Event Loops
Before you get started, there is one other item that you need to know about. In the introduction, you learned what widgets are. But when it comes to creating GUI programs, you need to understand that they use events to tell the GUI what to do. Unlike a command-line application, a GUI is basically an infinite loop, waiting for the user to do something, like click a button or press a key on the keyboard.
When the user does something like that, the GUI receives an event. Button events are usually connected to wx.EVT_BUTTON, for example. Some books call this event-driven programming. The overarching process is called the event loop.
You can think of it like this:
The GUI waits for the user to do something
The user does something (clicks a button, etc)
The GUI responds somehow
Go back to step 1
The user can stop the event loop by exiting the program.
Now that you have a basic understanding of event loops, it's time to learn how to write a simple prototype application!
How to Create Widgets
Widgets are the building blocks of your application. You start out with top-level widgets, such as a wx.Frame or a wx.Dialog. These widgets can contain other widgets, like buttons and labels. When you create a frame or dialog, it includes a title bar and the minimize, maximize, and exit buttons. Note that when using wxPython, most widgets and attributes are pre-fixed with wx.
To see how this all works, you should create a little "Hello World" application. Go ahead and create a new file named hello_wx.py and add this code to it:
Here you import wx, which is how you access wxPython in your code. Then you create an instance of wx.App(), which is your Application object. There can only be one of these in your application. It creates and manages your event loop for you. You pass in False to tell it not to redirect standard out. If you set that to True, then standard out is redirected to a new window. This can be useful when debugging, but should be disabled in production applications.
Next, you create a wx.Frame() where you set its parent to None. This tells wxPython that this frame is a top-level window. If you create all your frames without a parent, then you will need to close all the frames to end the program. The other parameter that you set is the title, which will appear along the top of your application's window.
The next step is to Show() the frame, which makes it visible to the user. Finally, you call MainLoop() which starts the event loop and makes your application work. When you run this code, you should see something like this:
Hello World in wxPython
When working with wxPython, you will actually be sub-classing wx.Frame and quite a few of the other widgets. Create a new file named hello_wx_class.py and put this code into it:
This code does the same thing as the previous example, but this time you are creating your own version of the wx.Frame class.
When you create an application with multiple widgets in it, you will almost always have a wx.Panel as the sole child widget of the wx.Frame. Then the wx.Panel widget is used to contain the other widgets. The reason for this is that wx.Panel provides the ability to tab between the widgets, which is something that does not work if you make all the widget children of wx.Frame.
So, for a final "Hello World" example, you can add a wx.Panel to the mix. Create a file named hello_with_panel.py and add this code:
In this code, you create two classes. One sub-classes wx.Panel and adds a button to it using wx.Button. The MyFrame() class is almost the same as the previous example except that you now create an instance of MyPanel() in it. Note that you are passing self to MyPanel(), which is telling wxPython that the frame is now the parent of the panel widget.
When you run this code, you will see the following application appear:
Hello World with a wxPython Panel
This example shows that when you add a child widget, like a button, it will automatically appear at the top left of the application. The wx.Panel is an exception when it is the only child widget of a wx.Frame. In that case, the wx.Panel will automatically expand to fill the wx.Frame.
What do you think happens if you add multiple widgets to the panel though? Let's find out! Create a new file named stacked_buttons.py and add this code:
Now you have three buttons as children of the panel. Try running this code to see what happens:
Oops! You only see one button, which happens to be the last one you created. What happened here? You didn't tell the buttons where to go, so they all went to the default location, which is the upper left corner of the widget. In essence, the widgets are now stacked on top of each other.
Let's find out how you can fix that issue in the next section!
How to Lay Out Your Application
You have two options when it comes to laying out your application:
Absolute positioning
Sizers
In almost all cases, you will want to use Sizers. If you want to use absolute positioning, you can use the widget's pos parameter and give it a tuple that specifies the x and y coordinate in which to place the widget. Absolute positioning can be useful when you need pixel perfect positioning of widgets. However, when you use absolute positioning, your widgets cannot resize or move when the window they are in is resized. They are static at that point.
The solution to those issues is to use Sizers. They can handle how your widgets should resize and adjust when the application size is changed. There are several different sizers that you can use, such as wx.BoxSizer, wx.GridSizer, and more.
The wxPython documentation explains how sizers work in detail. Check it out when you have a chance.
Let's take that code from before and reduce it down to two buttons and add a Sizer. Create a new file named sizer_with_two_widgets.py and put this code into it:
In this example, you create a wx.BoxSizer. A wx.BoxSizer can be set to add widgets horizontally (left-to-right) or vertically (top-to-bottom). For your code, you set the sizer to add widgets horizontally by using the wx.HORIZONTAL constant. To add a widget to a sizer, you use the Add() method.
The Add() method takes up to five arguments:
window - the widget to add
proportion - tells wxPython if the widget can change its size in the same orientation as the sizer
flag - one or more flags that affect the sizer's behavior
border - the border width, in pixels
userData - allows adding an extra object to the sizer item, which is used for subclasses of sizers.
The first button that you add to the sizer is set to a proportion of 1, which will make it expand to fill as much space in the sizer as it can. You also give it three flags:
wx.ALL - add a border on all sides
wx.CENTER - center the widget within the sizer
wx.EXPAND - the item will be expanded as much as possible while also maintaining its aspect ratio
Finally, you add a border of five pixels. These pixels are added to the top, bottom, left, and right of the widget because you set the wx.ALL flag.
The second button has a proportion of 0, which means it wont expand at all. Then you tell it to add a five pixel border all around it as well. To apply the sizer to the panel, you need to call the panel's SetSizer() method.
When you run this code, you will see the following applications:
Buttons in Sizers
You can see how the various flags have affected the appearance of the buttons. Note that on MacOS, wx.Button cannot be stretched, so if you want to do that on a Mac, you would need to use a generic button from wx.lib.buttons instead. Generic buttons are usually made with Python and do not wrap the native widget.
Now let's move on and learn how events work!
How to Add Events
So far you have created a couple of neat little applications with buttons, but the buttons don't do anything when you click on them. Why is that? Well, when you are writing a GUI application, you need to tell it what to do when something happens. That "something" that happens is known as an event.
To hook an event to a widget, you will need to use the Bind() method. Some widgets have multiple events that can be bound to them while others have only one or two. The wx.Button can be bound to wx.EVT_BUTTON only.
Let's copy the code from the previous example and paste it into a new file named button_events.py. Then update it to add events like this:
Here you call Bind() for each of the buttons in turn. You bind the button to wx.EVT_BUTTON, which will fire when the user presses a button. The second argument to Bind() is the method that should be called when you click the button.
If you run this code, the GUI will still look the same. However, when you press the buttons, you should see different messages printed to stdout (i.e. your terminal or console window). Give it a try and see how it works.
Now let's go ahead and write a simple application!
How to Create an Application
The first step in creating an application is to come up with an idea. You could try to copy something simple like Microsoft Paint or Notepad. You will quickly find that they aren't so easy to emulate as you would think, though! So instead, you will create a simple application that can load and display a photo.
When it comes to creating a GUI application, it is a good idea to think about what it will look like. If you enjoy working with pencil and paper, you could draw a sketch of what your application will look like. There are many software applications you can use to draw with or create simple mock-ups. To simulate a Sizer, you can draw a box.
Here is a mockup of what the finished application should look like:
Image Viewer Mockup
Now you have a goal in mind. This allows you to think about how you might lay out the widgets. Go ahead and create a new file named image_viewer.py and add the following code to it:
Here you create a new class named ImagePanel() that will hold all your widgets. Inside it, you have a wx.Image, which you will use to hold the photo in memory in an object that wxPython can work with. To display that photo to the user, you use wx.StaticBitmap. The other widget you need is the familiar wx.Button, which you will use to browse to the photo to load.
The rest of the code lays out the widgets using a vertically oriented wx.BoxSizer. You use the sizer's Fit() method to try to make the frame "fit" the widgets. What that means is that you want the application to not have a lot of white space around the widgets.
When you run this code, you will end up with the following user interface:
Initial Image Viewer GUI
That looks almost right. It looks like you forgot to add the text entry widget to the right of the browse button, but that's okay. The objective was to try and get a close approximation to what the application would look like in the end, and this looks pretty good. Of course, none of the widgets actually do anything yet.
Your next step is to update the code so it works. Copy the code from the previous example and make a new file named image_viewer_working.py. There will be significant updates to the code, which you will learn about soon. But first, here is the full change in its entirety:
# image_viewer_working.py

import wx

class ImagePanel(wx.Panel):

    def __init__(self, parent, image_size):
        super().__init__(parent)
        self.max_size = 240

        img = wx.Image(*image_size)
        self.image_ctrl = wx.StaticBitmap(self,
                                          bitmap=wx.Bitmap(img))

        browse_btn = wx.Button(self, label='Browse')
        browse_btn.Bind(wx.EVT_BUTTON, self.on_browse)

        self.photo_txt = wx.TextCtrl(self, size=(200, -1))

        main_sizer = wx.BoxSizer(wx.VERTICAL)
        hsizer = wx.BoxSizer(wx.HORIZONTAL)

        main_sizer.Add(self.image_ctrl, 0, wx.ALL, 5)
        hsizer.Add(browse_btn, 0, wx.ALL, 5)
        hsizer.Add(self.photo_txt, 0, wx.ALL, 5)
        main_sizer.Add(hsizer, 0, wx.ALL, 5)

        self.SetSizer(main_sizer)
        main_sizer.Fit(parent)
        self.Layout()

    def on_browse(self, event):
        """
        Browse for an image file
        @param event: The event object
        """
        wildcard = "JPEG files (*.jpg)|*.jpg"
        with wx.FileDialog(None, "Choose a file",
                           wildcard=wildcard,
                           style=wx.ID_OPEN) as dialog:
            if dialog.ShowModal() == wx.ID_OK:
                self.photo_txt.SetValue(dialog.GetPath())
                self.load_image()

    def load_image(self):
        """
        Load the image and display it to the user
        """
        filepath = self.photo_txt.GetValue()
        img = wx.Image(filepath, wx.BITMAP_TYPE_ANY)

        # scale the image, preserving the aspect ratio
        W = img.GetWidth()
        H = img.GetHeight()
        if W > H:
            NewW = self.max_size
            NewH = self.max_size * H / W
        else:
            NewH = self.max_size
            NewW = self.max_size * W / H
        img = img.Scale(NewW,NewH)

        self.image_ctrl.SetBitmap(wx.Bitmap(img))
        self.Refresh()

class MainFrame(wx.Frame):

    def __init__(self):
        super().__init__(None, title='Image Viewer')
        panel = ImagePanel(self, image_size=(240,240))
        self.Show()

if __name__ == '__main__':
    app = wx.App(redirect=False)
    frame = MainFrame()
    app.MainLoop()
This change is pretty long. To make things easier, you will go over each change in its own little chunk. The changes all occurred in the ImagePanel class, so you will go over the changes in each of the methods in turn, starting with the constructor below:
There are a few minor changes here. The first one is that you added a max_size for the image. Then you hooked up an event to the the browse button. This button will now call on_browse() when it is clicked.
The next change is that you added a new widget, a wx.TextCtrl to be precise. You stored a reference to that widget in self.photo_txt, which will allow you to extract the path to the photo later.
The final change is that you now have two sizers. One is horizontal and the other remains vertical. The horizontal sizer is for holding the browse button and your new text control widgets. This allows your to place them next to each other, left-to-right. Then you add the horizontal sizer itself to the vertical main_sizer.
Now let's see how on_browse() works:
def on_browse(self, event):
    """
    Browse for an image file
    @param event: The event object
    """
    wildcard = "JPEG files (*.jpg)|*.jpg"
    with wx.FileDialog(None, "Choose a file",
                       wildcard=wildcard,
                       style=wx.ID_OPEN) as dialog:
        if dialog.ShowModal() == wx.ID_OK:
            self.photo_txt.SetValue(dialog.GetPath())
            self.load_image()
Here you create a wildcard which is used by the wx.FileDialog to filter out all the other files types except the JPEG format. Next, you create the wx.FileDialog. When you do that, you set its parent to None and give it a simple title. You also set the wildcard and the style. style is an open file dialog instead of a save file dialog.
Then you show your dialog modally. What that means is that the dialog will appear over your main application and prevent you from interacting with the main application until you have accepted or dismissed the file dialog. If the user presses the OK button, then you will use GetPath() to get the path of the selected file and set the text control to that path. This effectively saves off the photo's path so you can use it later.
Lastly, you call load_image() which will load the image into wxPython and attempt to show it. You can find out how by reading the following code:
def load_image(self):
    """
    Load the image and display it to the user
    """
    filepath = self.photo_txt.GetValue()
    img = wx.Image(filepath, wx.BITMAP_TYPE_ANY)

    # scale the image, preserving the aspect ratio
    W = img.GetWidth()
    H = img.GetHeight()
    if W > H:
        NewW = self.max_size
        NewH = self.max_size * H / W
    else:
        NewH = self.max_size
        NewW = self.max_size * W / H
    img = img.Scale(NewW,NewH)

    self.image_ctrl.SetBitmap(wx.Bitmap(img))
    self.Refresh()
The first step in this method is to extract the filepath from the text control widget. Then you pass that path along to a new instance of wx.Image. This will load the image into wxPython for you. Next, you get the width and height from the wx.Image object and use the max_size value to resize the image while maintaining its aspect ratio. You do this for two reasons. The first is because if you don't, the image will get stretched out or warped. The second is that most images at full resolution won't fit on-screen, so they need to be resized.
Once you have the new width and height, you Scale() the image down appropriately. Then you call your wx.StaticBitmap control's SetBitmap() method to update it to the new image that you loaded. Finally, you call Refresh(), which will force the bitmap widget to redraw with the new image in it.
Here it is with a butterfly photo loaded in it:
Viewing an Image in wxPython
Now you have a fully-functional application that can load JPEG photos. You can update the application to load other image types if you'd like. The wxPython toolkit uses Pillow, so it will load the same types of image file types that Pillow itself can load.
Wrapping Up
The wxPython toolkit is extremely versatile. It comes with many, many widgets built-in and also includes a wonderful demo package. The demo package will help you learn how to use the widgets in your own code. You are only limited by your imagination.
In this chapter, you learned about the following topics:
Learning About Event Loops
How to Create Widgets
How to Lay Out Your Application
How to Add Events
How to Create an Application
You can take the code and the concepts in this code and add new features or create brand new applications. If you need ideas, you can check out some of the applications on your own computer or phone. You can also check out my book, Creating GUI Applications with wxPython, which has lots of fun little applications you can create and expand upon.